Supported file formats
The supported file formats for the Computational Pathology Portal are:
- Aperio SVS (Brightfield)
- Zeiss CZI (Brightfield and IF)
- Vectra Polaris QPTIFF + MSI tiles
- TIFF (single-page)
- Hamamatsu NDPI
- Ventana BIF
- 3DHistech MRXS (brightfield)
- Leica SCN (brightfield)
Tip: Upload slide performance
- Connect the computer that is performing the upload wit a wired LAN connection. This way you ensure better upload performance.
Upload slides to a project
Important!
- The process described below explain how to upload slides using the web browser.
- For the information on how to upload slides using PyPortal, please see here.
- Navigate to your project, using the project selection panel
- Click on the button in the functions bar, at the top-right
- Upload panel will be opened, from the right-hand side
Upload cannot be interrupted
- The upload process cannot be aborted.
- Please make sure you add only whole slide images that you want to upload to the CP Portal.
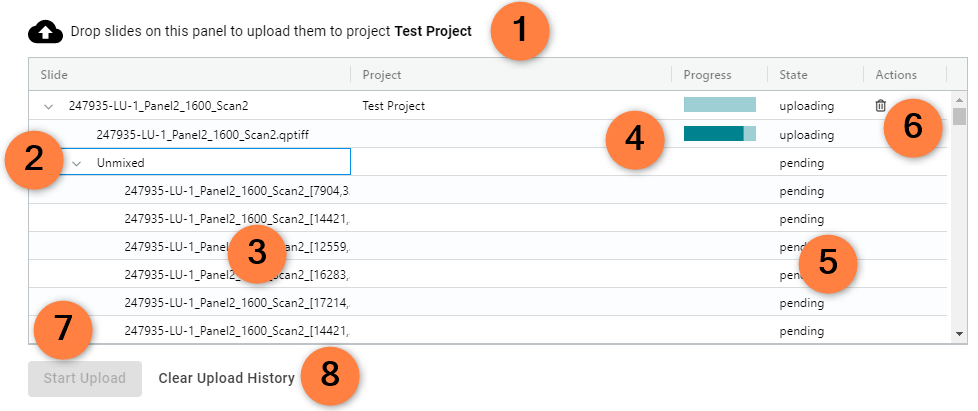
Image: Upload panel, with functional elements highlighted
Highlighted elements in the Upload panel:
- Current project
- Folder drop-down arrow
- Files constituting a complex IF slide
- Upload progress bar for a slide
- Upload state (values: new, pending, uploading, done)
- Remove icon, for removing slides from the upload queue
- Start upload button
- Clear upload history button
Steps to upload slides
- Drag and drop your whole slide images or folders from your system's file browser into the right upload panel to add them to the upload queue
- You can sequentially add more whole slide images or image folders to the upload panel
- Optional: To remove whole slides images from the upload queue, click the trash can icon (6) to the right side of the slide
- To start the upload, click the button in the lower left corner
- After the upload has finished, you will get a notification indicating that the upload has been completed.
- After the upload has finished, click the button in the upper right on the metadata page. The slides will now be shown in the slide list.
- For cleaning up the upload history of previous uploads, click the button
Tip: Upload single file slides
- For upload, whole slide images in .SVS, .CZI, .NDPI, .TIFF or .BIF format can be single files or bundled together in folders
Multifile slide upload
CP Portal currently supports QPTIFF and MRXS formats for multi-file slides.
QPTIFF/MSI
Whole slide images in QPTIFF format must be uploaded in the following folder format:
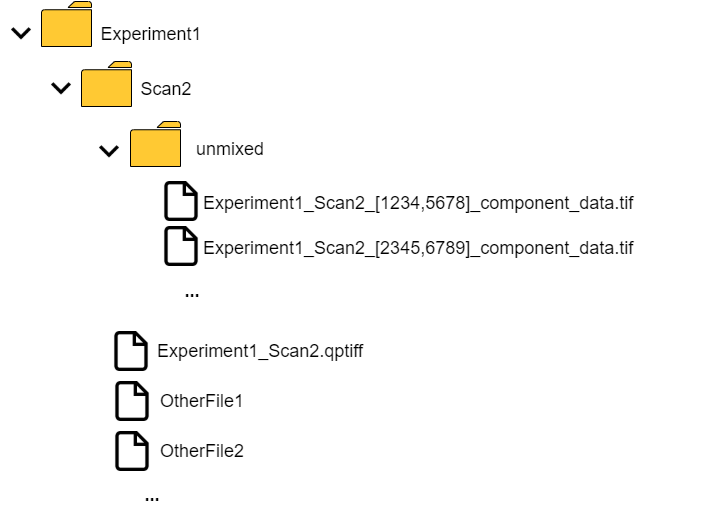
Image: Supported folder structure for QPTIFF/MSI slides
Several QPTIFF/MSI folders can be bundled together in a parent folder for upload.
- If several Scan subfolders exist, the folder with the will be automatically imported
- The folder containing the MSI tiles needs to be named
MIRAX/MRXS
Whole slide images in MRXS format must be in the following folder format:
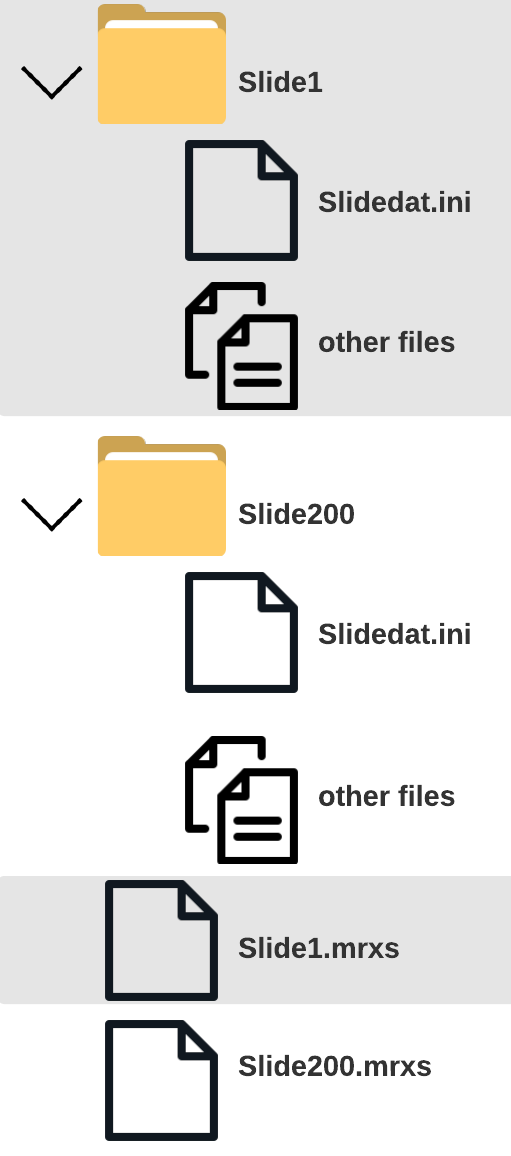
Image: Supported folder structure for MRXS slides
The CP Portal supports MRXS slide upload in the following configuration:
- A [filename].mrxs file
- A folder next to it with the name [filename]
- Slidedat.ini in the folder [filename]
Several slide folders and .mrxs files can be bundled together in a parent folder for upload.
Upload progress
- You can see that slide upload is in progress when the spinner in the button in the upper right is moving
- Check the progress of your upload by clicking the button. The upload panel will open on the right and the upload progress for each slide is indicated
Upload slides to a project that contains slides
- Select your project in the drop-down list in the upper left
- Click on the button in the upper right
- Drag and drop your whole slide images or folders from your system's file browser into the upload panel to add them to the upload queue
- Click the button in the lower left corner
- After upload is finished, click the button in the upper right. The slides will now be shown in the slide list
Slide status
Slides have different status depending on where they are in the upload pipeline process.
| Slide status | Viewable | Explanation |
|---|---|---|
| New | No | This slide is in the upload queue but not in the system yet |
| Uploaded | No | This slide is in the system and will be processed for viewing. This will take around 10 minutes |
| Available | Yes | This slide is available for viewing |
| Invalid | No | The Portal cannot read this file, most likely due to an error in the file. You can try to delete and re-upload the same slide to make sure the file did not get corrupted during transfer |
Upload slides to multiple projects
- You can upload slides to several projects at the same time by switching the project and repeating the upload process
Upload of slides that are already in the CP Portal
- If an identical whole slide image (same name, extension, size and parts in the content) already exists in another project, it will not get uploaded again
- Instead, the slide with its metadata is added to the current project while also remaining in the original project
- Note that the metadata for a slide that resides in multiple project is shared, i.e., metadata changes for such a slide in one project will be also shown in all the other projects that contain the same slide
Copy slides and associated data
NOTE: Copy slides permissions
- Copy slides option is available to Project Admins for non-home projects, and to Project Data Owner for home projects
You can copy slides between projects within CP Portal by using the Copy Slides option.
To copy slides to another project:
- Click on button
- This will bring up the Copy slides Wizard
- From the project drop-down in the Copy slides wizard, select the project to which you want to copy slides
- Select associated data that you want to copy, by checking the corresponding checkbox
- Click on the button button
A slide copy job will be submitted. You can track the progress of the copy job in the Jobs panel.