Get PyPortal
PyPortal is the Portal's python package to interact with the data in the CP Portal programatically and to make data changes in a bulk.
With Pyportal, you can:
- Create Annotation Sets
- Add Collection Tags to annotation sets
- Delete Annotation Sets
- Download Annotations
- Download Slides
- Download Raster Annotations
- Upload Annotations
- Upload Landmarks
- Extend Landmarks
- Upload Slides
- Upload Raster Annotations
Download the PyPortal Windows executable
Important
- As an external user you will normally not have access to the AstraZeneca GitLab.
- If you don't have access to the link listed below, please contact our Support team at DEMU_Support@astrazeneca.com.
- The Support team will be able to provide you with an option of how and where to download PyPortal from.
Windows users should download the package from this link: https://gitlab.img.astrazeneca.net/portal/pyportal/-/releases
The downloaded executable can be placed in any place in your operating system. The package should be called within the terminal (NOT by double click).
Always download the latest version
- Make sure to always download the latest version of the pyportal.exe
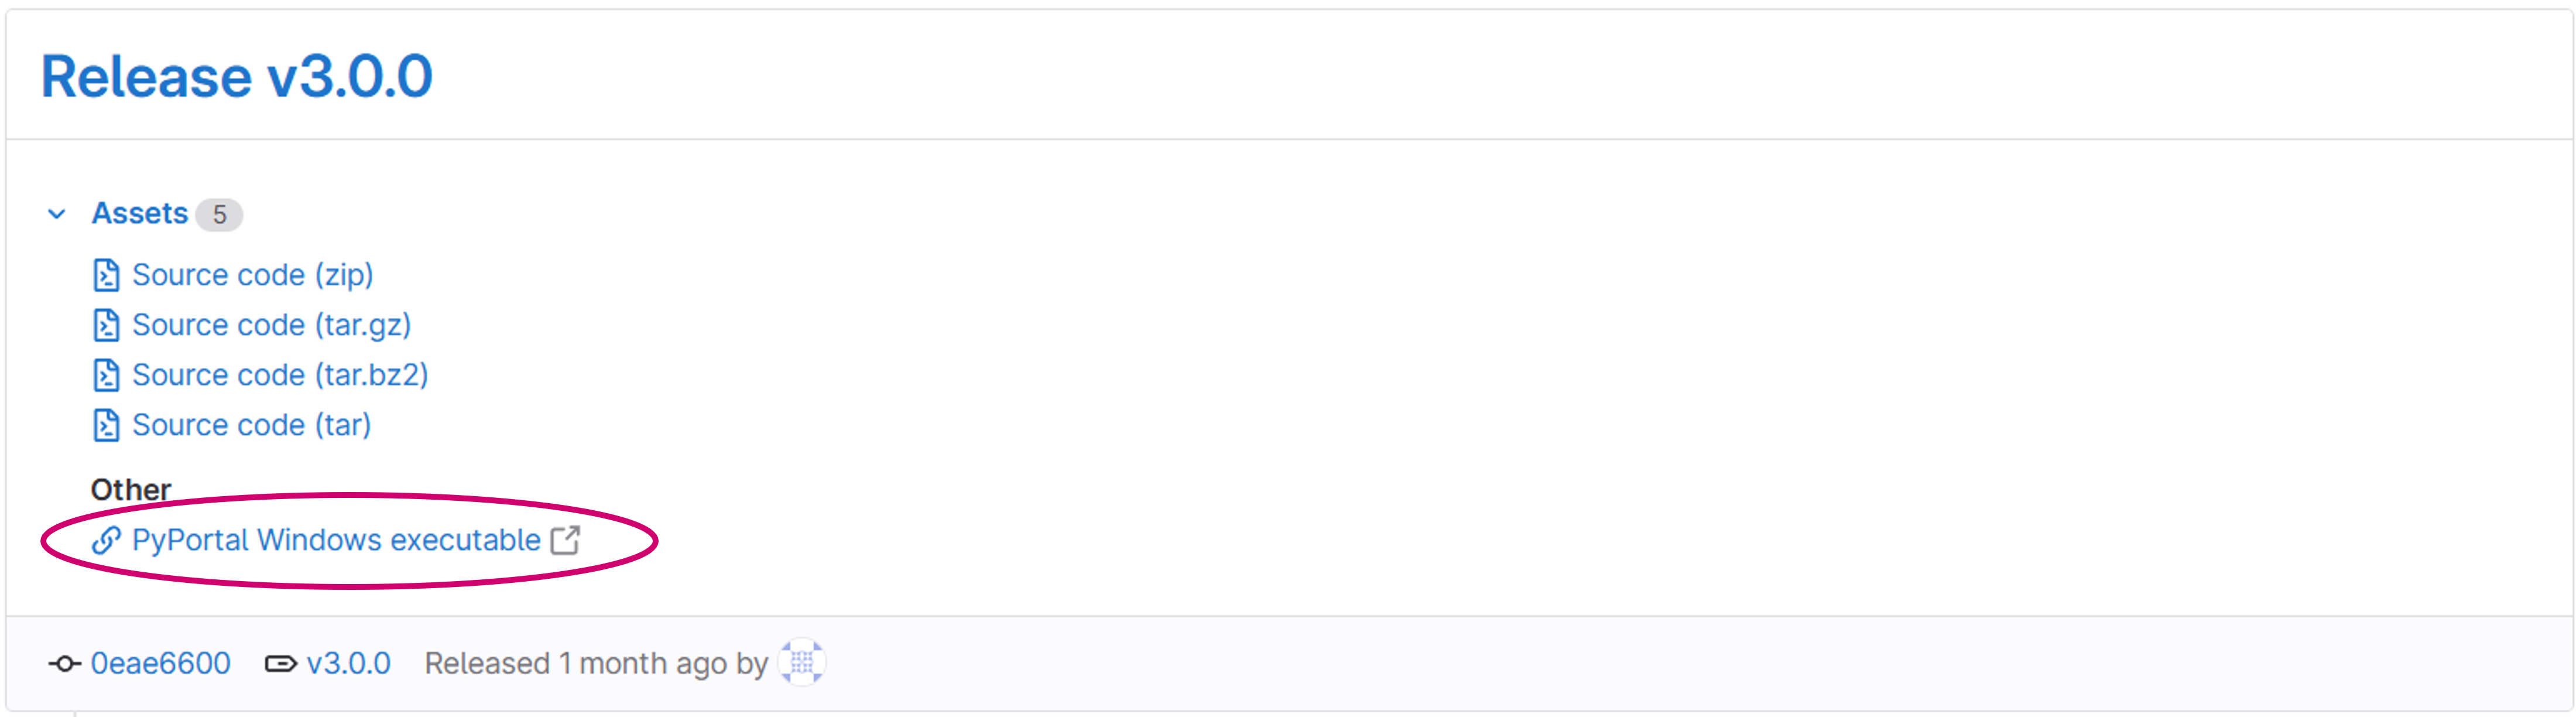
Image: Use the marked link to download the PyPortal's Windows executable
Running the GxP Script
For raster annotation operations and Mac/Linux support, PyPortal includes a GxP script.
After downloading the latest PyPortal's release, the GxP script can be found at .
Installing UV Package Manager
The GxP script requires the package manager to be installed first:
Linux / macOS:
curl -LsSf https://astral.sh/uv/install.sh | sh
Windows (PowerShell):
powershell -c "irm https://astral.sh/uv/install.ps1 | iex"
GxP Compliance and Reproducibility:
The GxP script uses locked dependencies to ensure reproducible results. The flag enforces use of the lock file when running commands:
uv run --locked gxp-scripts/pyportal-cli.py [command] [options]
PyPortal Python API and other platforms
- To use PyPortal from other Python applications or a Jupyter notebook, it must be installed as a Python package as described in this document
- This also allows use of PyPortal on other platforms such as Windows, Linux (SCP, Docker) and Mac OS
Running PyPortal's help
Navigate to the folder where you download the pyportal.exe file to.
In the following example, the user Alex has downlaod the pyportal.exe file to the Downloads folder on their machine.
cd C:\Users\Alex\Downloads
They can run pyportal from the folder by typing:
pyportal.exe -h
Alternatively, they can run the package help from any place by calling it using the full path:
C:\Users\Alex\Downloads\pyportal.exe -h
To verify the package version they can run the following command:
C:\Users\Alex\Downloads\pyportal.exe version
Or, if they have navigated to the folder where the pyportal.exe is located, they can use the following command:
pyportal.exe version
Setup PyPortal
To perform any action with the PyPortal, an API key is required. It can be generated in your user settings in the CP Portal by clicking on your user name.
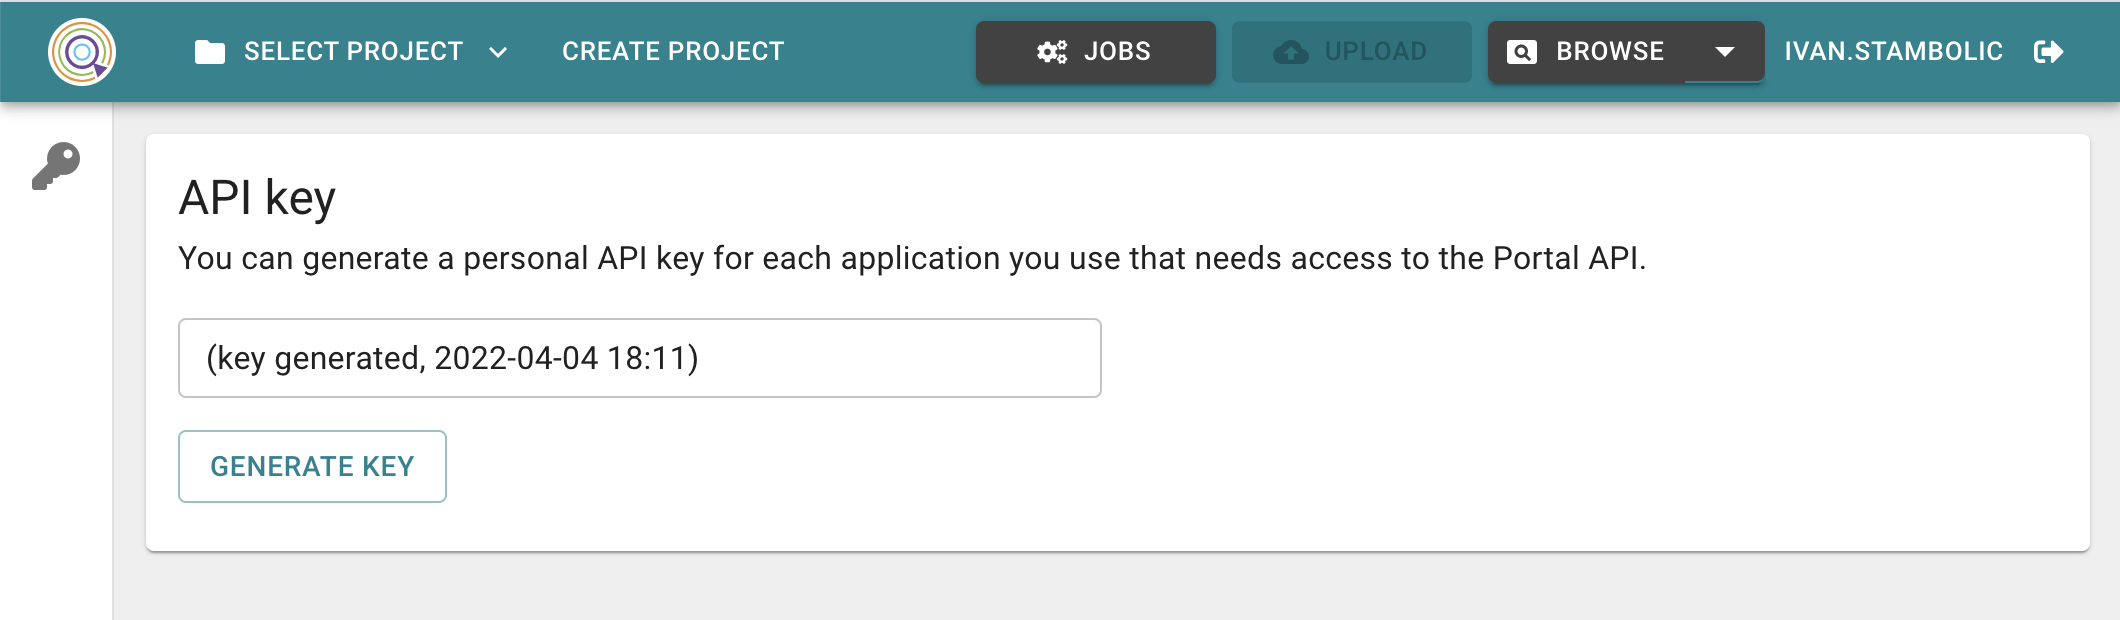
Image: Generate API key page in the CP Portal
Please note that:
- To generate an API key you will be asked to re-authenticate yourself
- Your API key will only be shown right after generation. Please keep it in a secure place
- If you forget your API key, you can generate a new one. The old key becomes invalid
- Please check out the Accessing the Portal via API article if you want to get more information about API key
Setting the API key for PyPortal usage
You can provide API key as a parameter when calling pyportal.exe:
pyportal.exe ds -c [PATH_TO_CONFIG_FILE] --portal-api-key [API_KEY]
However, it is recommended (from security and simplicity reasons) to store it in a .portal_key file in your user home directory, e.g. in C:\Users\Alex\.portal_key.
Please create that file using a text editor, e.g. with Notepad.
To do that, please navigate to your home directory and create new text document:
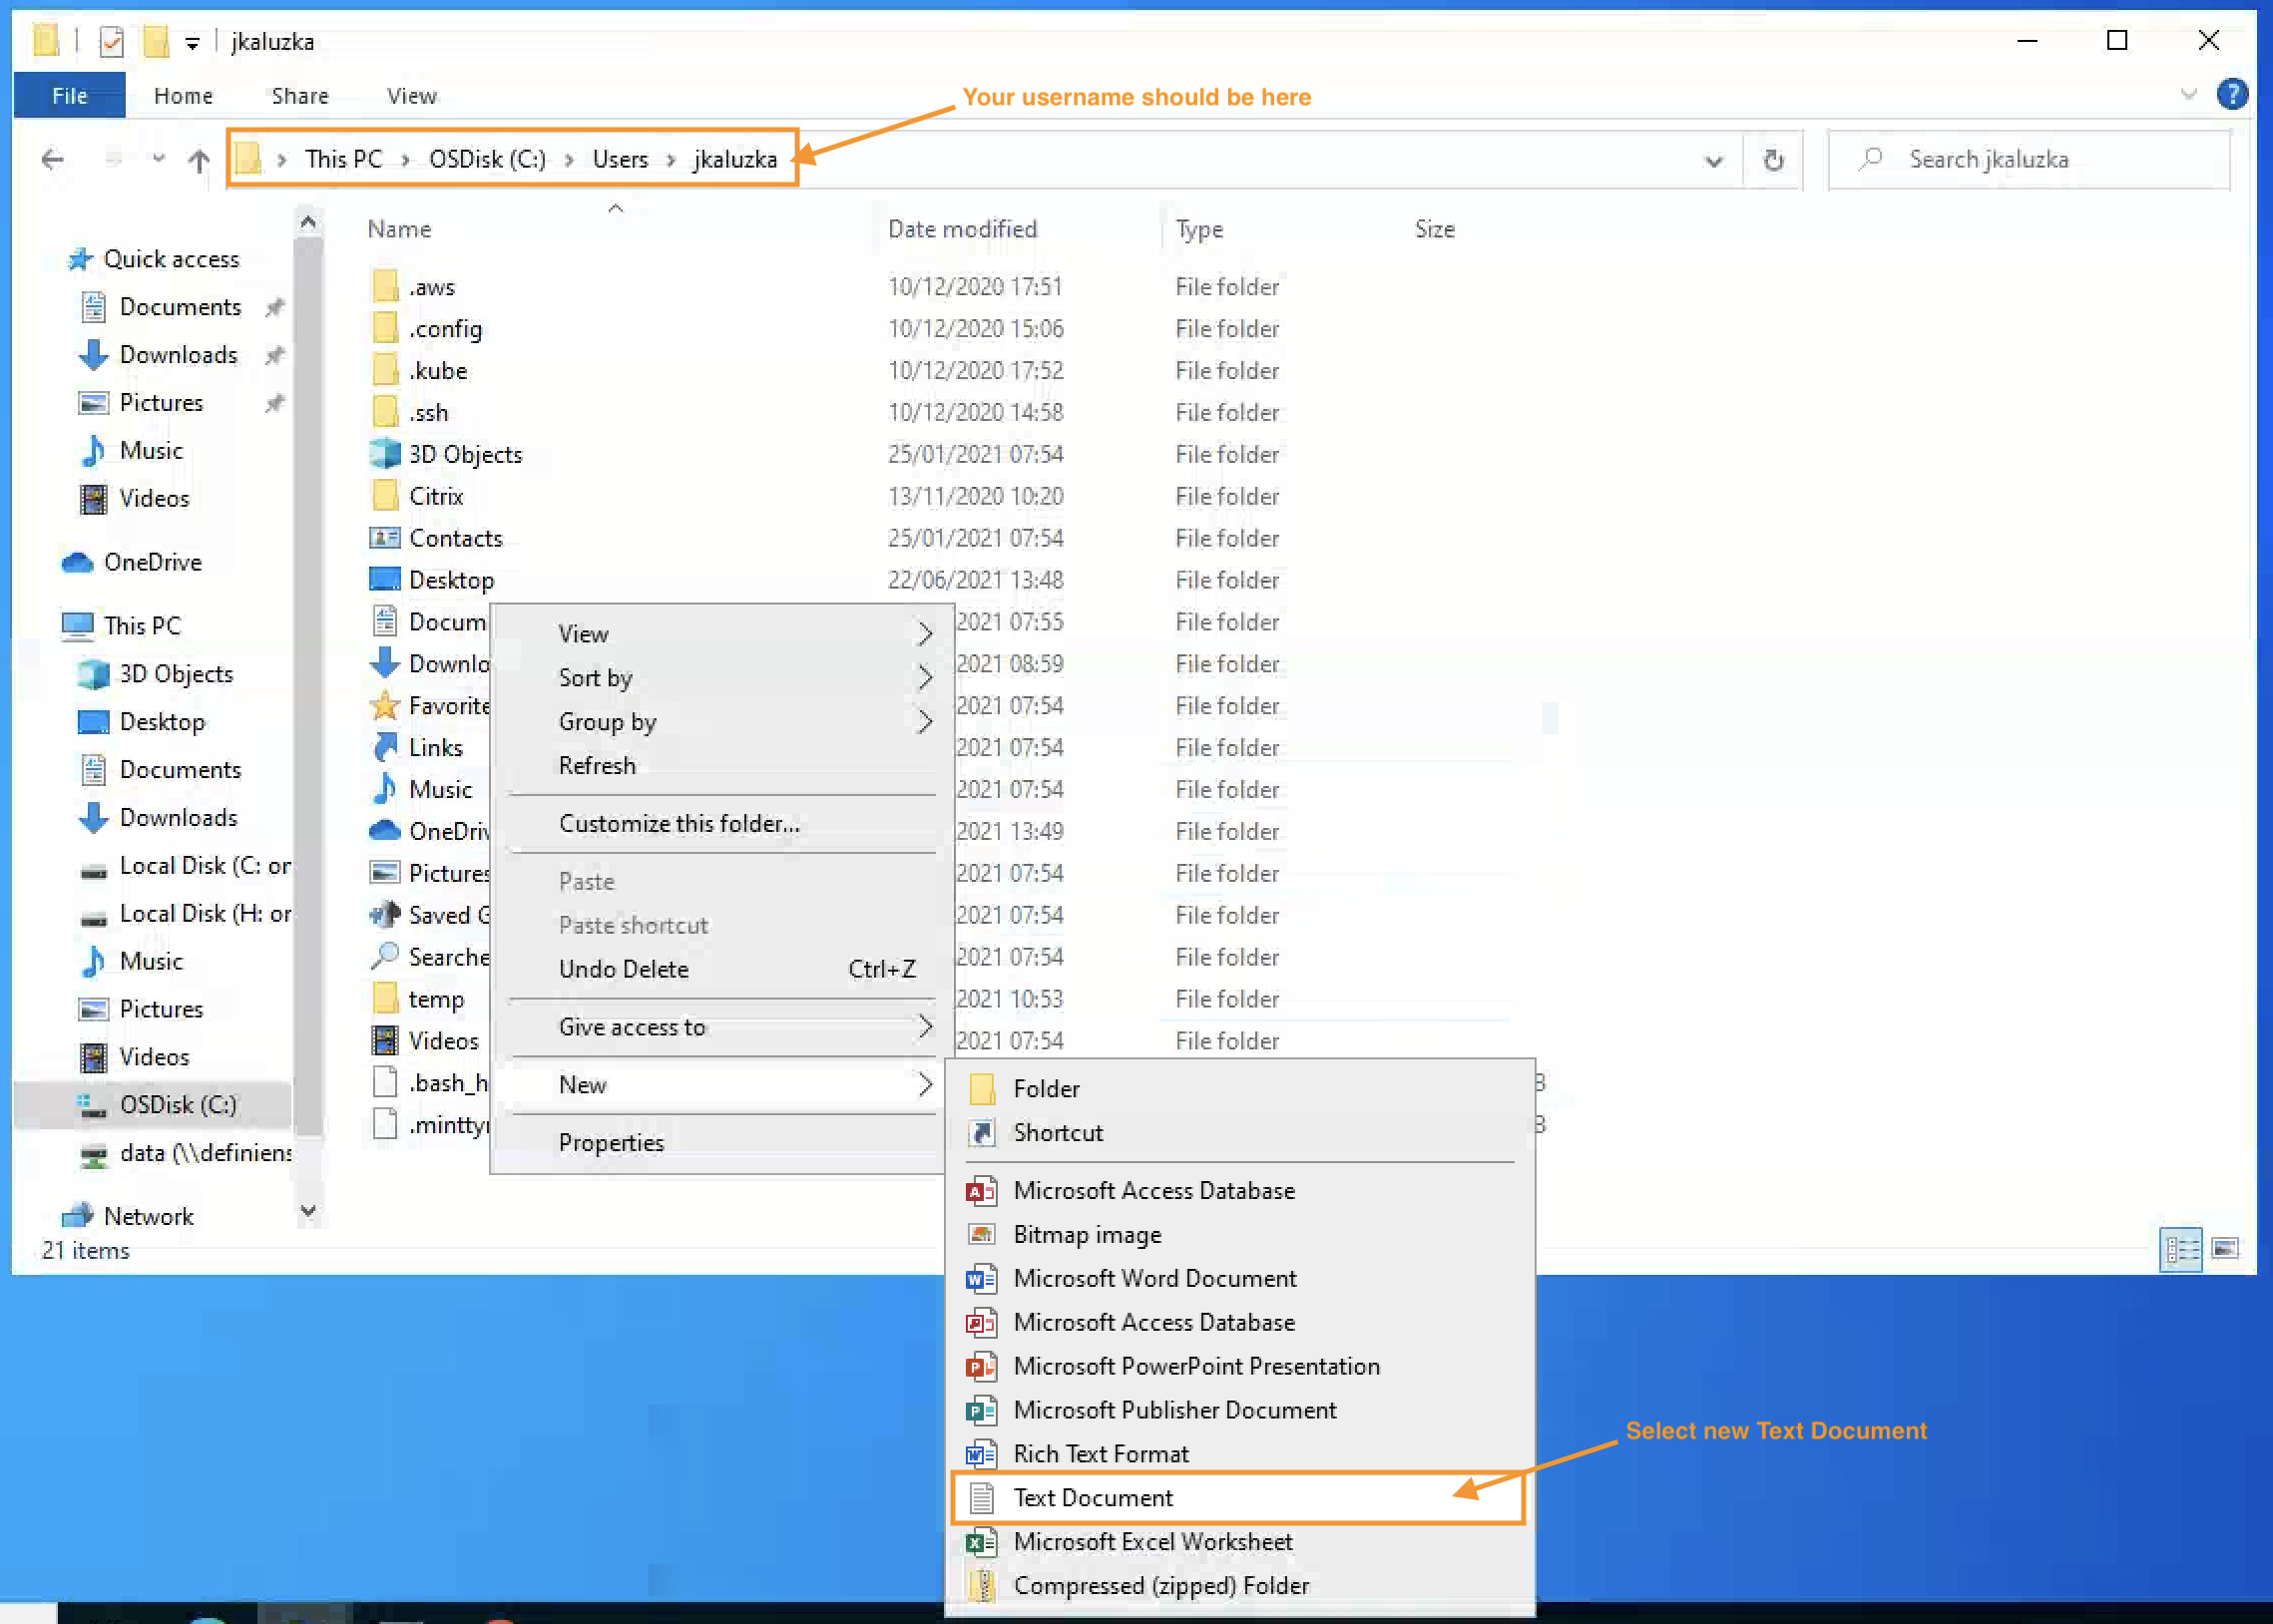
Image: User home folder where to place the API key file
The name should be exactly . Note the dot at the start!
In this file, paste the API key you copied from the CP Portal as its only content. As an example (note that this API key is invalid), this should be the only text present in the key file:
WIFIfKqmOG93ZWeCFkVj2ZtpOCqhKkF2g3d9t672
Turn on showing file extensions, to be sure that file name is exactly , and not

Image: Show file extensions in Windows explorer
In case of modifying the file name, one can be notified to confirm change of the extension, in such a situation please click yes.
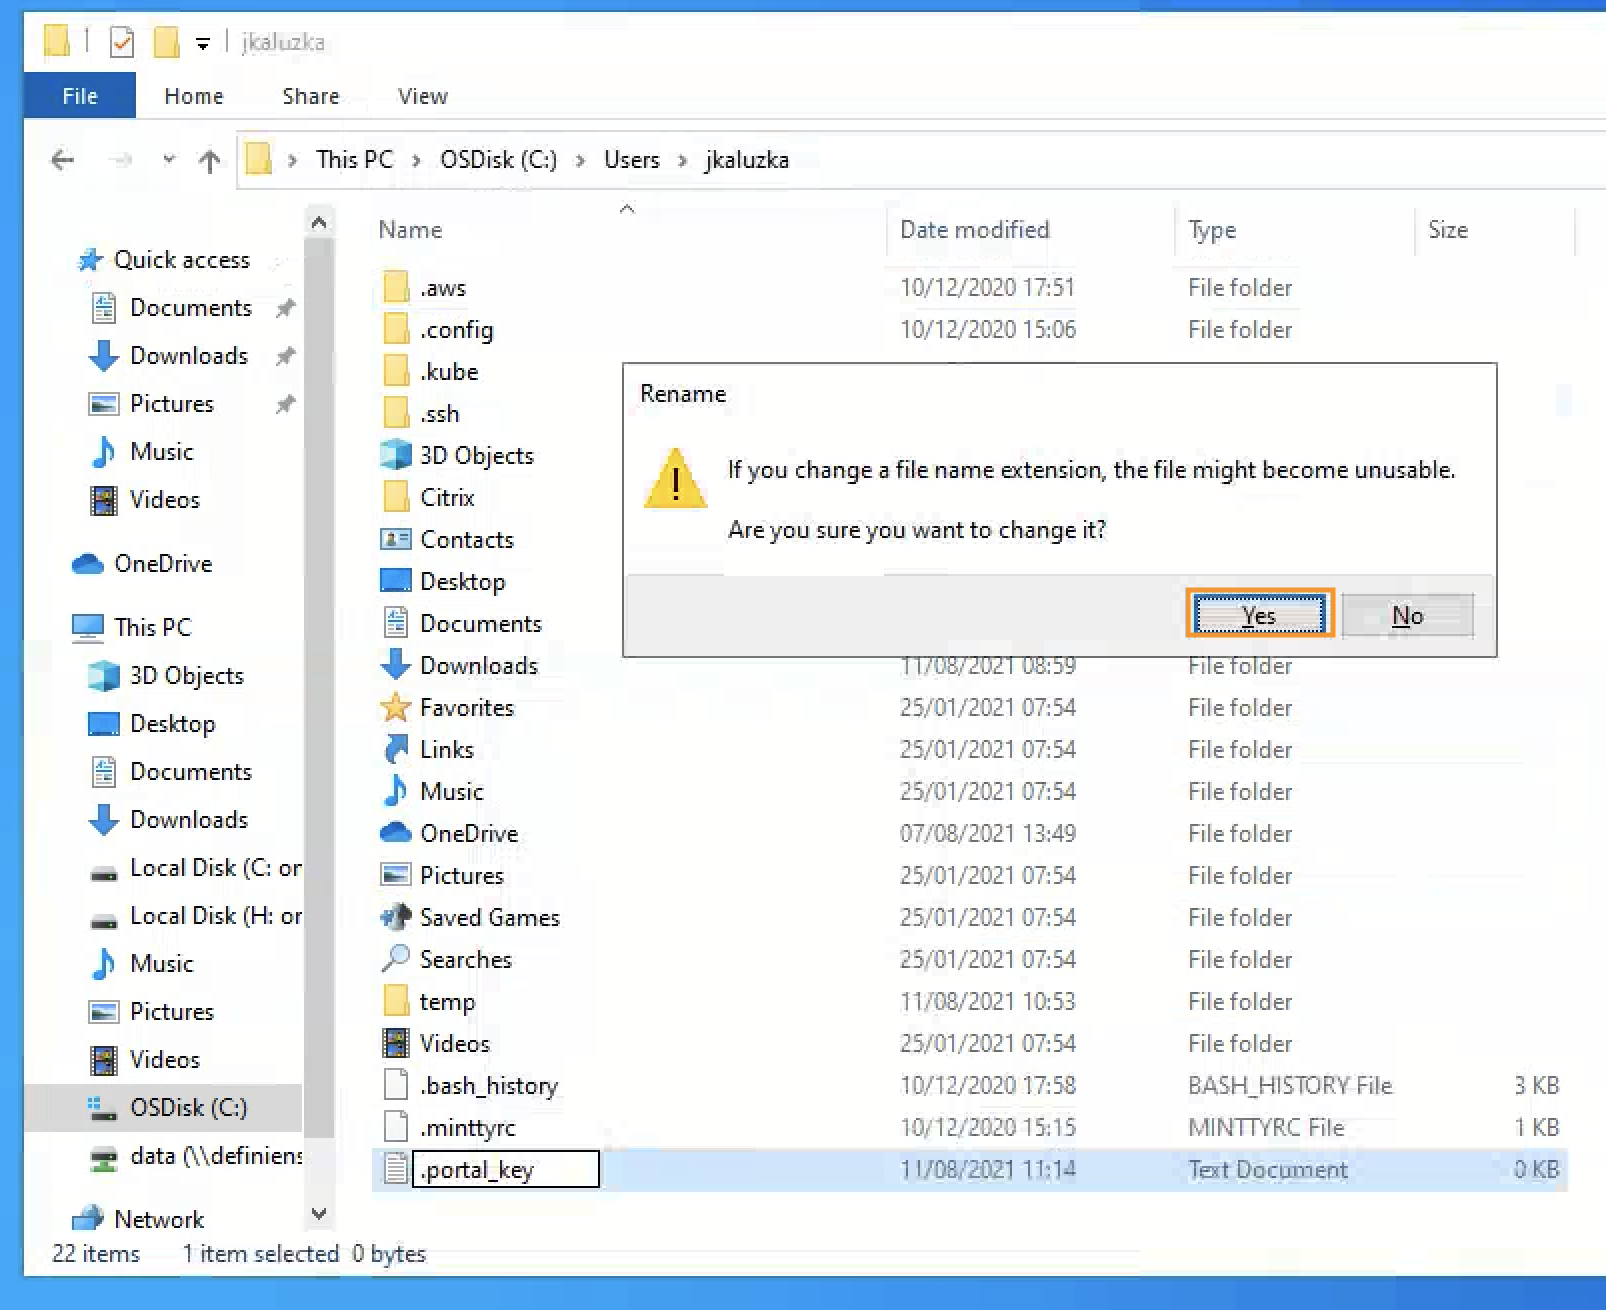
Image: Confirm the change of the file extension in Windows explorer
Running PyPortal on AstraZeneca lab PCs (Cambridge, Gaithersburg)
From some laboratory sites, additional PC settings are required in order to make successful calls with PyPortal.
In some situations proxy needs to be set in order to connect with our infrastructure.
On , simply set the following variables:
set HTTP_PROXY=http://azpzen.astrazeneca.net:9480
set HTTPS_PROXY=http://azpzen.astrazeneca.net:9480
On , set the following variables:
export HTTP_PROXY=http://azpzen.astrazeneca.net:9480
export HTTPS_PROXY=http://azpzen.astrazeneca.net:9480
Further information on PyPortal
For more information please see the information in the package: https://gitlab.img.astrazeneca.net/portal/pyportal#pyportal
Create annotation sets
To create annotation sets, one should use the built-in functionality or the shortcut version .
To see all available options for the command, type:
pyportal.exe cas -h
Annotation Sets can be created by calling the following command:
pyportal.exe cas -p [PROJECT_ID] -s [ANNOTATION_SET_NAME_TO_BE_CREATED]
The Portal project ID can be copied from your browser's address bar.
Image: Project ID as part of the URL in the address bar
As an outcome, messages similar to these should appear in your command line:
pyportal.exe cas -p 619b9c1e30325cc7cc33ec1b --annotation-set test_test_test
PyPortal v2.5.0

Creating annotation sets...

100%|██████████| 1/1 [00:00<00:00,  3.41slide/s]
Successfully created 10 annotation sets with name 'test_test_test'

With warnings:
Slide ID '61a4a20957db16fb8cfe3a25' in project '619b9c1e30325cc7cc33ec1b' already has annotation set 'test_test_test'. No annotation set was created for this slide.
Slide ID '61a4a46a57db16a8bdfe3acd' in project '619b9c1e30325cc7cc33ec1b' already has annotation set 'test_test_test'. No annotation set was created for this slide.
Create annotation sets for specific slides
To be more specific when creating annotation sets, you can provide --slide-ids argument in the command line. This will create annotation sets only for the specified slide(s).
If an annotation set with such a name already exists, warnings will be printed, and an annotation set will not be created. It will not be overwritten, nor any annotations are removed.
pyportal.exe cas -p [PROJECT_ID] -s [ANNOTATION_SET_NAME_TO_BE_CREATED] --slide-ids "[SLIDE_ID_1]" "[SLIDE_ID_2]" "[...]"
As an outcome, messages similar to these should appear in your command line:
pyportal.exe cas -p 619b9c1e30325cc7cc33ec1b --annotation-set test_test_test --slide-ids

PyPortal v2.5.0

Creating annotation sets...

100%|██████████| 1/1 [00:00<00:00,  3.41slide/s]
Successfully created 1 annotation sets with name 'test_test_test'

With warnings:
Slide ID '61a4a20957db16fb8cfe3a25' in project '619b9c1e30325cc7cc33ec1b' already has annotation set 'test_test_test'. No annotation set was created for this slide.

With errors:
SlideID '61d57795309f68ced5693402' not found in project with ID '619b9c1e30325cc7cc33ec1b'
Usage of config file instead of CLI arguments
As in other commands, here one can also use a config file to have a simpler call in the command line. The following config file: create_annotation_sets_config.yml contains the same parameters as in the above call.
create_annotation_sets_config.yml
project_id: 619b9c1e30325cc7cc33ec1b
annotation_set: "test_test_test"
slide_ids:
  - 61a4a20957db16fb8cfe3a25
  - 61d57795309f68ced5693402
  - 61a4a46a57db16a8bdfe3acd
And the usage is as follows:
pyportal.exe cas --config create_annotation_sets_config.yml

PyPortal v2.5.0

Creating annotation sets...

100%|██████████| 1/1 [00:00<00:00,  3.41slide/s]
Successfully created 1 annotation sets with name 'test_test_test'

With warnings:
Slide ID '61a4a20957db16fb8cfe3a25' in project '619b9c1e30325cc7cc33ec1b' already has annotation set 'test_test_test'. No annotation set was created for this slide.

With errors:
SlideID '61d57795309f68ced5693402' not found in project with ID '619b9c1e30325cc7cc33ec1b'
All available options for creating annotation sets
| Argument | Required | Options (default in bold) / Usage example | Explanation | Added in version |
|---|---|---|---|---|
| -p | Yes | -p [PROJECT_ID] | ID of the portal project. You can find this in your browser's address bar | v2.5.0 |
|
-s, --annotation-set |
Yes |
-s [ANNOTATION_SET_NAME], --annotation-set [ANNOTATION_SET_NAME] |
Name of the annotation set to create | v2.5.0 |
| --slide-ids | No | --slide-ids [SLIDE_ID_1] [SLIDE_ID_2] [...] | The slide IDs for which annotation set should be created. Multiple IDs can be supplied as consecutive arguments. If not provided annotation set with the provided name will be created in all slides in the project | v2.5.0 |
|
-e, --environment |
No |
-e dev -e prod |
Portal environment to use | v2.5.0 |
| --portal-api-key | Yes | --portal-api-key [API_KEY] | An API key that can be generated in the Portal. See this article to get more information on how to generate such a key and how to save it | v2.5.0 |
| --automation-api-gateway-url | No | --automation-api-gateway-url [URL] | Overwrite standard API URLs. For developers use only! | v2.5.0 |
| --config | No | --config [CONFIG] | Path to a configuration YAML file. The configuration file can be used instead of specifying options on the command line. The names of the options are the same, only with - replaced with _ in the config file. Command line arguments override config file parameters | v2.5.0 |
Add collection tags to annotation sets
Collection tags can be used to mark the latest version of annotations in one or several annotations sets. After tagging, the annotations can be downloaded using the tag name. This way it is possible to set a mark on a particular state of the annotations and use this to retrieve the exact same state again and again, regardless of the changes that were done in the meantime.
The creation of collection tags can be done through Pyportal. You can use the command or the short-cut version cvac
To see all options for the command, type:
pyportal.exe cvac --help
Collection tags can be created calling the following command:
pyportal.exe cvac -p [PROJECT_ID] -t [COLLECTION_TAG_NAME]
The Portal project ID can be copied from your browser's address bar.
Image: Project ID as part of the URL in the address bar
Create collection tags for specific annotation sets
To be more specific when creating collection tags, you can provide argument in the command line. This will create collection tags only for the specified annotation sets.
pyportal.exe cvac -p [PROJECT_ID] -t [COLLECTION_TAG_NAME] --set-names "[SET_NAME_1]" "[SET_NAME_2]" "[...]"
Notes
- If no annotation sets were found with the provided arguments, PyPortal will throw an exception
- If only some of the annotation sets were found, but not all of them that were provided as an argument to PyPortal, then the existing annotation set will be tagged and no warning will be given to the user
All available options for adding collection tags to annotation sets
| Argument | Required | Options (default in bold) / Usage example | Explanation | Added in version |
|---|---|---|---|---|
| -p | Yes | -p [PROJECT_ID] | ID of the portal project. You can find this in your browser's address bar | v3.0.0 |
|
-t, --collection-tag |
Yes |
-t [COLLECTION_TAG_NAME], --collection-tag [COLLECTION_TAG_NAME] |
Name of the collection tag to add | v3.0.0 |
|
-e, --environment |
No |
-e dev -e prod |
Portal environment to use | v3.0.0 |
| --portal-api-key | Yes | --portal-api-key [API_KEY] | An API key that can be generated in the Portal. See this article to get more information on how to generate such a key and how to save it | v3.0.0 |
| --automation-api-gateway-url | No | --automation-api-gateway-url [URL] | Overwrite standard API URLs. For developers use only! | v3.0.0 |
| --set-names | No | --set-names [SET_NAME1] [SET_NAME2] [...] | The set names for which collection should be created. Multiple set names can be supplied as consecutive arguments. If not provided collection with provided tag will be created for all sets in the project. | v3.0.0 |
| --config | No | --config [CONFIG] | Path or http(s) URL to a configuration YAML file. The configuration file can be used instead of specifying options on the command line. The names of the options are the same, only with - replaced with _ in the config file. Command line arguments override config file parameters. | v3.0.0 |
Delete annotation sets
To delete annotations, one should use the built-in functionality or the shortcut version .
To see all available options for the command, type:
pyportal.exe das -h
Annotation sets can be deleted from the CP Portal by calling the following command:
pyportal.exe das -p [PROJECT_ID] -s [ANNOTATION_SET_NAME]
The Portal project ID can be copied from your browser's address bar.
Image: Project ID as part of the URL in the address bar
Delete annotation sets from specific slides in a project
To delete annotation sets only from specific slides, one can provide argument in the command line. In which case, annotation sets will be deleted from only the specified slide(s) if they exist there.
pyportal.exe das -p [PROJECT_ID] -s [ANNOTATION_SET_NAME] --slide-file-names "[SLIDE_NAME_1]" "[SLIDE_NAME_2]" "[...]"
Notes
- If no annotation sets were found with the provided arguments, PyPortal will throw an exception
- If annotation sets were found only in one slide, but not in all that were provided as an argument to PyPortal, then the existing annotation set will be removed and no warning will be given to the user
Alternatively to providing slide names, you can provide argument in the command line. In which case, annotation sets will be deleted from only the specified slide(s) if they exist there.
pyportal.exe das -p [PROJECT_ID] -s [ANNOTATION_SET_NAME] --slide-ids "[SLIDE_ID_TAKEN_FROM_BROWSER_1]" "[SLIDE_ID_TAKEN_FROM_BROWSER_2]" "[...]"
All available options for deleting annotations
| Argument | Required | Options (default in bold) / Usage example | Explanation | Added in version |
|---|---|---|---|---|
| -p | Yes | -p [PROJECT_ID] | ID of the portal project. You can find this in your browser's address bar | v0.47.0 |
|
-s, --annotation-set |
Yes |
-s [Set name], --annotation-set [ANNOTATION_SET_NAME] |
Name of the annotation set to delete. By default, all annotation sets with that name will be deleted in the specified project | v0.47.0 |
| --slide-ids | No | --slide-ids [SLIDE_ID] [SLIDE_IDS] [...] | The slide IDs from which annotation set should be deleted. Multiple IDs can be supplied as consecutive arguments. If not provided annotation set with provided name will be deleted from all slides where it exists | v0.47.0 |
| --slide-file-names | No | --slide-file-names [SLIDE_FILE_NAME] [SLIDE_FILE_NAME] [...] | The slide names from which annotation set should be deleted. Multiple names can be supplied as consecutive arguments. If not provided annotation set with provided name will be deleted from all slides where it exists | v0.47.0 |
| --ignore-missing | No | --ignore-missing | By default, an error is raised if the annotation set is missing in this project completely. If this flag is set, only a warning is printed in this case | v2.7.0 |
|
-e, --environment |
No |
-e dev -e prod |
Portal environment to use | v0.47.0 |
| --portal-api-key | Yes | --portal-api-key [API_KEY] | An API key that can be generated in the Portal. See this article to get more information on how to generate such a key and how to save it | v2.5.0 |
| --automation-api-gateway-url | No | --automation-api-gateway-url [URL] | Overwrite standard API URLs. For developers use only! | v2.5.0 |
Download annotation sets
To download annotations, one should use the built-in functionality or the shortcut version .
Tip
Starting with version 2.14.0 this option will also include AnnotationIndex in the GeoJSON/XML file. You can read more about the annotation index feature and how it works, over at the SharePoint article
To see all available options for the command, type:
pyportal.exe da -h
To download annotations "as is" into the GeoJSON format, two parameters have to be provided:
- Exactly project ID which you want to download from
- Exactly output location to store the files
Download all annotations
In general, the download annotations command to download all annotation from a project, looks like this:
pyportal.exe da -p [PROJECT_ID] -o [ANNOTATION_OUTPUT_FOLDER]
The Portal project ID can be copied from your browser's address bar.
Image: Project ID as part of the URL in the address bar
Usage of a config file
There are many options for downloading annotations (see the table of all options for downloading annotations command). Entering many options into the command might be hard to read/edit, so a special config file can be created in the YAML format. It will give a better overview of the selected options and allow for easy reuse for subsequent downloads. The names of the options are the same as for the client interface, however, "-" (minus) signs between the words need to be replaced with "_" (underscores).
Here is an example file:
project_id: 5e57b8d248dbe6f07e5f44a0
output_path: C:\Users\Alex\Downloads\annotations
format: geojson
The format used in the above example indicates the fact that more options can be included in the config file. The format is not required, the default value geojson is used if it's not provided. Please refer to the table with all options to learn more about all available options that can be used as Command-Line parameters or in the config file.
Using the YAML config file with PyPortal:
pyportal.exe da --config annotations_config.yaml
Download sets
To download annotations from a specific annotation set, one can use the flag :
pyportal.exe da --annotation-set [ANNOTATION_SET_NAME] -o [ANNOTATION_OUTPUT_FOLDER] -p [PROJECT_ID]
Or set the following example value in a config file and use it as in other calls:
project_id: 5e57b8d248dbe6f07e5f44a0
output_path: C:\Users\Alex\Downloads\annotations
annotation_set: Validation
pyportal.exe da --config annotations_config_with_set_name.yaml
As a result of this call, annotations will be placed in the folder 'C:\Users\Alex\Downloads\annotations' in the following structure:
C:\Users\Alex\Downloads\annotations/
└── Validation
    ├── slide_name_1.geojson
    ├── slide_name_2.geojson
    ...
    └── slide_name_n.geojson
Download from specific slides
To download only annotations for a specific set of slides, one can use the flag . In that case, the unique ID of a slide, NOT the file name needs to be provided. You can specify more than one ID.
pyportal.exe da --slide-ids 5eb02046931446030155d38a 5eb02046931446030155d38b -o C:\Users\Alex\Downloads\annotations -p 5e57b8d248dbe6f07e5f44a0
Or set the following example value in a config file and use it as in other calls:
project_id: 5e57b8d248dbe6f07e5f44a0
output_path: C:\Users\Alex\Downloads\annotations
slide_ids:
  - 5eb02046931446030155d38a
  - 5efb4399eaa8022c65f72023
And the command call will look like this:
pyportal.exe da --config annotations_config_with_slide_ids.yaml
As a result of this call, annotations will be placed in the folder 'C:\Users\Alex\Downloads\annotations' in the following structure:
C:\Users\Alex\Downloads\annotations/
├── annotation_set_1
│   └── slide_name_1.geojson
├── annotation_set_2
│   ├── slide_name_1.geojson
│   └── slide_name_2.geojson
├── Validation
│   ├── slide_name_1.geojson
...
└── annotation_set_n
    ├── slide_name_1.geojson
    ├── slide_name_2.geojson
If there are no annotations in the set for one slide, then the file slide_name_xxx.geojson is not created.
Obviously, the 2 above commands can be joined. In that situation only annotations for set name Validation for a slide with the id 5eb02046931446030155d38a will be downloaded:
Example config file :
project_id: 5e57b8d248dbe6f07e5f44a0
output_path: C:\Users\Alex\Downloads\annotations
annotation_set: Validation
slide_ids:
    - 5eb02046931446030155d38a
Supplying that config file to PyPortal command, will result in the following structure:
C:\Users\Alex\Downloads\annotations\
└── Validation
    ├── slide_name_1.geojson
Download by class Name or ID
It is possible to download annotations of a specific class name or ID. To filter out , use the flag . You can use class ID or class name to filter.
pyportal.exe da -p 5e57b8d248dbe6f07e5f44a0 -o C:\Users\Alex\Downloads\filtered_annotations --region-class-filter "Tumor" "Tumor Area"
Or set the following example value in a config file and use it as in other calls:
project_id: 5e57b8d248dbe6f07e5f44a0
output_path: C:\Users\Alex\Downloads\filtered_annotations
region_class_filter:
  - "Tumor"
  - "Tumor Area"
Similarly, cell marker annotations can be downloaded by providing value for the option.
pyportal.exe da -p 5e57b8d248dbe6f07e5f44a0 -o C:\Users\Alex\Downloads\filtered_annotations --cma-class-filter "CD68" "Premalignant"
Tip when filtering
- Filtering by region class name/ID will NOT PREVENT from downloading cell marker annotations
-
In order to download ONLY region annotations, provide an empty value for option --cma-class-filter
pyportal.exe da -p 5e57b8d248dbe6f07e5f44a0 -o C:\Users\Alex\Downloads\filtered_annotations --region-class-filter "Tumor" "Tumor Area" --cma-class-filter ""
Similarly, to download ONLY cell marker annotations, you need to set an empty value for --region-class-filter
pyportal.exe da -p 5e57b8d248dbe6f07e5f44a0 -o C:\Users\Alex\Downloads\filtered_annotations --region-class-filter "" --cma-class-filter "CD68"
Annotations format
Annotations can be downloaded in 2 formats that are described below. Use a special parameter in order to use a specific format. By default, GeoJSON is used.
GeoJSON (Default)
This format exports annotations into GeoJSON file: annotations.geojson
Aperio XML (Deprecated)
This format exports annotations into a XML file, that supports Aperio format: Annotations_Markers.xml
Examples
This example will show how to download annotations using the following example config file.
project_id: 5eeb552c7d677c4d5de9797c
slide_ids:
  - 5eeb5c947d677c227ee97ecb
annotation_set: Intensity Score
output_path: pyportal_intensity_score
A call, together with the output should be similar to the following:
pyportal da --config da_config.yaml

INFO - PyPortal v2.10.0
INFO - Downloading annotations for project 5eeb552c7d677c4d5de9797c...
INFO - Region annotations 1 - 0 downloaded
INFO - CMAs 1 - 6 downloaded
Downloading annotations for 1 slides (current: 5eeb5c947d677c227ee97ecb): 100%|████████████████████████| 1/1 [00:00<00:00,  4.32slide/s]
INFO - 6 annotations downloaded.
INFO - Wrote Annotation GeoJSON file "pyportal_intensity_score/Intensity Score/MDM001_MOS739_RDG_ML1713200_20170928B_FoxP3+PD1+CD8.geojson".
Which will produce a folder structure similar to this:
.
├── da_config.yaml
└── pyportal_intensity_score
    └── Intensity\ Score
        └── MDM001_MOS739_RDG_ML1713200_20170928B_FoxP3+PD1+CD8.geojson
All available options for downloading annotations
| Argument | Required | Options (default in bold) / Usage example | Explanation | Added in version |
|---|---|---|---|---|
| -p | Yes | -p [PROJECT_ID] | ID of the portal project. You can find this in your browser's address bar | v0.1.0 |
|
-o, --output-path |
No |
-o [ANNOTATION_OUTPUT_FOLDER], annotations |
A path to a directory where annotations should be downloaded. If not provided, files are created in the annotations folder that will be created in the place where the pyportal.exe package is executed | v1.0.0 |
|
-s, --annotation-set |
No | --annotation-set [ANNOTATION_SET_NAME] | Only annotations from the provided set name will be downloaded | v0.46.0 |
| -t | No | --t [COLLECTION_TAG_NAME] | Only annotations in annotation sets with the provided collection tag name will be downloaded | v3.0.0 |
| --slide-ids | No | --slide-ids [SLIDE_ID] [SLIDE_IDS] [...] | The slide ids for which annotations should be downloaded. Multiple ids can be supplied as consecutive arguments | v0.43.0 |
| --region-class-filter | No | --region-class-filter [REGION_CLASS] [REGION_CLASS] [...] | Filter region annotations by class name or ID | v2.4.0 |
| --cma-class-filter | No | --cma-class-filter [CMA_CLASS] [CMA_CLASS] [...] | Filter cell markers annotations by class name or ID | v2.4.0 |
| --format | No |
--format geojson --format aperio_xml |
The format is used to export annotations. The possible options are either the aperio_xml or the geojson | v0.1.0 |
| --config | No | --config [CONFIG] | Path to a configuration YAML file. The configuration file can be used instead of specifying options in the command line. The names of the options are the same, only with - replaced with _ in the config file. Command-line arguments override config file parameters. | v0.1.0 |
|
-e, --environment |
No |
dev prod |
Portal environment to use | v0.1.0 |
| --portal-api-key | Yes | --portal-api-key [API_KEY] | An API key that can be generated in the Portal. See this article to get more information on how to generate such a key and how to save it | v0.1.0 |
| --automation-api-gateway-url | No | --automation-api-gateway-url [URL] | Overwrite standard API URLs. For developers use only! | v0.30.0 |
|
-sv, --annotation-set-version |
No | --annotation-set-version [ANNOTATION_SET_VERSION] | PARAMTER IN DEVELOPMENT - NOT FOR PRODUCTION USE. Optional parameter to download a specific version of the specified annotation set. | v2.28.0 |
Linux use
For advanced Linux use, please refer to this documentation.
Known issues
| Issue | Solution or a workaround |
|---|---|
| A bug was identified when downloading annotations and renaming markers. Mapping with intensity score is currently not possible! | No available solution at the moment |
Download slides
To download slides, use the built-in functionality or its shortcut version .
Download all slides
To download all slides using PyPortal, use the following command:
pyportal.exe ds -p [project_id] -o [PATH_WHERE_SLIDES_SHOULD_BE_DOWNLOADED] --portal-api-key [API_KEY]
All slides from your project will be downloaded by default. If there are slides present from your CP Portal project in the destination folder from a previous download, they will be skipped and not downloaded again. Download will continue from where you left off the previous time.
If a slide has an 'invalid' status (e.g. corrupted file), during the download PyPortal will automatically skip this file and the download will proceed, but with valid files only. Each slide is downloaded into its own, separate folder.
By providing an extra parameter you can use new and faster way of downloading slides. Please note however, that this option does not allow to continue where you left off in case of a failure or partially downloaded slide. If this option is used and there is an interruption in the download process, the whole slide will be re-downloaded starting from scratch.
By default, the download option "with continued download" is enabled. Faster download needs to be enabled explicitly by specifying the parameter when issuing the command.
Download a filtered set of slides
-
In the CP Portal filter for the set of slides you want to download
- Please see articles on a global search and column filtering for more information on how to filter for slides
-
Download the PyPortal config file
- Click on the button
- Click on the option
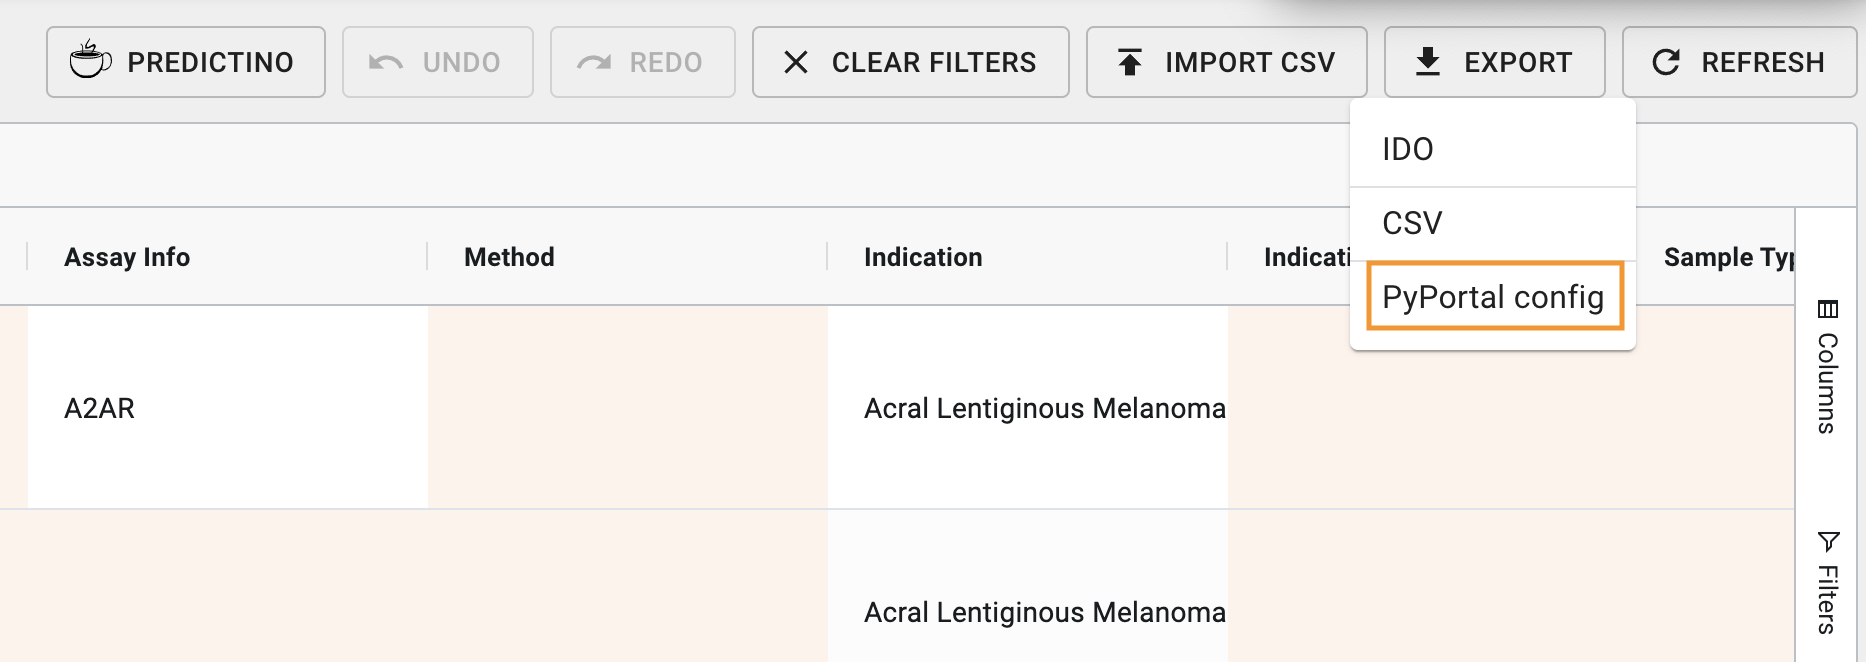
Image: Export drop-down options, with PyPortal config option highlighted
-
Export the config file, by clicking on the button in the confirmation dialog
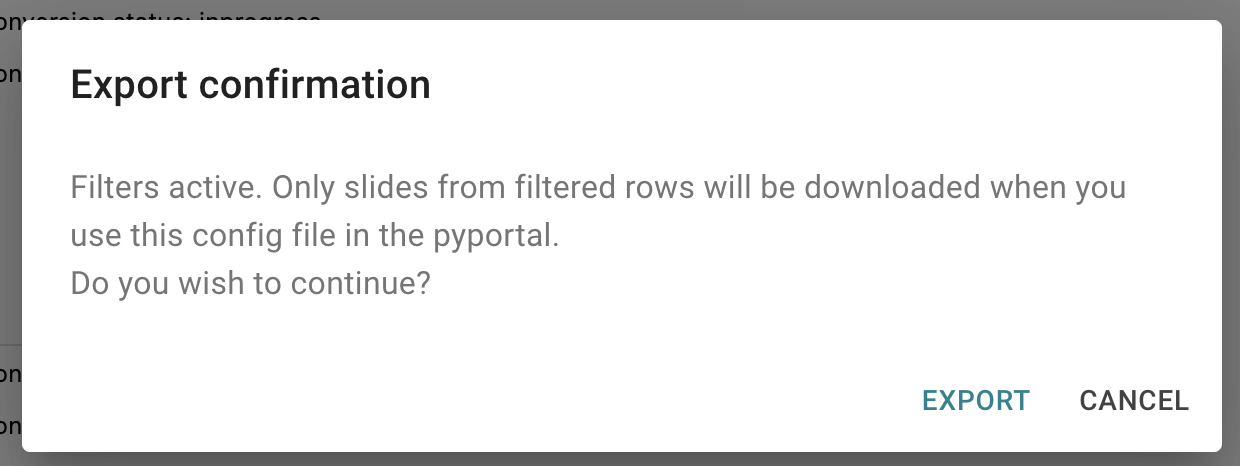
Image: Confirmation dialog for exporting a config file when filters are active
-
Download slides using the config file and PyPortal
pyportal.exe ds --config [PATH_TO_DOWNLAODED_CONFIG] -o [PATH_WHERE_SLIDES_SHOULD_BE_DOWNLOADED]
All available options
| Argument | Required | Options (default in bold) / Usage example | Explanation | Added in version |
|---|---|---|---|---|
|
-p --project-id |
Yes | -p [PROJECT_ID] | ID of the portal project. You can find this in your browser's address bar | v0.1.0 |
| --config | No | --config .\slides.yaml | Path to a configuration YAML file. The configuration file can be used instead of specifying options on the command line. The names of the options are the same, only with - replaced with _ in the config file. Command line arguments override config file parameters | v0.1.0 |
|
-o, --output-path |
No |
-o . -o slides |
A path (relative or absolute) to a directory where slides should be saved. If not provided, slides are saved in a 'slides' folder in the current working directory. | v0.1.0 |
| --extract | No | --extract |
If set, downloaded slide files are extracted
directly to output_path (e.g.
output_path/slide1.svs, output_path/slide2.svs).
Otherwise, each slide's files are placed in a
sub-folder with the slide name (e.g.
output_path/slide1/slide1.svs,
output_path/slide2/slide2.svs). Not allowed for multi-file slides. |
v0.31.0 |
| --slide-ids | No | --slide-ids [SLIDE_ID] [SLIDE_ID] [...] | The slide IDs to be downloaded. Multiple IDs can be supplied as separate arguments. In case slide_ids are provided in the download config file, the command-line option will take precedence and overwrite the value in the download config. | v0.34.0 |
|
-b --chunk-size |
No |
10 Range: 5-500 |
The size of each chunk (in MegaBytes) when downloading files. Default is 10MB. Min is 5MB and max is 500MB. Larger chunks can improve download speed but may use more memory. | v2.24.0 |
| --fast-download | No |
auto yes, no, auto |
Use a faster but non-resumable download
mechanism. When run on a good network connection, this can utilize the full bandwidth of the connection. However, in case of failure, partially downloaded files are removed from the output folder and have to be re-downloaded entirely. If set to "auto" (default), it uses environment-dependent behavior, enabling fast download if run inside a cluster (SCP, Kubernetes) and safe download otherwise. |
v2.24.0 |
| --portal-api-key | Yes | --portal-api-key [API_KEY] | An API key that can be generated in the Portal. See this article to get more information on how to generate such a key and how to save it | v0.42.0 |
|
-e --environment |
No |
dev prod |
CP Portal environment to use | v0.42.0 |
Running PyPortal on SCP
To run PyPortal on SCP please refer to this article.
If you are having issues installing PyPortal for Linux, please refer to the PyPortal README documentation.
Download raster annotations
To download raster annotations from a project, use the GxP script's command or its shortcut .
For information about TIFF format requirements and metadata specifications, see the Raster Annotations Format section.
To see all available options for the command, type:
uv run --locked gxp-scripts/pyportal-cli.py download-raster-annotations --help
Download all raster annotations
To download all raster annotations from a set, provide the project ID, raster annotation set name, and output directory:
uv run --locked gxp-scripts/pyportal-cli.py download-raster-annotations \
    --project-id [PROJECT_ID] \
    --ra-set-name "[ANNOTATION_SET_NAME]" \
    --output-path [OUTPUT_DIRECTORY]
Download from specific slides
To download raster annotations for specific slides only, use the flag:
uv run --locked gxp-scripts/pyportal-cli.py dra \
    --project-id [PROJECT_ID] \
    --ra-set-name "[ANNOTATION_SET_NAME]" \
    --output-path [OUTPUT_DIRECTORY] \
    --slide-ids [SLIDE_ID_1] [SLIDE_ID_2]
Using PyPortal Config File
Downloading raster annotations from specific slides typically happens with an exported config file. To generate this file, filter for the desired slides in the Portal's metadata table and export the PyPortal configuration, as described in Download a filtered set of slides.
To use a config file:
uv run --locked gxp-scripts/pyportal-cli.py dra --config [PATH_TO_CONFIG_FILE]
The download process creates:
- - Metadata file containing all annotation information (see metadata requirements)
- TIFF files - Individual raster annotation images as referenced in the metadata (see TIFF layer structure)
All available options
| Argument | Required | Description |
|---|---|---|
| --project-id | Yes | ID of the portal project from which to download raster annotations |
| --ra-set-name | Yes | Name of the raster annotation set to download |
| --output-path | Yes | Directory where TIFF files and ra_metadata.csv will be saved |
| --ra-set-version | No | Specific version to download (default: latest) |
| --slide-ids | No | Download only specific slides (space-separated list) |
| --config | No | Path to a configuration YAML file. The configuration file can be used instead of specifying options on the command line. Command line arguments override config file parameters |
| --portal-api-key | Yes* | API key for authentication (*can also be stored in .portal_key file). See this article for more information |
Upload annotations
To upload annotations, use the built-in functionality or its shortcut version .
Please note that the annotation upload will only import annotations themselves (polygons, lines, cell markers), but not the associated metadata!
Tip: Multiple uploads of same annotations to the same annotation set
- If you're trying to upload annotations to an annotation set which already has annotations, PyPortal will check with you what you would like to do:
- you can either append annotations to that already existing set,
- or you can skip uploading annotations to that set completely.
Upload annotations process
To see the instructions in the CLI tool and all available arguments, type:
pyportal.exe ua -h
To upload annotations "as is" into the Portal, two parameters have to be provided
- Exactly one CP Portal project ID where annotations should be stored to
-
The folder location where annotations are located, or alternatively a path to a specific file containing annotations
- From the provided folder path only files with format `.xml`, `.annotations`, `.json` or `.geojson` are going to be uploaded.
pyportal.exe ua -p [PORTAL_PROJECT_ID] [FOLDER_PATH_WITH_ANNOTATIONS]
Instead of command line arguments, you can provide a config file instead.
Content of an example config file :
project_id: 5e57b8d248dbe6f07e5f44a0
The example config file, can be used in the following way:
pyportal.exe ua --config annotations_config.yaml [FOLDER_PATH_WITH_ANNOTATIONS]
Mapping of class names
The Portal has a consolidated set of class names for annotations. Furthermore, for cell marker annotations (CMAs), a new concept of labelling cell positions with multiple attributes was introduced (e.g. a cell can be lymphoid, positive for CD8 and negative for CD3 at the same time).
Annotations of type FOV (FOV, HPF, or ROIs) are automatically imported by PyPortal to annotations of class FOV. There is no need to explicitly map them with class mappings such as None: FOV.
All currently existing scripts require cell marker positions in a format where each position can only have one attribute. To support your work with CMAs or legacy algorithms, which still require specific class names for regions, there are different possibilities to map them when downloading annotations.
How to find the annotation class names for mapping?
When using the remapping options, make sure to double-check supported region annotation classes and supported cell marker annotation classes and to use the correct spelling of class names and attributes as used in the CP Portal database. They don't match 1:1 in all cases with the names you can see in the portal GUI. You can also use the Portal GUI to find out the correct class_id for the config file by hovering over the class name:
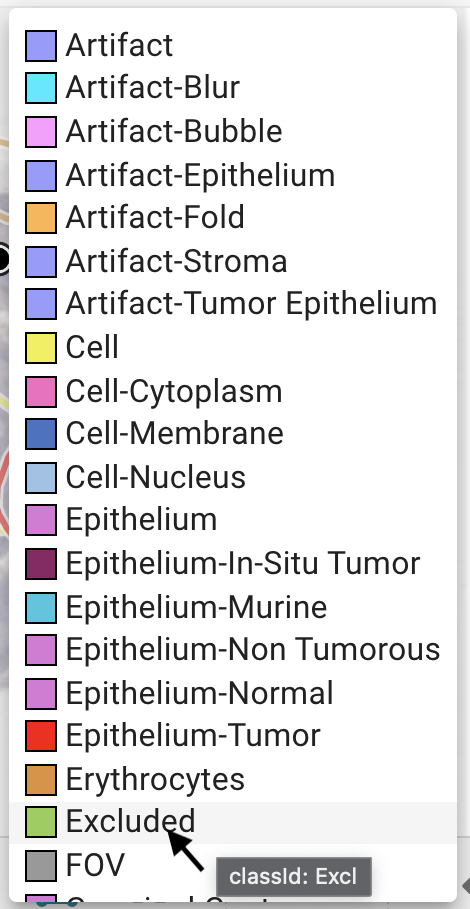
Image: Class ID of annotation classes presented in the CP Portal GUI
Allowed rating attributes of CMA classes are: po for positive, ne for negative, and un for uncertain.
Allowed intensity score attributes of CMA classes are: 0, 1+, 2+, and 3+.
How to map XML classes to CP Portal classes?
Example 1
In the Portal, a single cell can be annotated with multiple classes and each class can be marked as positive or negative. For this reason, special mapping is possible when uploading annotations.
In that case, the annotations_config.yaml should be extended with the proper mapping separately for CMAs and region annotations.
The example file contains the following data:
 1 project_id: 5e57b8d248dbe6f07e5f44a0
 2
 3 # definitions of CMA mapping
 4 cma_mapping:
 5     Lymphoid Positive (blue):
 6     - class_id: lymphoid
 7         rating: po
 8     - class_id: CD8
 9         rating: po
10     Lymphoid Ambiguous (light blue):
11     - class_id: lymphoid
12         rating: un
13
14 # definitions of region annotations mapping
15 region_mapping:
16 # HALO class: Portal class
17     Other: Excl
18     None: FOV
When using the config file with the above entries the following thing will be done:
- line 1 → annotations will be uploaded into the slides of the project with ID: 5e57b8d248dbe6f07e5f44a0
- lines 4-12 → contains information about CMA mapping
- lines 5-9 → every cell marker with the class Lymphoid Positive (blue) will be mapped to one cell with two attributes lymphoid = positive AND CD8 = positive
- lines 10-12 → every cell marker with the class Lymphoid Ambiguous (light blue) will be mapped to one cell with the attribute lymphoid = uncertain
- lines 14-16 → contains information about region annotations mapping
- line 15 → every region annotation with the class Other will be uplaoded as a class Excluded
- line 16 → every region annotation without a class name (e.g. None) will be uploaded as an annotation with a class name FOV
The PyPortal call should look like this:
pyportal.exe ua --config annotations_config_with_mapping.yaml [FOLDER_PATH_WITH_ANNOTATIONS]
Example 2
The example file contains the following data:
 1 project_id: 5e57b8d248dbe6f07e5f44a0
 2
 3 # definitions of CMA mapping
 4 cma_mapping:
 5     PDL1:
 6     - class_id: CD8
 7         rating: po
 8     FOXP3 positive cells:
 9     - class_id: FOXP3
10         rating: po
11     CD8FOXP3 positive cells:
12     - class_id: CD8
13         rating: po
14     - class_id: FOXP3
15         rating: po
Please note that class names in a mapping must match the text attribute that can be found in the XML file. When mapping values exported from the CP Portal which are being imported also to the CP Portal usually you don't need to use positive cells when the cell is single.
...
    <Region NegativeROA="0" Selected="0" Text="CD8" Type="2">
...
When using the config file with above entries the following thing will be done:
- line 1 → annotations will be uploaded into the slides of project with ID: 5e57b8d248dbe6f07e5f44a0
- lines 5-7 → every cell marker with the class CD8 positive cells will be mapped to one CD8 positive cell
- lines 8-10 → every cell marker with the class FOXP3 positive cells will be mapped to one FOXP3 positive cell
- lines 11-15 → every cell marker with the class CD8FOXP3 positive cells will be mapped to one cell with attributes CD8 positive AND FOXP3 positive
The PyPortal call should look like this:
pyportal.exe ua --config annotations_config_with_mapping.yaml [FOLDER_PATH_WITH_ANNOTATIONS]
Upload to a specific set
To upload only annotations from a specific set only, one can use the flag :
pyportal.exe ua --annotation-set [ANNOTATION_SET_NAME] [FOLDER_PATH_WITH_ANNOTATIONS]
Alternatively, you can provide a config file. Here is an example config file containing the following data:
 1 project_id: 5e57b8d248dbe6f07e5f44a0
 2 annotation_set: Validation
 3
 4 # definitions of CMA mapping
 5 cma_mapping:
 6   CD8 positive cells:
 7    - class_id: CD8
 8      rating: po
 9   FOXP3 positive cells:
10    - class_id: FOXP3
11      rating: po
12   CD8FOXP3 positive cells:
13    - class_id: CD8
14      rating: po
15    - class_id: FOXP3
16      rating: po
You can provide that config file to PyPortal in the following way:
pyportal.exe ua --config annotations_config_with_set_name.yaml [PATH_TO_FOLDER_WITH_ANNOTATIONS]
Rename Cell-Marker Annotation Classes by Down- and Upload
In this example, we show how to change cell-marker annotation (CMA) classes. Sometimes, pathologists create CMAs with wrong classes, and down- and uploading them with a class mapping is a good way to fix this:
-
Download cell-markers:
In the CP Portal, CMAs do not have class names, but a list of class dictionaries with class ID and rating or intensity score. During download to XML and GeoJSON files, PyPortal generates class names based on the class dictionaries.
Examples: Cell-markers with class CD8 and rating "negative" are downloaded with class name "CD8-ne". Class FOXP3 and intensity score "1+" becomes "FOXP3-1+". "positive" CMAs get no suffix, so a "positive" PD1 CMA becomes just "PD1". -
Upload downloaded CMAs with class mapping:
During annotation upload, PyPortal allows assigning new Portal class dictionaries based on the class names in the annotation XML or GeoJSON files.
This example config maps the "positive" CD8 cell-markers ("CD8", no suffix) to "positive" CD68 cell-markers and changes the intensity score of the FOXP3 cell-markers from "1+" ("FOXP3-1+") to "2+":project_id: 5eeb552c7d677c4d5de9797c annotation_set: Intensity Score annotations_path: pyportal_intensity_score_mapping cma_mapping: CD8: - class_id: CD68 rating: po FOXP3-1+: - class_id: FOXP3 intensity_score: 2+
All available options
| Argument | Required | Options (default in bold) / Usage example | Explanation | Added in version |
|---|---|---|---|---|
|
-p --project-id |
Yes | -p [PROJECT_ID] | ID of the portal project. You can find this in your browser's address bar | v0.1.0 |
| annotations_path | Yes | [ANNOTATIONS_PATH] | Path to a single annotation file or directory containing annotation files. If a directory path is specified, annotations from all files with suffix '.xml', '.annotations', '.json' or '.geojson' are uploaded if they contain annotations belonging to slides in the specified project. | v3.0.0 |
|
-e, --environment |
No |
dev prod |
Portal environment to use | v0.1.0 |
| --portal-api-key | Yes | --portal-api-key [API_KEY] | An API key that can be generated in the Portal. See this article to get more information on how to generate such a key and how to save it | v0.1.0 |
| --automation-api-gateway-url | No | --automation-api-gateway-url [URL] | Overwrite standard API URLs. For developers use only! | v0.30.0 |
|
-s, --annotation-set |
No | --annotation-set [ANNOTATION_SET_NAME] | Name of the annotation set where the annotations will be uploaded. If the set does not exist, it is created on upload. Uploading to an existing set does not modify annotations already present in that set, so duplicates might be created. If not specified, a new numbered set with name upload_# is created | v0.1.0 |
| --default-class | No |
--default-class [ANNOTATION_CLASS] Tumor |
Default class for annotations without class information. Negative annotations are assigned to class 'Excluded'. Default: Tumor | v0.1.0 |
| --fix-invalid | No | --fix-invalid | If set, fix invalid polygon annotations while loading the XML files, e.g. if they contain self-intersections. If unset (the default), such annotations are uploaded unmodified. | v2.34.0 |
| --config | No | --config [CONFIG_FILE] | Path to a configuration YAML file. The configuration file can be used instead of specifying options in the command line. The names of the options are the same, only with - replaced with _ in the config file. Command line arguments override config file parameters | v0.1.0 |
| --config-content | No | --config-content "portal_api_key: [API_KEY]" | Content of a configuration file in YAML format. This works like --config, but accepts the raw config text instead of a file path | v0.1.0 |
| --if-set-non-empty | No |
ask add |
What to do in case the annotation set to which annotations are being uploaded already exists and is not empty. Default is to "ask" - confirm with the user. In specific environments (e.g., KubeFlow), the default is to "add" - append to the existing set. If this option is set to "ask", during the upload PyPortal will ask the user what to do (add or skip) in case an annotation set is not empty. If it's set to "add", PyPortal will automatically append new annotations to the already existing annotation set. | v2.31.0 |
Linux use
For an advanced usage in Linux please refer to this article.
Upload landmarks
Obtain landmarks
The co-registration tool Slidematch is used for generating landmark files in a JSON format.
Please reach out to Slidematch team if you are not sure about the usage of that program.
We propose to use the Portal-generated IDO file with the slides that you want to generate landmarks for. This way, all information about slide file name, stains (assay info) and location in the file share will be propagated to the landmarks JSON file and can be automatically linked to the slides in Portal.
Upload landmarks to a project
To upload landmarks, use the built-in functionality or its shortcut version .
To see the instructions in the CLI tool and all available arguments, type:
pyportal.exe ul -h
Landmarks can be uploaded by providing the Project ID to which landmarks should be uploaded, and the path to a folder which contains landmark files.
pyportal.exe ul -p [PROJECT_ID] --landmarks-path [PATH_TO_FOLDER_WITH_LANDMARKS]
All available options
| Argument | Required | Options (default in bold) / Usage example | Explanation | Added in version |
|---|---|---|---|---|
|
-p --project-id |
Yes | -p [PROJECT_ID] | ID of the portal project. You can find this in your browser's address bar | v0.37.0 |
| --landmarks-path | Yes | --landmarks-path [PATH_TO_FOLDER_WITH_LANDMARKS] | Path to a single file with landmarks or directory containing files with landmarks. If a directory path is specified, landmarks from all files with suffix '.json' are uploaded. This is a positional argument, which does not require prepending the value with any key | v0.37.0 |
|
-e, --environment |
No |
-e dev -e prod |
Portal environment to use | v0.37.0 |
| --portal-api-key | Yes | --portal-api-key [API_KEY] | An API key that can be generated in the Portal. See this article to get more information on how to generate such a key and how to save it | v0.37.0 |
| --automation-api-gateway-url | No | --automation-api-gateway-url [URL] | Overwrite standard API URLs. For developers use only! | v0.37.0 |
Extend landmarks
Extend existing landmarks
Landmarks are extended by adding new stains present in given JSON files and not present yet in the Portal. Landmark positions on newly added stains are calculated by transfering positions on common stains, so it is required that at least one stain in given JSON files is already present in the Portal. The existing stains and landmark positions in the Portal are left untouched.
Be aware, that landmarks created by extending existing landmarks with new stains are usually a bit different than landmarks created by registering all stains at once in Slidematch and they may cause slightly different alignment of the slides.
To extend already existing landmarks, use the built-in functionality or its shortcut version .
To see the instructions in the CLI tool and all available arguments, type:
pyportal.exe el -h
Landmarks can be extended by providing the Project ID to which landmarks should be uploaded, and the path to a folder which contains landmark files.
pyportal.exe el -p [PROJECT_ID] --landmarks-path [PATH_TO_FOLDER_WITH_LANDMARKS]
All available options
| Argument | Required | Options (default in bold) / Usage example | Explanation | Added in version |
|---|---|---|---|---|
|
-p --project-id |
Yes | -p [PROJECT_ID] | ID of the portal project. You can find this in your browser's address bar | v2.13.1 |
| --landmarks-path | Yes | --landmarks-path [PATH_TO_FOLDER_WITH_LANDMARKS] | Path to a single file with landmarks or directory containing files with landmarks. If a directory path is specified, landmarks from all files with suffix '.json' are uploaded. This is a positional argument, which does not require prepending the value with any key | v2.13.1 |
|
-e, --environment |
No |
-e dev -e prod |
Portal environment to use | v2.13.1 |
| --portal-api-key | Yes | --portal-api-key [API_KEY] | An API key that can be generated in the Portal. See this article to get more information on how to generate such a key and how to save it | v2.13.1 |
| --automation-api-gateway-url | No | --automation-api-gateway-url [URL] | Overwrite standard API URLs. For developers use only! | v2.13.1 |
| --config | No | --config [PATH_TO_CONFIG_FILE] | Path or http(s) URL to a configuration YAML file. The configuration file can be used instead of specifying options on the command line. The names of the options are the same, only with - replaced with _ in the config file. Command line arguments override config file parameters | v2.13.1 |
Upload slides
Upload slides from a local drive
Slides can be uploaded to the CP Portal using PyPortal's Upload Slides functionality. Typically, this method results in faster upload speeds and less time overall, compared to uploading slides via the browser.
To upload slides, use the built-in functionality or its shortcut version .
To see the instructions in the CLI tool and all available arguments, type:
pyportal.exe us -h
Slides can be uploaded by providing the Project ID to which slides should be uploaded, and the path to a folder which contains digital pathology slide files.
pyportal.exe us -p [PROJECT_ID] -s [PATH_WHERE_SLIDES_ARE_LOCATED]
Here is an example run of uploading slides to the CP Portal using the PyPortal's uplad-slides functionality.
pyportal us -p 62625f998d52266f327dba7c -s ./input
INFO - PyPortal v2.23.0
INFO - Collected slides: 2
INFO - Slide 64e5a269f8f12a1f6b387208 creation was initiated.
INFO - Slide 64e5a269f8f12a1f6b387208 was added to the project: 62625f998d52266f327dba7c
INFO - Slide 64e5a269f8f12a1f6b387208 is already available, skipping.
INFO - Slide 64e5a269f8f12a1f6b387209 creation was initiated.
INFO - Slide 64e5a269f8f12a1f6b387209 has status: new.
input/pyportal_upload_test_22.tif: 100%|█████████████████████████████████████████████████| 16.3M/16.3M [04:03<00:00, 70.3kB/s]
INFO - Collected 2 slides, uploaded: 1, failed: 0, skipped: 1.
INFO - 16.3 MB uploaded in 0:04:05.414386 seconds. Speed: 0.07 MB/s.
Important!
- Please note that all files from the specified source folder will be scanned in order to upload them to the Portal.
- All files from the source folder identified to match any of the CP Portal's supported slide formats will be uploaded.
- If there are already slides with the same name and checksum in the CP Portal, they will be linked to your project and skipped.
All available options
| Argument | Required | Options (default in bold) / Usage example | Explanation | Added in version |
|---|---|---|---|---|
|
-p --project-id |
Yes | -p [PROJECT_ID] | ID of the portal project. You can find this in your browser's address bar | v2.23.0 |
|
-s --source-path |
Yes | -s ./input_folder | A path to a directory where slides are stored. | v2.23.0 |
| --config | No | C:\a_path\to\a\downloadConfig.yaml | Path to a configuration YAML file. The configuration file can be used instead of specifying options on the command line. The names of the options are the same, only with - replaced with _ in the config file. Command line arguments override config file parameters. | v2.23.0 |
|
-b --chunk_size |
No |
-b 16 -b 5 |
The size of each chunk to upload in mega bytes. Default is 5 MB. | v2.23.0 |
|
-e, --environment |
No |
-e dev -e prod |
Portal environment to use | v2.23.0 |
| --dry-run | No | --dry-run | This command will not upload any slides, instead it will print out the list of slides that would have been uploaded and which would only be linked to an already eisting slide. | v2.32.0 |
| --portal-api-key | Yes | --portal-api-key [API_KEY] | An API key that can be generated in the Portal. See this article to get more information on how to generate such a key and how to save it | v2.23.0 |
Upload raster annotations
Raster annotations are image-based annotations that can be uploaded using PyPortal's GxP-compliant CLI script. This functionality allows for bulk operations with raster annotation data, including version tracking and provenance management.
The GxP script is located in the PyPortal repository at and uses the package manager.
For TIFF format requirements and metadata specifications, see the Raster Annotations Format section.
To see all available options for the command, type:
uv run --locked gxp-scripts/pyportal-cli.py upload-raster-annotations --help
Upload process
To upload raster annotations to a project, the source directory used for the upload must contain:
- file with metadata for each annotation (see metadata requirements)
- TIFF files with the raster annotation data (see TIFF layer structure)
Basic upload command:
uv run --locked gxp-scripts/pyportal-cli.py upload-raster-annotations \
    --project-id [PROJECT_ID] \
    --ra-set-name "[ANNOTATION_SET_NAME]" \
    --source-directory [SOURCE_DIRECTORY]
Important Notes
- The TIFF files referenced in the metadata CSV must be located in the same directory as the CSV file.
- Each raster annotation is linked to a specific slide using the field.
All available options
| Argument | Required | Description |
|---|---|---|
| --project-id | Yes | ID of the portal project where raster annotations will be uploaded. You can find this in your browser's address bar |
| --ra-set-name | Yes | Name of the raster annotation set to create or update |
| --source-directory | Yes | Path to directory containing TIFF files and ra_metadata.csv |
| --experiment-name | No | Experiment name (overrides CSV value) |
| --vector-annotation-set-name | No | Vector annotation set name containing FOVs (overrides CSV value) |
| --application-id | No | Application ID for the annotation tool |
| --application-version | No | Application version for the annotation tool |
| --config | No | Path to a configuration YAML file. The configuration file can be used instead of specifying options on the command line. Command line arguments override config file parameters |
| --portal-api-key | Yes* | API key for authentication (*can also be stored in .portal_key file). See this article for more information |
Raster Annotations Format
This section describes the technical format requirements for raster annotation TIFF files and metadata.
TIFF layer structure
Raster annotation TIFF files must contain exactly 6 channels in the following order. All files must use uint32 data type with background value 0.
| Channel # | Name | Content Type | Label Values | Metadata Required |
|---|---|---|---|---|
| 1 | FOV | Binary Mask | 0 = background, 1 = FOV | No |
| 2 | Regions | Class IDs | 0 = background, 1+ = tissue classes (e.g., 1 = Epithelium, 2 = Necrosis) | Yes (Class Map) |
| 3 | Cells | Object IDs | 0 = background, 1+ = individual cells (1 = Cell 1, 2 = Cell 2, etc.) | No |
| 4 | Nuclei | Object IDs | 0 = background, 1+ = individual nuclei (1 = Nucleus 1, 2 = Nucleus 2, etc.) | No |
| 5 | Centers | Class IDs | 0 = background, 1+ = center classes (e.g., 1 = Cell-Center, 2 = Nucleus-Center) | Yes (Class Map) |
| 6 | Exclusions | Class IDs | 0 = background, 1+ = exclusion classes (e.g., 1 = Artifact, 2 = Artifact-Blur) | Yes (Class Map) |
Critical Requirements
- All six channels must exist, even if they only contain zeros (background)
- Label values must be positive integers or zero (background only)
- FOV layer must contain only binary values (0 or 1)
- Class maps (in CSV column) must map all non-zero label values to a class name and display color
- Nuclei labels are independent from Cells labels (no required relationship)
Validation Rules
The TIFF data must satisfy these constraints:
- Cells or Nuclei labels are not split into multiple disconnected components
- Cells labels do not extend outside the Regions mask
- Nuclei labels do not extend over more than one Cells label
- Each Cells label has exactly one corresponding Centers label
Important: Any raster annotation data must follow this format. If it does not, there is no guarantee that the data will work with ODSP tools. Use only tools or pipelines provided by ODSP for creating raster annotation data.
Reference: Raster Annotation Format Documentation
Metadata requirements
The file must contain the following columns. The source directory should also contain the TIFF files referenced by .
Critical
- The must match the exact value from the Portal API
Required columns (cannot be empty):
| Column Name | Description | Example |
|---|---|---|
| slide_stem | Must match the exact fileName value from the Portal API for the slide | full_slide |
| vector_annotation_set_name | Name of the vector annotation set containing FOV/ROI annotations | FOV Set |
| raster_annotation_set_name | Name of the raster annotation set to create/update | Tissue Analysis |
| raster_annotation_set_experiment_name | Experiment name for the raster annotation set | Experiment 1 |
| x, y, width, height | Window coordinates (integers, in pixels) - defines spatial location on slide | 3566, 1960, 512, 512 |
| raster_annotation_filename | Path to the TIFF file (relative to source directory) | Cam_175927_x3566_y1960.tif |
| model_type | Annotation model type | "art", "sstc", or empty/null |
Conditionally required columns:
| Column Name | When Required | Description |
|---|---|---|
| image_metadata | If TIFF has non-zero values in Regions/Centers/Exclusions channels | Python dictionary string with class maps for annotation channels |
Optional columns:
- - Workflow status: "toAnnotate", "toReview", "accepted", etc.
- - Human-readable description of the set
- - Description of the experiment
Example value:
{'Regions': {'class_map': {'1': {'name': 'Tumor', 'color': '0xa31ae5'}}}}
GxP Script Setup
For information on installing the UV package manager and understanding GxP compliance features, see the Get PyPortal section above.