 Frequently Asked Questions (FAQ)
Click on a question to expand its answer.
You can access the CP Portal (AstraZeneca) using the following link: CP Portal.
You can access the CP Portal (Definiens) using the following link: CP Portal.
If you are an AstraZeneca user you can simply log in using your AZ single sign-on (SSO) credentials and start using CP Portal right away.
For users external to AZ (CROs, academic collaborators, partners, vendors, etc.) you need someone from AstraZeneca to request an account to be created for you, before you can log in and use the CP Portal.
To request an account to be created for an external user, please follow the steps in the FAQ below "How to I request to add an external user to the CP Portal?".
You can write a message in the Send a message in the Teams channel: Dictionaries and answer the following question:
Alternatively, you can send an email to DEMU_ProductManagement@astrazeneca.com and answer the following question:
- What is the new term?
- Explanation of the requested term.
Process description:
- In case of the Team channel, Data governance team will manage the discussion
- In case of the Team channel, SData governance will reach out with information to the PO
- PO will contact the responsible team for approval, if not already provided
- PO creates an item in backlog
- Team will implement the requested change
- PO informs the user
- PO informs the IODA team to make new markers available in IODA
Email the CP Portal Support team and answer the following question:
- What is the Email address of the external user?
- What is the End date of access for the external user to the CP Portal?
The Support team will take care of account creation and inform the external user about the login information.
Yes, there is! Slides should be converted. Email the CP Portal Support team and answer the following question:
- What is the project in which slides should be converted?
The Support team will inform the CP Portal team who will trigger the slide conversion. Once the process is done, the user will be notified
Email to DEMU_ProductManagement@astrazeneca.com and answer the following question:
- Which indication or indication subtype should be added?
- Why is it needed?
- When is the new class required?
Process description:
- Responsible team will review and approve or reject the request
- PO creates an item in backlog
- Team will implement the requested change
- PO informs the user
- PO will update the indication and indication subtype overview pages: Indication, Indication Subtype
Email to DEMU_ProductManagement@astrazeneca.com and answer the following question:
- Which type of annotation should be added?
- Why is it needed?
- Is the new class aligned with the IODA and drcs dictionary? See the IODA dictionary overview for details
Process description:
- PO will contact the responsible team for approval
- PO creates an item in backlog
- Team will implement the requested change
- PO informs the user
- Responsible team will update the annotation overview page: What are the supported region annotation classes?
Send a message in the Teams channel: Dictionaries and answer the following question:
- Which class, feature/object variable be added and why is it needed?
- When is the new entry required?
- Does this entry have to be added also to other dictionaries (e.g. annotation classes, readouts, ...)?
Process description:
- Responsible team will review and approve or reject the request
- PO creates an item in IODA backlog
- Team will implement the requested change
- PO informs the user
- Responsible team will update the IODA dictionary page, if needed and ensure that changes are propagated to other dictionaries
For a detailed description on the Data Ownership process, roles, and responsibilities, please see here.
To request a Data ownership role or to have a project marked as a Home project:
-
Please write to DEMU_ProductManagement@astrazeneca.com
-
and indicate:
- The user who should be assigned the role, or
- The project which should be assigned the Home project status, and
- The reason (project) why you need these privileges
- PO will inform Portal data admins
- Portal data admins will then assign the right permissions in the CP Portal
- Portal data admins will inform the user
To delete a project:
- The Project admin or the Project data owner adds "TODELETE_" in front of the project name
-
Write a ticket to the Support team, and indicate:
- the URL of the project
- if all project related data should also be removed (annotations, DRCs etc.)
- Support will remove you from the project and dev teams schedule a deletion at a later time point
The complete list of supported Region annotation classes can be found here: Region annotation classes.
The complete list of supported Region annotation classes can be found here: CMA classes.
You can find the controlled vocabularies for the Portal here: Metadata Table: Data dictionary.
Click on the blue entry in the list to lear more about the allowed entries.
Note: Slides deleted in the last 60 days can be restored. If the slides have been deleted more than 60 days ago, they are permanently deleted and cannot be restored.
If you have accidentally deleted slides from a project and you would like them restored, please contact the Support team.
Please provide the ID of the project from which slides were deleted, to the Support team. They will be able to help and guide you from there.
You can find an extensive list of computational pathology tools and applications here.
Protocols from Cambridge TransPath Lab
Point of Contact: DEMU_ProductManagement@astrazeneca.com.
- If you want to know more information about a protocol from an assay performed in Cambridge Trans Path lab, Covance, or Akoya please follow the link to Assay protocol.
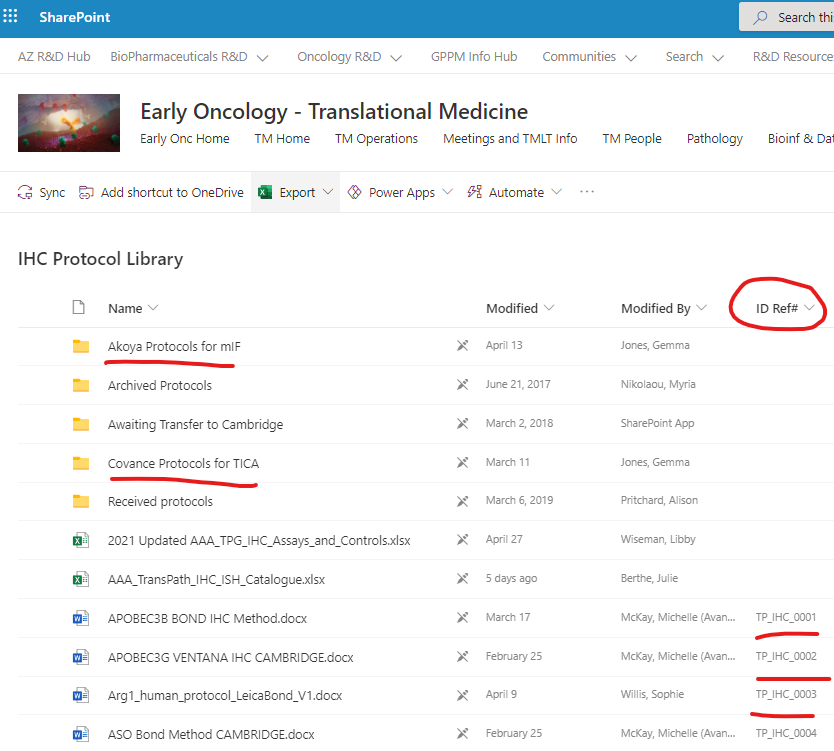
- You will land in the Translational Pathology SharePoint Site for IHC Protocol Library. There:
- You can find a specific protocol searching by the unique ID reference number (ID Ref #)
- You can find Covance protocols in the "Covance Protocols for TICA" folder
- You can find Akoya protocols in the "Akoya Protocols for mIF" folder
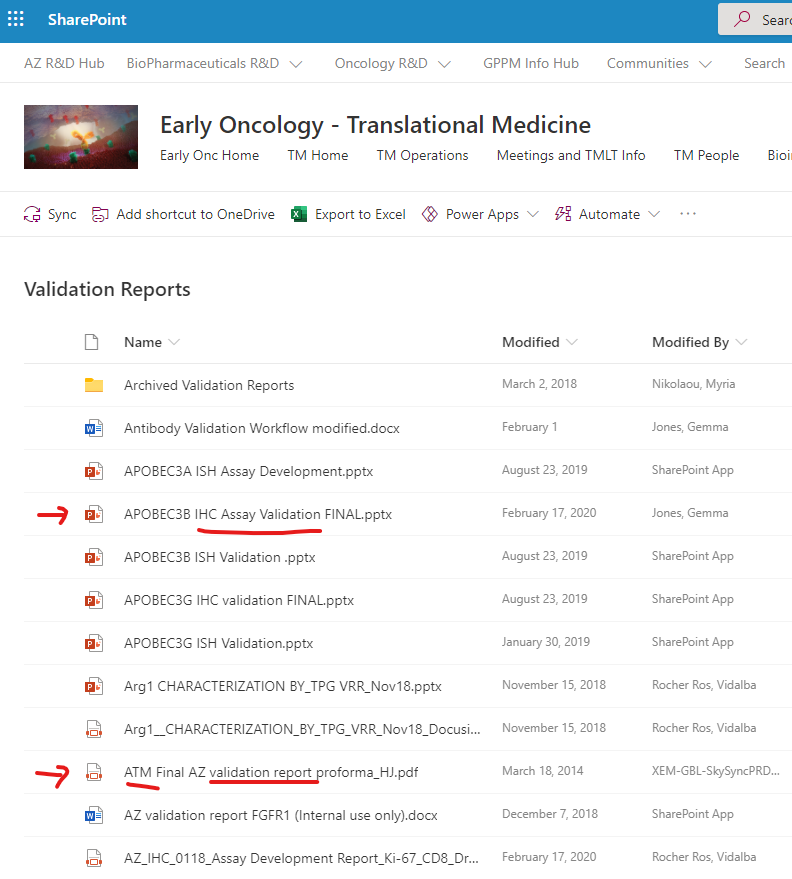
- If you want to understand how those assays were validated, please follow the link to Validation reports.
- You will land in the Translational Pathology SharePoint Site (see snapshot below) for Validation Reports. There:
- You can find a specific validation report for an assay searching by the assay name
Protocols from CPSS
Point of Contact: DEMU_ProductManagement@astrazeneca.com.
-
If you want to know more information about a protocol from an assay performed in CPSS:
- Check the excel list below to find the reference ID for your assay of interest
- Use the contact from above and they will email you the requested protocol
-
List of protocols
ID Prefix ID# (XXXXX) Name Instrument PM_LS 00029 CD28(DAB).pdf Leica Bond PM_DM 00001 CD3(Pu)+CD68(DAB)+CK(Yel).pdf Ventana Discovery PM_DM 00013 CD3(Pu)+CD68(Yel).docx Ventana Discovery PM_DM 00008 CD3(Pu)+Ki67(Yel).pdf Ventana Discovery PM_DS 00018 CD34 (DAB).docx Ventana Discovery PM_LS 00012 CD39 (br).pdf Leica Bond PM_DS 00040 CD39.pdf Ventana Discovery PM_DS 00019 CD4 (DAB).docx Ventana Discovery PM_DS 00020 CD40 (DAB).docx Ventana Discovery PM_DS 00021 CD56 (DAB).docx Leica Bond PM_DS 00022 CD56 (Pu).docx Ventana Discovery PM_DS 00023 CD73 (DAB).docx Ventana Discovery PM_DS 00014 CD8 (SP239).docx Ventana Discovery PM_DM 00002 CD8(DAB)+FoxP3(Pu).pdf Ventana Discovery PM_DM 00003 CD8(Pu)+FoxP3(DAB)+CK(Yel).pdf Ventana Discovery PM_DM 00028 CTLA4(Pu)+FoxP3(Yel).pdf Ventana Discovery PM_DS 00010 CXCL9 (Pu).pdf Ventana Discovery PM_DM 00006 CXCL9(Pu)+CD8(DAB).pdf Ventana Discovery PM_LS 00036 EGFR (DAB).pdf Leica Bond PM_DM 00015 GITR(Pu)+FoxP3(DAB)+CK(Yel).docx Ventana Discovery PM_DS 00016 Granzyme B (DAB).docx Ventana Discovery PM_DS 00017 Granzyme B (Purple).pdf Ventana Discovery PM_LS 00030 IL-33.Nessy-1(DAB).pdf Leica Bond PM_DM 00009 Lag3(Pu)+CXCL9(DAB).pdf Ventana Discovery PM_LM 00007 Lag3(Red)+PDL1(DAB).pdf Leica Bond PM_DS 00033 MBP Assay Transfer Form signed.pdf Ventana Discovery PM_LS 00027 NKp46 Final Assay.pdf Leica Bond PM_LM 00038 NKp46(br)+CD20(red).pdf Leica Bond PM_DM 00025 OX40 (DAB)+FoxP3 (Pu).pdf Ventana Discovery PM_LS 00026 p16 DAB Protocol Form.pdf Leica Bond A_Procedure 1 Pathology Method numbering convention_work instruction.docx Combo PM_LM 00004 PD1(DAB)+PDL1(Pu).docx Combo PM_DS 00011 Perforin (Pu).pdf Ventana Discovery PM_DS 00005 pHH3 (DAB).pdf Ventana Discovery PM_VS 00041 TROP2(DAB).docx Ventana Discovery PM_BS 00024 V-PD-L1(SP263) Benchmark Protocol #15.pdf Ventana Benchmark
You can download the List of assays by method ID, from 04.23.21 (Excel file).
Slides have different status depending on where they are in the upload pipeline process.
| Slide status | Slide viewable | Explanation |
|---|---|---|
| new | no | This slide is in the upload queue but not in the system yet. |
| uploaded | no | This slide is in the system and will be processed for viewing. |
| available | yes | This slide is available for viewing. |
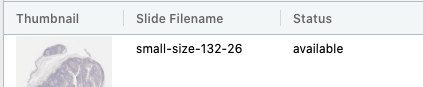
Image: Slide status after upload
If the slide status is available for longer than 10 minutes and you cannot view the slide in the viewer, please email the Support team and submit the URL from the project page.
Please use Google Chrome on Windows 10 or later. While different browser and operating systems may work, we cannot guarantee that all feature will work as intended in any other browser or operating system.
Background information
- Images of large size (e.g. 10'000 x 10'000 pixels and larger) can be very slow to visualize in any viewer if they don't incorporate optimized representation (tiled storage of pixel data and downscaled overlays or pyramids). The CP Portal is not an exception - if you upload such image it will be not possible to visualize it completely on the screen (with e.g. 5% scale from origin) in reasonable time (e.g. faster than 10 seconds). It is good to make sure that TIFF files you are uploading are fitting these requirements (tiles + pyramids), especially if these files are created by you or be someone who can alter the process of image creation. In this article there are 2 sections:
- how can you check that a TIFF file has necessary data (and in a right form)
- what can you do to make sure created images are having right structure
- what can you do to improve existing TIFF files
How can you check that a TIFF file has necessary data (and in a right form)
- On high level - you can use various software utilities that will check format and metadata for your review. There are plenty of tools that might help with this:
- identify (from imagemagick tool)
- gdalinfo (from GDAL package)
- some other tools could be used (e.g. QuPath tool allows to open TIF files and shows in the metadata were pyramids taken from a file or are generated on-the-fly by slowing down the viewing process)
Example of use
-
Image Magick identify tool, to get information about the file, make sure you have the tool installed and then run from the CLI:
$ magick identify a-file-name.tif
...
Example use of identify for an image file with 4 overlays (pyramids).
A GOOD image: pay attention that dimensions of every next level is continuously decreasing (it could be by 2 or by 4 or by other factor).
$ magick identify image-file-xyz.tiff
image-file-xyz.tiff[0] TIFF 1024x1024 1024x1024+0+0 16-bit Grayscale DirectClass 42.7KB 0.000u 0:00.000
image-file-xyz.tiff[1] TIFF 512x512 512x512+0+0 16-bit Grayscale DirectClass 42.7KB 0.000u 0:00.000
image-file-xyz.tiff[2] TIFF 256x256 256x256+0+0 16-bit Grayscale DirectClass 42.7KB 0.000u 0:00.000
image-file-xyz.tiff[3] TIFF 128x128 128x128+0+0 16-bit Grayscale DirectClass 42.7KB 0.000u 0:00.000
image-file-xyz.tiff[4] TIFF 64x64 64x64+0+0 16-bit Grayscale DirectClass 42.7KB 0.000u 0:00.000
A SLOW image: notice that it is shown only 1 image layer of large dimensions 31042 𐄂 22080 pixels:
$ magick identify image-file-no-pyramids.tiff
image-file-no-pyramids.tiff TIFF 31042x22080 31042x22080+0+0 8-bit sRGB 311.80MiB 0.000u 0:00.000
-
GDAL gdalinfo tool, to get information about the file, make sure you have the tool installed and then run from the CLI:
$ gdalinfo a-file-name.tif
Example use of gdalinfo for an image file with 4 overlays (pyramids).
A GOOD image: pay attention that there are many sub-datasets of various dimensions:
$ gdalinfo image-file-good.tiff
...
...
Subdatasets:
	SUBDATASET_1_NAME=GTIFF_DIR:1:image-file-good.tiff
	SUBDATASET_1_DESC=Page 1 (24960P x 34560L x 1B)
	SUBDATASET_2_NAME=GTIFF_DIR:2:image-file-good.tiff
	SUBDATASET_2_DESC=Page 2 (12480P x 17280L x 1B)
	SUBDATASET_3_NAME=GTIFF_DIR:3:image-file-good.tiff
	SUBDATASET_3_DESC=Page 3 (6240P x 8640L x 1B)
	SUBDATASET_4_NAME=GTIFF_DIR:4:image-file-good.tiff
	SUBDATASET_4_DESC=Page 4 (3120P x 4320L x 1B)
	SUBDATASET_5_NAME=GTIFF_DIR:5:image-file-good.tiff
	SUBDATASET_5_DESC=Page 5 (1560P x 2160L x 1B)
	SUBDATASET_6_NAME=GTIFF_DIR:6:image-file-good.tiff
	SUBDATASET_6_DESC=Page 6 (780P x 1080L x 1B)
	SUBDATASET_7_NAME=GTIFF_DIR:7:image-file-good.tiff
	SUBDATASET_7_DESC=Page 7 (390P x 540L x 1B)
	SUBDATASET_8_NAME=GTIFF_DIR:8:image-file-good.tiff
	SUBDATASET_8_DESC=Page 8 (195P x 270L x 1B)
	SUBDATASET_9_NAME=GTIFF_DIR:9:image-file-good.tiff
	SUBDATASET_9_DESC=Page 9 (97P x 135L x 1B)
	SUBDATASET_10_NAME=GTIFF_DIR:10:image-file-good.tiff
	...
	...
A SLOW to read image: there are no sub-datasets, so entire image is stored as an image without overlays on higher levels:
$ gdalinfo image-file-no-pyramids.tiff
Driver: GTiff/GeoTIFF
Files: image-file-no-pyramids.tiff
Size is 31042, 22080
Metadata:
	TIFFTAG_RESOLUTIONUNIT=2 (pixels/inch)
	TIFFTAG_XRESOLUTION=72
	TIFFTAG_YRESOLUTION=72
Image Structure Metadata:
	COMPRESSION=LZW
	INTERLEAVE=PIXEL
	PREDICTOR=2
Corner Coordinates:
Upper Left  (     0.0,     0.0)
Lower Left  (     0.0, 22080.0)
Upper Right ( 31042.0,     0.0)
Lower Right ( 31042.0, 22080.0)
Center      ( 15521.0, 11040.0)
Band 1 Block=2048x1 Type=Byte, ColorInterp=Red
Band 2 Block=2048x1 Type=Byte, ColorInterp=Green
Band 3 Block=2048x1 Type=Byte, ColorInterp=Blue
What can you do to make sure created images are having right structure
- On a high level - make sure that written TIFF image has overviews (pyramids) inside. Concrete solution depends on a library, tool or software you are using to generate TIFF images. Some approaches will require adding special set of steps to generate each level separately per channel, some other will allow to use a simplified approach (when lib will come with most reasonable strategy for pyramids). For example if you are using GDAL library to write TIFF images
-
For Python make (at the end of writing of all data to the image) an additional call to BuildOverviews method:
# Python

image = gdal.Open(....)

# at this step write the data into image
gdal.SetConfigOption('COMPRESS_OVERVIEW', 'DEFLATE') # other compression options are also available
image.BuildOverviews('NEAREST', [4, 8, 16, 32, 64, 128], gdal.TermProgress_nocb) # will take quite some time, will add all pyramids of specified scale

del image  # close the image (flush)
-
For C++ you can use the BuildOverviews function from GDALDataset (it is same to what Python is doing above).
// create a dataset (image)
GDALDataset* poDataset = ...

// at this step write data into the dataset (via bands,...)

// generate pyramids
int anOverviewList[3] = { 2, 4, 8 };
poDataset->BuildOverviews( "NEAREST", 3, anOverviewList, 0, nullptr, GDALDummyProgress, nullptr);

// close the dataset
...
What can you do to improve existing TIF files
- What if you have 1 or 100 TIF files that were already generated, you don't want to regenerate them and be able to use them efficiently?
-
Solution will be to add overlays (pyramids) to the file. This you can do in various ways, one most easiest one is to use the gdaladdo tool.
$ gdaladdo -r average a-file-to-be-improved.tiff
0...10...20...30...40...50...60...70...80...90...100 - done.

It will update the file (recreate it) and extend with required pyramids (with zoom levels automatically calculated, see also parameter to the gdaladdo tool for more precise control).