Create an annotation set
To create a new annotation set:
- Open the slide in the slide viewer
- Click the button in the lower left corner, if the slide list panel is not already visible
- Click on the tab
- Click the (more options) button
- In the pop-up menu click on the option
- In the pop-up dialog, type in a name for the annotation set
- Click the button
- The new set is created and automatically selected in the Annotation set selection menu
Tip: Naming a new annotation set
- For naming conventions regarding annotation set names visit this page.
Video: Creating a new annotation set
Select an annotation set
In order to start annotating, an annotation set needs to be selected first.
Only then, the annotation tools will become visible in the slide viewer control bar.
All annotations will be added to the currently active set.
To select an annotation set and start using the annotation tools:
- Open the slide in the slide viewer
- Click the button in the lower left corner, if the slide list panel is not already visible
- Click on the tab
- Select an annotation set from the drop-down
- The annotation tools will appear in the slide viewer control bar
Video: Selecting an exsiting annotation set
Draw a polygon
To draw a polygon:
- Click on the polygon tool
- Click on the collapsed class panel
- Select an annotation class for drawing
- Start drawing
Video: Drawing a polygon annotation
All closed polygon annotation, except for field of view (FOV) class type, can display a total surface area of that annotation upon drawing. Labels are hidden by default. You can toggle label visibility by toggling the button in the control bar at the bottom of the image viewer, or using the keyboard shortcuts.
Inner area of all closed polygon annotation, except for field of view (FOV) class type, will now be filled in. This helps distinguish areas that belong to an annotation. FOV annotations will still be fully transparent for an easier annotating.
You can turn the fill off, or change it's transparency level using the Display tools panel. The settings are remembered per user per session, so if you close the browser and come back to CP Portal, settings are reset to default.
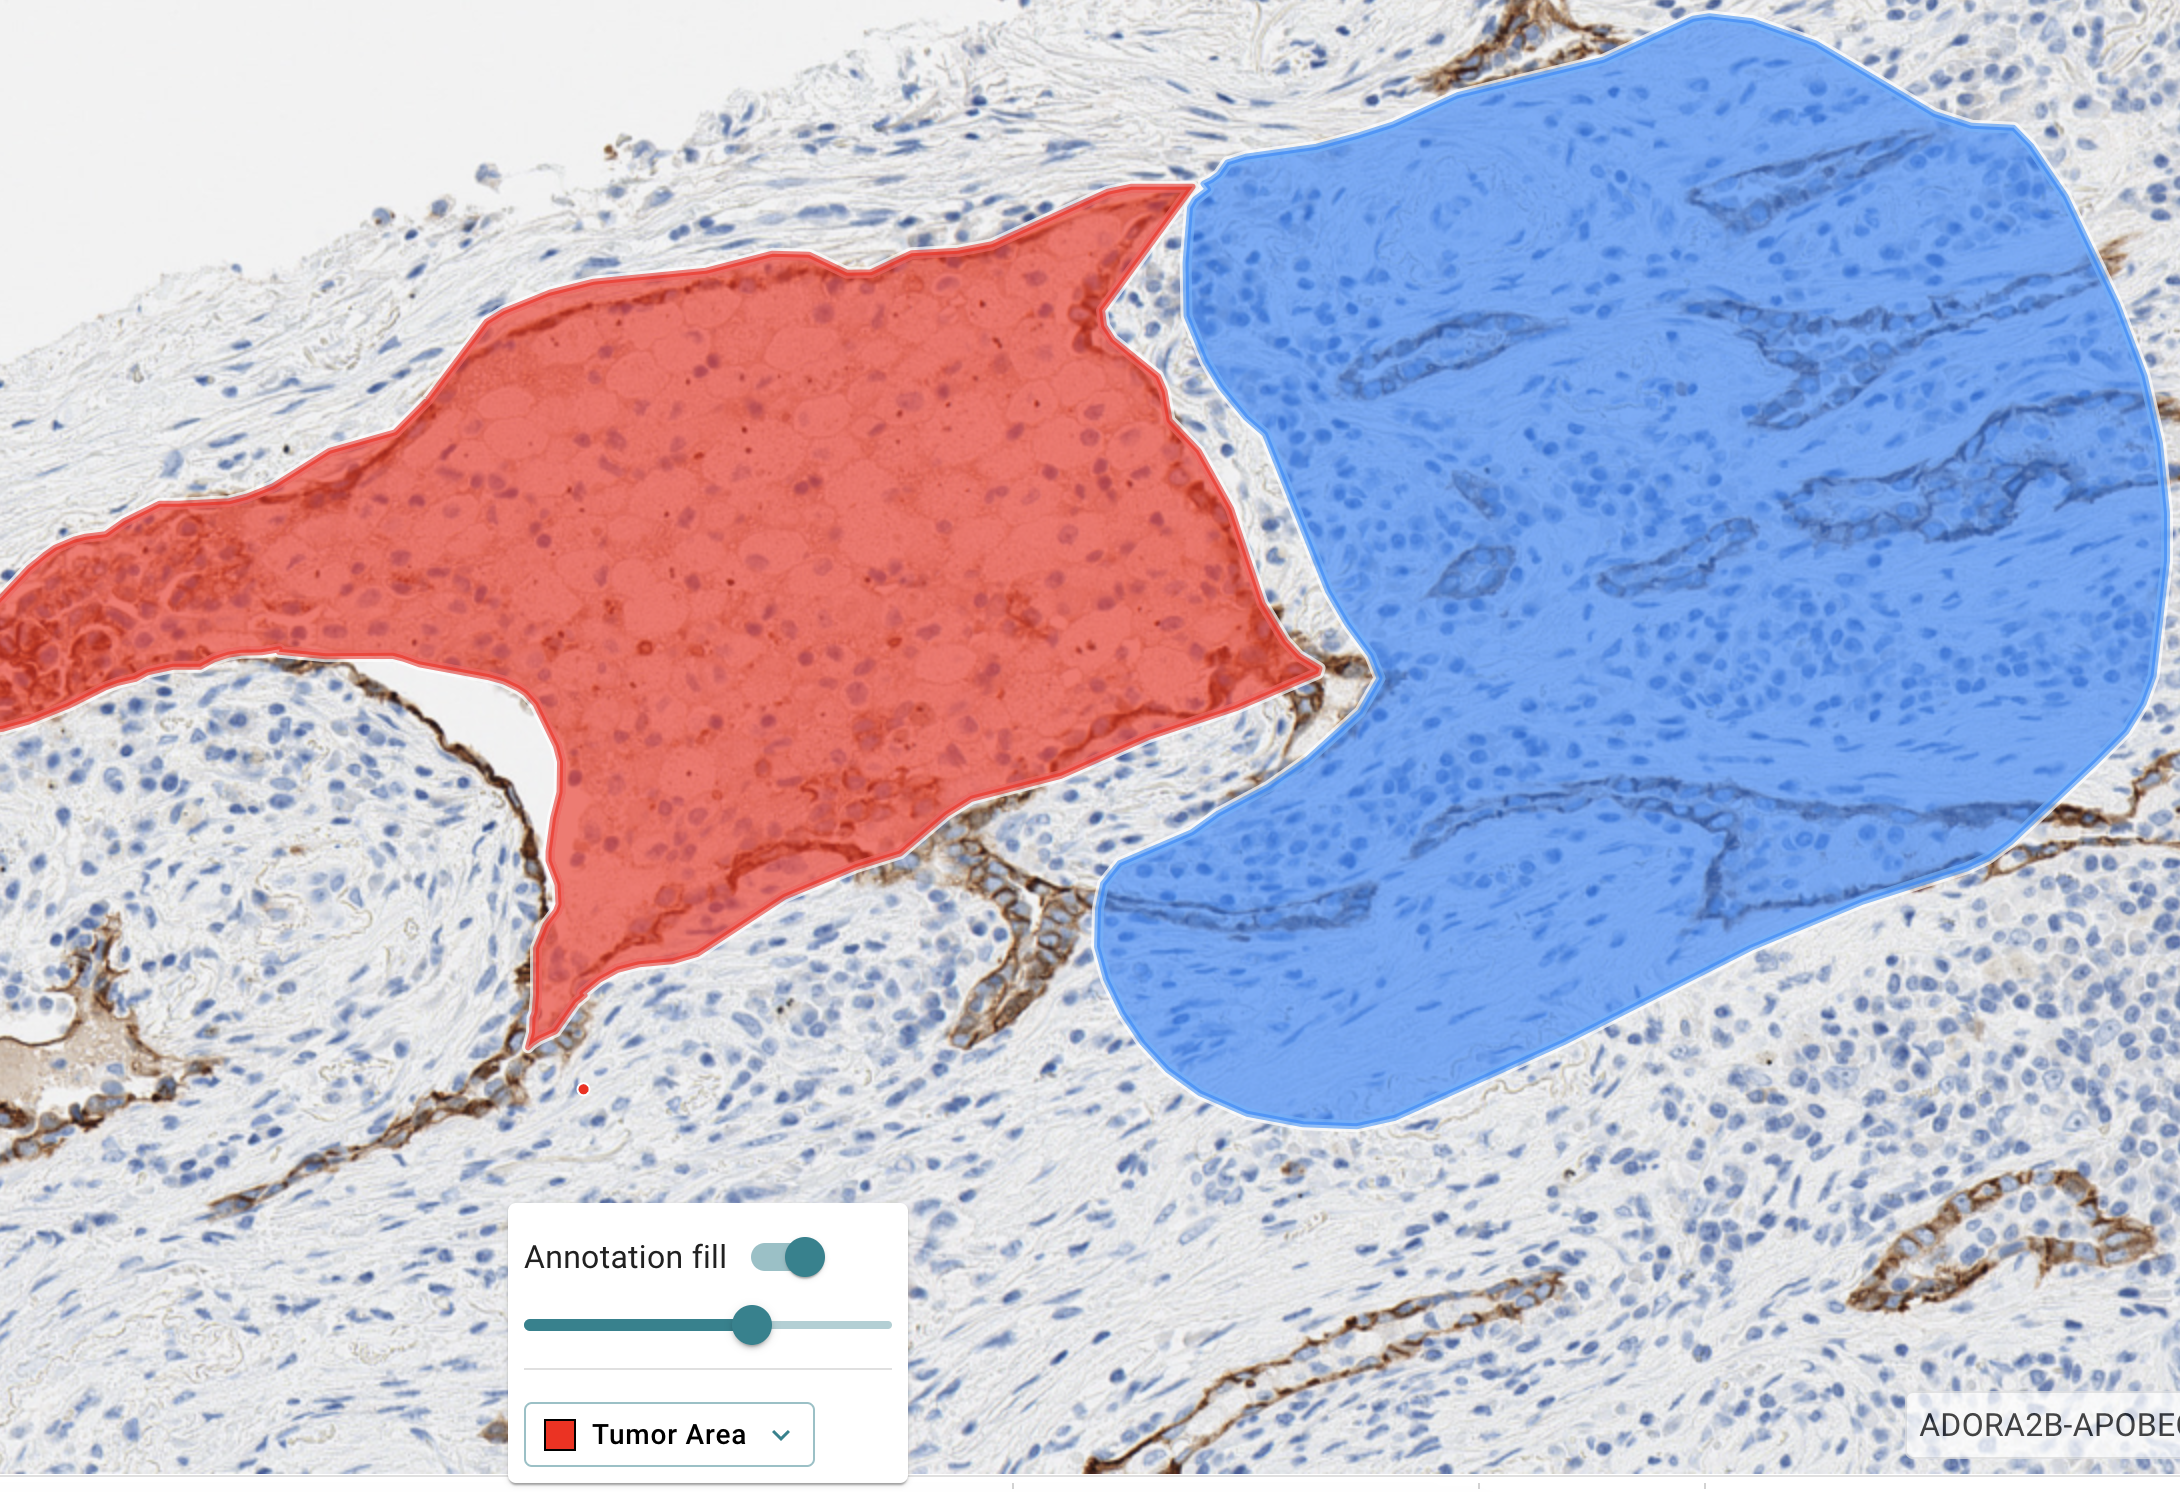
Image: Closed region annotation's inner area filled in
In the region annotation panel, each region annotation has an index assigned to it and is shown as part of the annotation name. Index is unique per combination of the Annotation Set together with the annotation class.
Index is an auto-incremented, auto-assigned integer, starting from 1. If an annotation is deleted, the index is skipped for all future annotations, and the "counting" continues from the last index. There is no re-using of used indexes per Annotation Set&Class combination. Indexes will be written in the annotation XML, when exporting annotations using PyPortal.
Tip: Panning while drawing polygons
- While the polygon tool is active, you can pan the image by pressing the key and primary mouse button.
Draw a circle or square annotation
To draw a circle or a square polygon:
- Click on the square tool. It will turn blue
- Select circle or square shape from the panel
- Enter a diameter of side length
- Select annotation class
- Place the shape on the image by pushing the primary mouse button
- When you are done drawing, de-activate the square tool by clicking on the tool symbol. It will turn grey
Video: Drawing FOV (field of view) square and circle annotations
Draw a line with the polygon tool
To draw a line:
- Click on the polygon tool. It will turn blue
- Select an annotation class for drawing
- On the region where you want to draw the line, push the primary mouse button down
- Push the key down and keep it pressed while also keeping the primary mouse button pressed
- Draw the line with the mouse
- Release the key
- Release the primary mouse button
Measure distance
To measure the distance between two points on a slide:
- Click on the Ruler tool. It will turn blue
- Click on the slide where you want to start your measurement (first point)
- Click on the slide where you want to end your measurement (second point)
The CP Portal will automatically draw a line connecting the two points and will display the distance between them.
Video: Measuring a distance between two points
Tip: Change a distance measurement
- After you have measured a distance, you can click-and-drag the end points of the distance measurement line to edit and change that measurement
Video: Correcting an existing distance measurement
Correct an annotation
Follow these steps to correct a polygon:
- Click on the polygon tool to activate it. It will turn blue
- Hover with the mouse over the outline you want to correct
- A dot and a circle around it will appear
- Press the primary mouse button and redraw the outline
- When you are done correcting, de-activate the polygon tool by clicking on the symbol. It will turn grey
Errors in annotations
The system automatically looks for errors in annotations when you open an annoation set or create a new annotation. If an error is found, it is highlighted with a red circle.
Following error types can be detected:
- Double coordinates (having the same coordinate twice)
- Sticks (line like spikes in the annotation boarder)
- Self-intersections
- Line annotations/polygons that are not closed (unless for the class Invasive Margin line annotation are highlighted as errors)

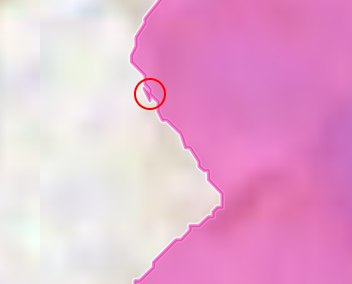
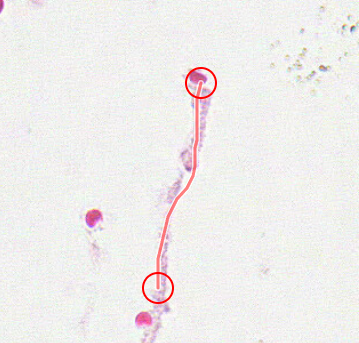
Image: Example of annoation errors: Sticks, self-intersection, open polygon (from left to right)
You can fix errors in annoations manually using the polygon tool, or fix them automatically. To fix errors automatically, open “Set actions” above the Annotation Set selection and choose “Fix Annotations”

Image: Fix annotation option in annoation set action menu
Check after fix annotations
- The algorithm fixes all errors. This changes the annotations. Therefore, it is advised to check the annotations after they are fixed.
Delete annotations with keyboard
To delete a single annotation:
- While all drawing tools are inactive, select the annotation with the mouse
- It will get highlighted
- Press the key on your keyboard
To delete multiple annotations:
- While all drawing tools are inactive, press the key and draw a section rectangle over the annotations your want to multi-select
- When you release the mouse button, selected annotations are highlighted
- Press the key on your keyboard
Change the annotation class
To reclasiffy an annotation class:
- On the slide, select an annotation with the mouse
- It will get highlighted
- You can also change multiple annotations at once
- Press the key and draw a selection rectangle over the annotations your want to multi-select
- Right click and select another annotation class from the context menu
Alternatively, you can reclassify annotation class:
- Check one or multiple annotations you want to change in the annotation table in the side panel
- They will get highlighted
- Click on the 3 dots (more options) next to the region annotations table
- Select from the context menu
- Select another annotation class from the context menu
Please note that reclassifying FOV annotations is not allowed and is disabled.
Locking and unlocking of vector annotations
To lock or unlock an annotation right click on the annotation and select or respectively.
Locking a vector annotation other than FOV or ROI has the following consequences:
- The annotation can no longer be changed with the drawing tool
- The annotation can no longer be manipulated with the movement tool
- The annotation can no longer be reclassified
- The annoation can no longer be deleted
Locking a FOV has the following consequences:
- The annotation can no longer be manipulated with the movement tool
Special properties of FOVs
- FOVs lock themselves after 5min. They can be unlocked again any time, unless raster annotations were created based in the FOV, which will lock them permanently.
- FOVs can't be changed with the drawing tool and can't be reclassified.
- Locked FOVs can be deleted, however this step requires a confirmation through a dialogue.
Transform a region annotation
When you activate the transform tool, you can click on any annotation to select it. The annotation will get highlighted and surrounded by a rectangle shape. You can also multi-select several annotations with the SHIFT key.
With this rectangle, you can transform the annotations:
- Rotate
- Shrink
- Expand
- Move
Video: Transforming annotations
Undo and Redo annotation actions
With the undo and redo buttons, you can undo/redo up to 150 annotation steps.
Current session only
- Your annotation actions can only be undone/redone as long as you stay in the current annotation set and session
Keyboard shortcuts in image viewer
The following shortcuts are available while working in the Image viewer.
| Action | PC | Mac | Comment |
|---|---|---|---|
| Hide all annotations | ALT + a | Option + a | This includes cell marker annotations, region annotations, and distance measurements. |
| Hide all labels | ALT + s | Option + s | This will hide all labels of the ruler measurements and of the annotation surface areas. |
| Hide all results | ALT + r | Option + r | This will hide the entire DRC results overlay. |
| Panning slide while drawing tool is active | ALT + mouse move | Option + mouse move | While you are still in the drawing mode, press Alt to move the slide. Stop pressing Alt and you can continue drawing. |
| Rotate slide | ALT + SHIFT + mouse move | Option + SHIFT + mouse move | This will rotate the entire slide with all its associated annotations and results. |
| Draw a line with polygon tool | SHIFT + mouse | SHIFT + mouse | Start drawing and then press Shift. To draw a line, keep Shift pressed until you release the left mouse button. |
| Select multiple annotations (one by one) | CONTROL + mouse click | COMMAND + mouse click | To keep adding specific polygons to already selected polygons, press the Control or Command key and click on the specific polygon with your left mouse button |
| Select multiple annotations (selection rectangle) | SHIFT + mouse move | SHIFT + mouse move | While all drawing tools are inactive, press the Shift key and draw a rectangular shape over the annotations you want to multi-select |
| Delete selected annotation | DELETE | FN + backspace | Select annotations you want to delete and then press the DELETE or FN + backspace keys |
| Cell marker shortcuts | Can be set by user, any key | Can be set by user, any key | You can set a separate key for each individual class and score in the CMA panel |
Create a cell marker
To place a cell marker annotation on a slide:
- Click on the Cell Marker Annotation tool (the target icon)
- Click on the button
- Select a cell marker class you wish to place on the slide, from the list of supported classes
- Add multiple markers you need, by repeating steps 2 and 3
- From the list of selected classes, choose 1 class to place it on the slide
- Select the rating mode you want to use: Rating or Intensity score
-
Select the rating or intensity score you want to apply
- You can select a positive (+), negative (-), or an ambiguous (?) rating
- You can select a 0, 1+, 2+, or 3+ intensity score
- Start placing cell marker annotations by left-clicking on the desired positions on the slide
Video: Place CMAs on a slide
Add multiple cell markers to one cell
To place multiple cell marker annotation on the same cell:
- Click on the Cell Marker Annotation tool (the target icon)
- Click on the button
- Select a cell marker class you wish to place on the slide, from the list of supported classes
- Add multiple markers you need, by repeating steps 2 and 3
- From the list of selected classes, choose 1 class to place it on the slide
- Select the rating mode you want to use: Rating or Intensity score
-
Select the rating or intensity score you want to apply
- You can select a positive (+), negative (-), or an ambiguous (?) rating
- You can select a 0, 1+, 2+, or 3+ intensity score
- Place a cell marker annotations by left-clicking on the desired positions on the slide
- Select a second marker you want to place on the slide
- Select the rating you want to apply
- Place a cell marker by clicking on the previously placed cell marker of a different class
Video: Place multiple CMAs on the same cell on a slide
Delete a cell marker
To delete a cell marker:
- Click on the Cell Marker Annotation tool (the target icon)
- Click on the button
- Select the class of the cell marker you wish to delete
- From the list of selected classes, choose 1 class to place it on the slide
- Using the same class, click on the marker you wish to delete
Tip: Rating mode makes no difference
- Rating mode does not make any difference when deleting cell markers, as long you are using the same class as the one of the marker you are deleting.
Video: Delete CMAs from a slide
Tip: Cell marker clicks
- When clicking on an existing marker with the same class as the one marker already has, that class will be removed from the clicked cell marker
- When clicking on an existing marker with a different class than the one already placed on the cell, that classes will be added to the existing marker
Video: Multiple clicks with CMA tool
Annotation versions
All annotation changes are cpatured as separate version. To open a versions overview:
- Open an annotation set in an image viewer
- Click on the (three dots above annotation set selection)
- Click on the option
This will open the Versions dialog in the image viewer, where you can select an annotation version.
You can check the version differences visually in the image viewer, and you can choose which version you wish to download. Selecting a version from the version drop-down list, will display that version in the image viewer, in a non-editable (view-only) mode. Selecting a different version from the drop-down list, will change the displayed version in the image viewer.
To download a particular version, select the version from the drop-down list and click on the button. This will generate a job in the jobs panel. From the jobs panel you can download the prepared XML, as well as the log of the requested job.
Link annotation set
It is possible to share annotation sets across multiple projects if these projects share the slide the annotation set is created on. This functionality is called linked annotation.
If the annotations within a linked annotation set is changed in any project, these changes are available in all other projects as well.
To link an annotation set to another project it is necessary that
- The slide the annotation set is created on is part of the target project
- The user has writing rights in the source project and the target project
- The target project has no annotation set created on the same slide with the same name
To link an annotation set:
- Open the slide in the slide viewer
- Click the Show slide list button in the lower left corner, if the slide list panel is not already visible
- Click on the Annotations tab
- Create a new or open an existing annotation set that you want to link
- Click the more menu button
- In the pop-up menu click on the Link set... option
- In the Select project window check the box of all projects you want to link the annotation set to
- Click the Next button in the lower right corner of the window
- Click the Finish button in the lower right corner of the window
- The annotation set is now linked to the selected projects. A small chain icon next to the annotation set name shows that the annotation set is linked to other projects
To unlink an annotation set you can follow the same steps, but uncheck the boxes at the respective projects. Note, that if an annotation set is unlinked from a project, it is deleted from that project.
It is not possible to unlink an annotation set from all projects. It needs to be part of at least one project.
Create polygons with Segment Anything
Segment Anything AI model is able to suggest annotations to the user.
The suggestion is based on the currently selected view on the slide and can be manipulated by the user through drawing a bounding box and through adding positive and negative markers.
To create an annotation with the Segment Anything Tool:
- Open the slide in the slide viewer
- Click the Show slide list button in the lower left corner, if the slide list panel is not already visible
- Click on the Annotations tab
- Create a new or open an existing annotation set
- Click on Toggle SAM panel (stars icon) in the tool bar below the slide
- In the SAM panel select one of the three tools and the annotation class
- Start placing positive or negative markers and/or a bounding box in the relevant area of the annotation
- See the blue overlay on the slide which is the current suggestion of the model
- Add additional positive or negative markers until the suggestion is satisfying
- Click accept to transfer the suggestion into a polygon annotation
- Leave the polygon as is or use the drawing panel to further manipulate the polygon (see Correct an annotation)
Note: Zooming is not possible while the SAM panel is activated, because the currently selected view on the slide is provided to the model as input. If you need to change the view on the slide turn the SAM panel off adjust your zoom and view on the slide and activate the SAM panel again.