Initialize raster annotation session
Create a raster annotation set (ART)
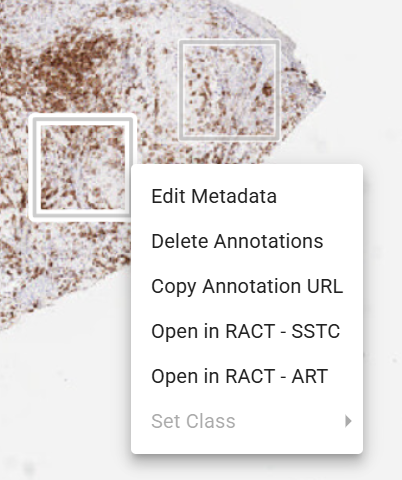
- Go to the field of view (FOV) of interest, use Right Mouse Key to access menu, and select RACT - ART (Raster Annotation Correction Tool - Automated Region Segmentation of Tumor).
- This will ask you to lock the current FOV. (Not applicable if the FOV is already locked)
- Then RACT page will open.
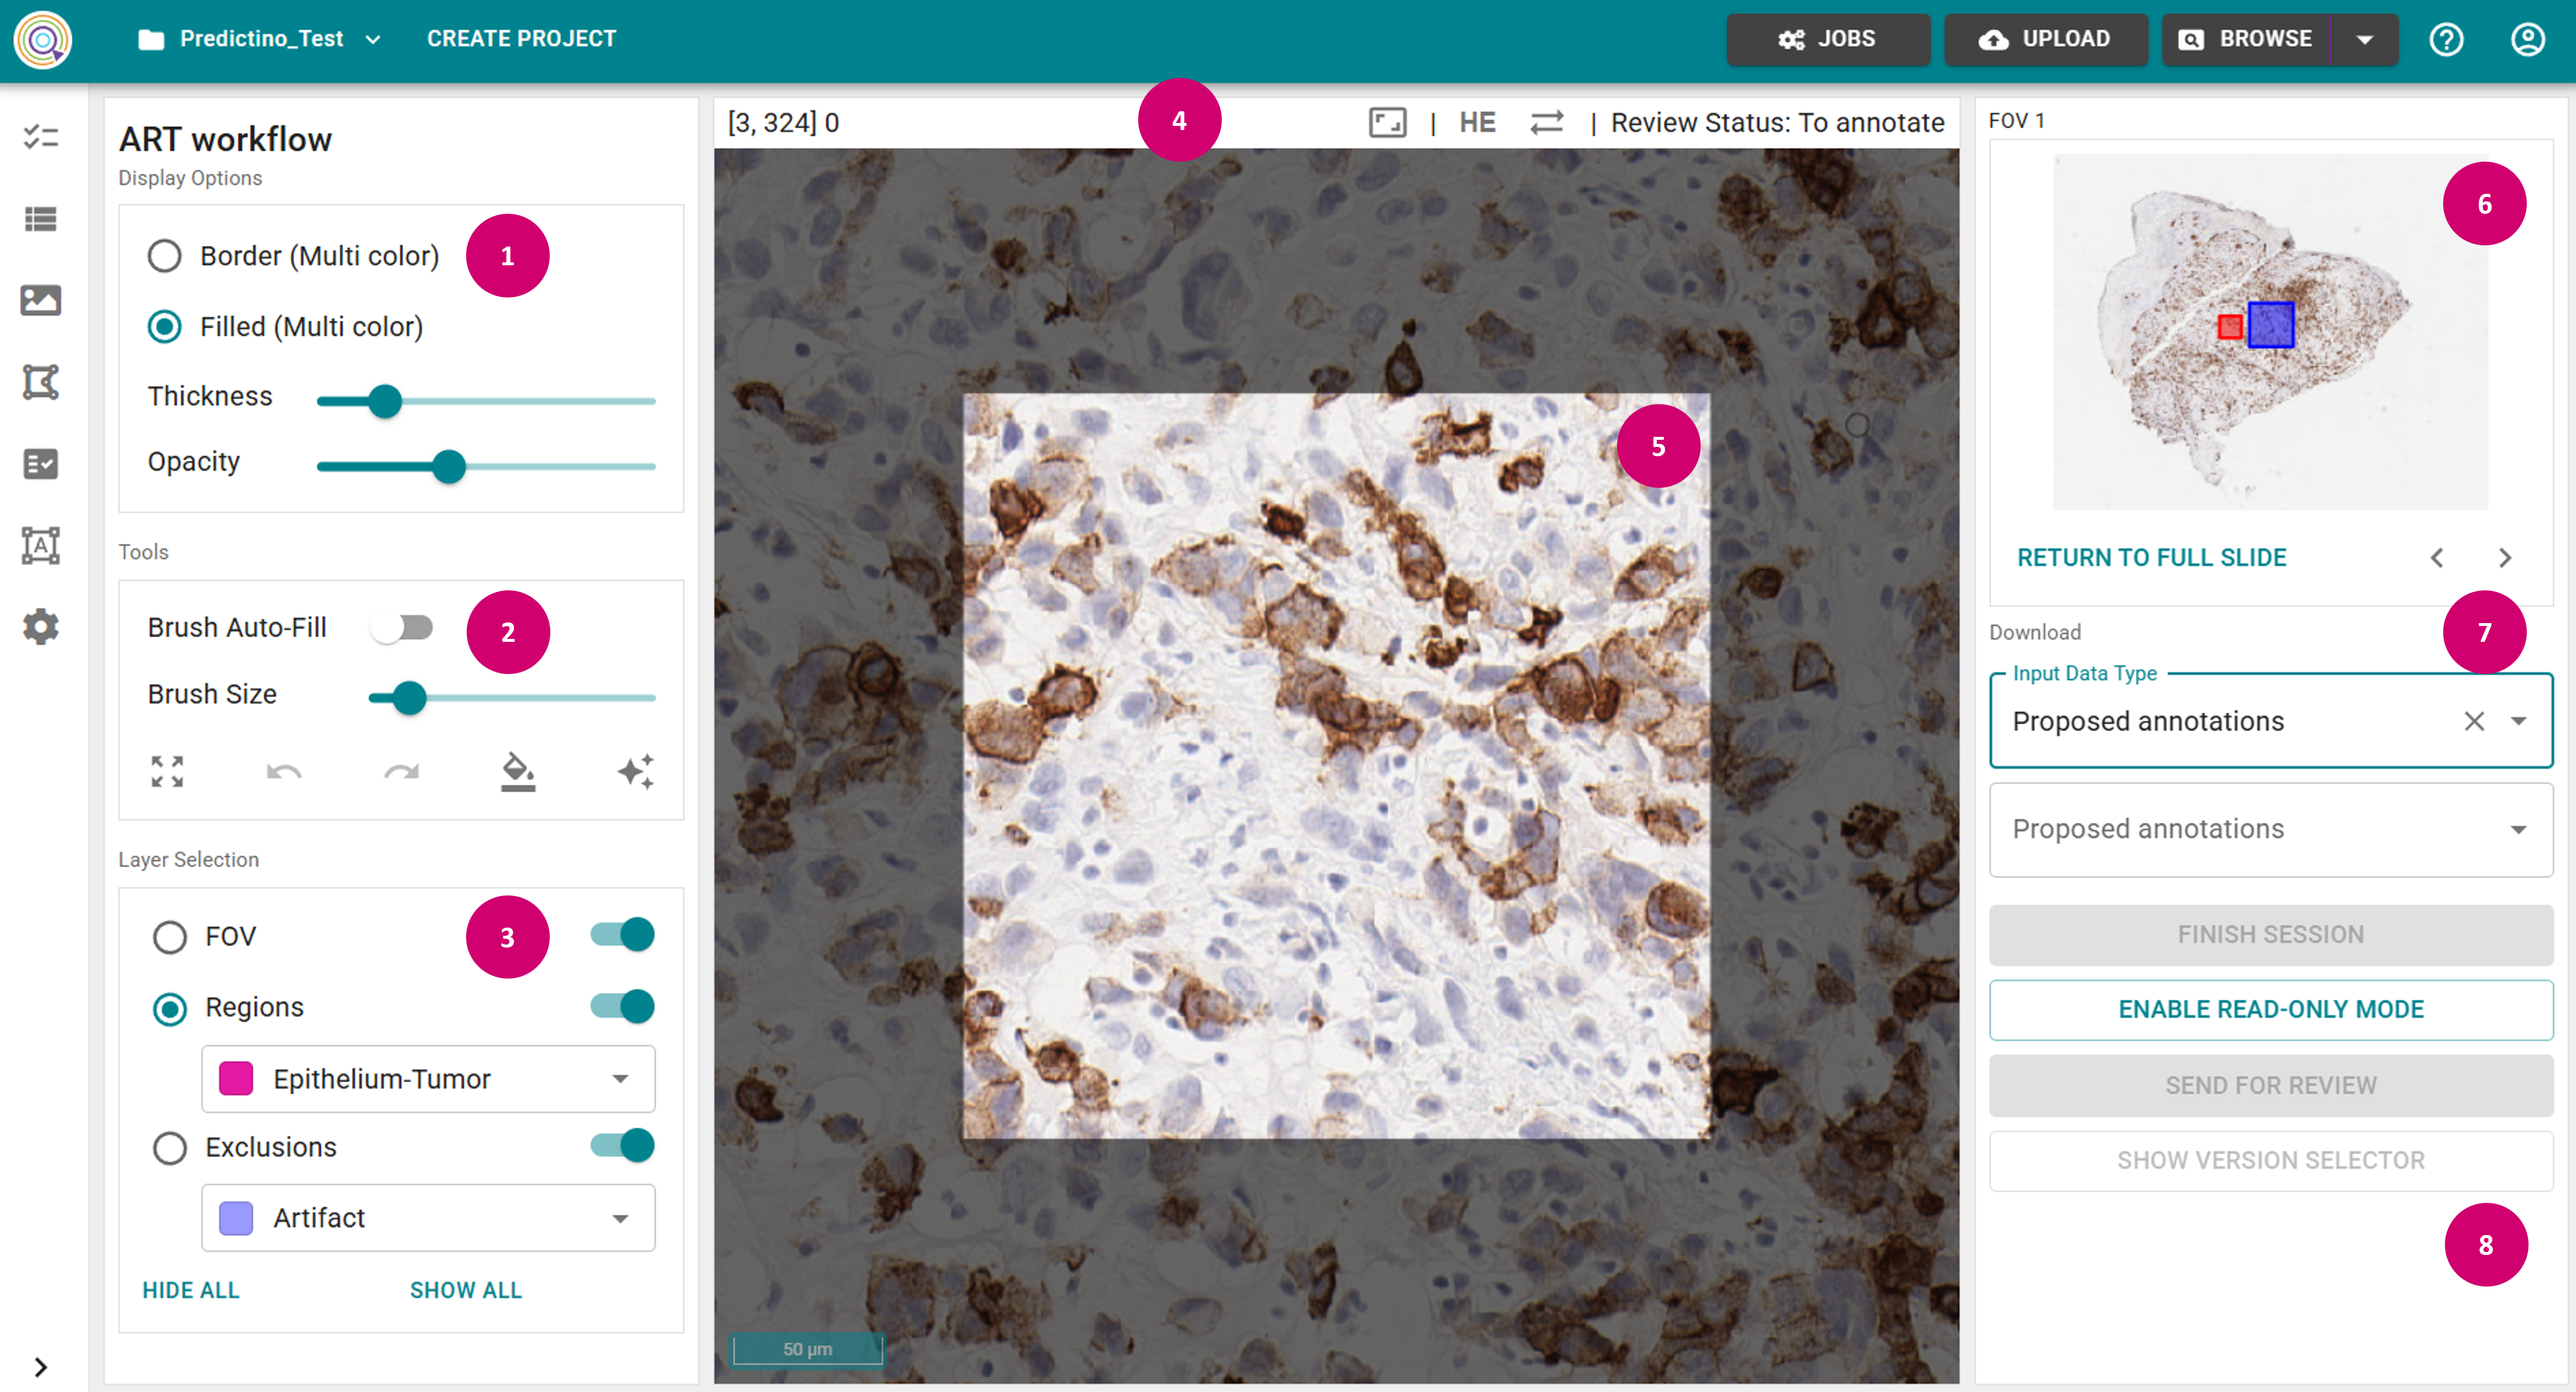
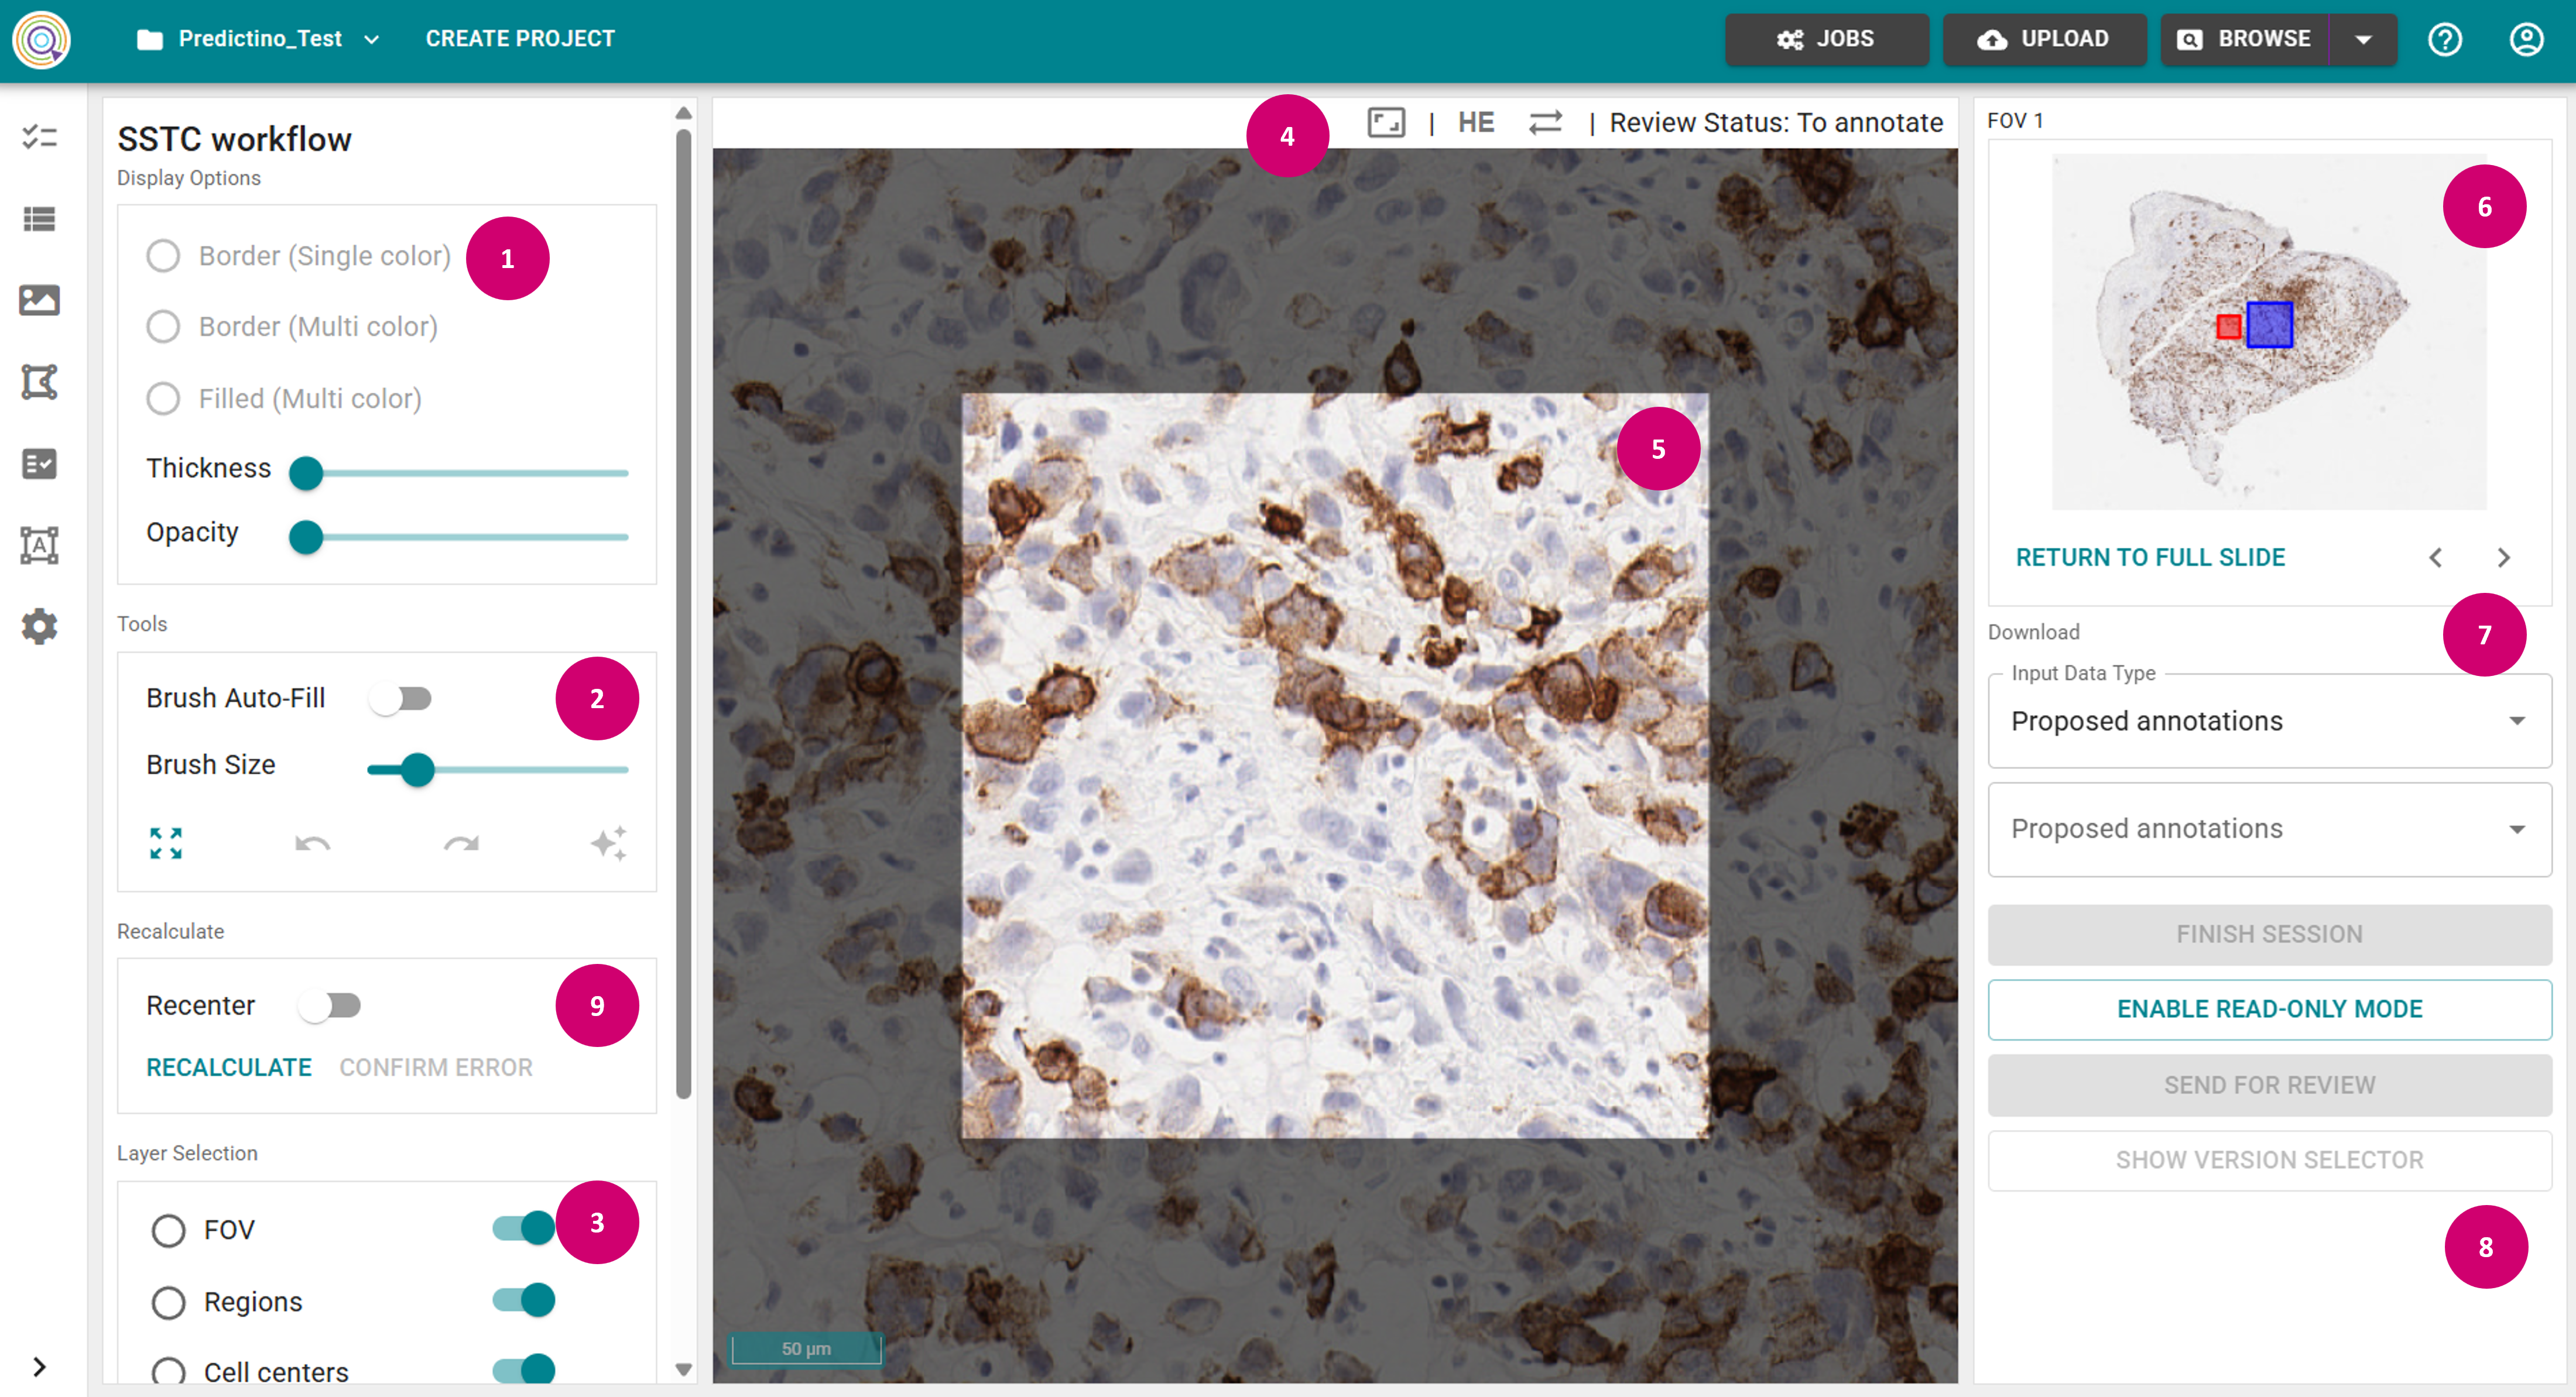
- Toggle off Brush Auto-Fill in the Tools panel (2). This fills areas that become completely encircled by a class with the encircling class, e.g. when drawing region outlines.
- Select Region in the Layer Selection (3), and select a class in a dropdown.
- Adjust Opacity as needed in the Display Options (1), and Brush Size in the Tools panel.
- Outline your areas with Shift + Left Mouse Key to draw a new object in the annotation view panel (5).
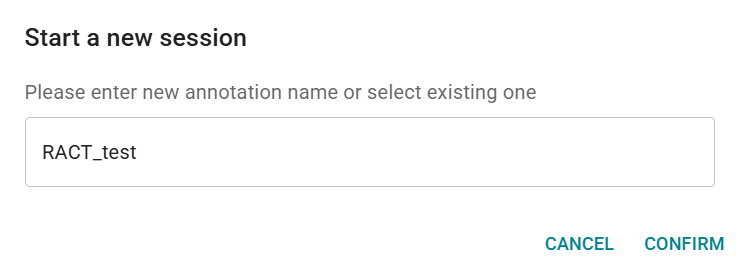
- This will open pop-up Start a new session. Confirm the raster annotation set name. The vector annotation set name is pre-filled by default, but can be modified.
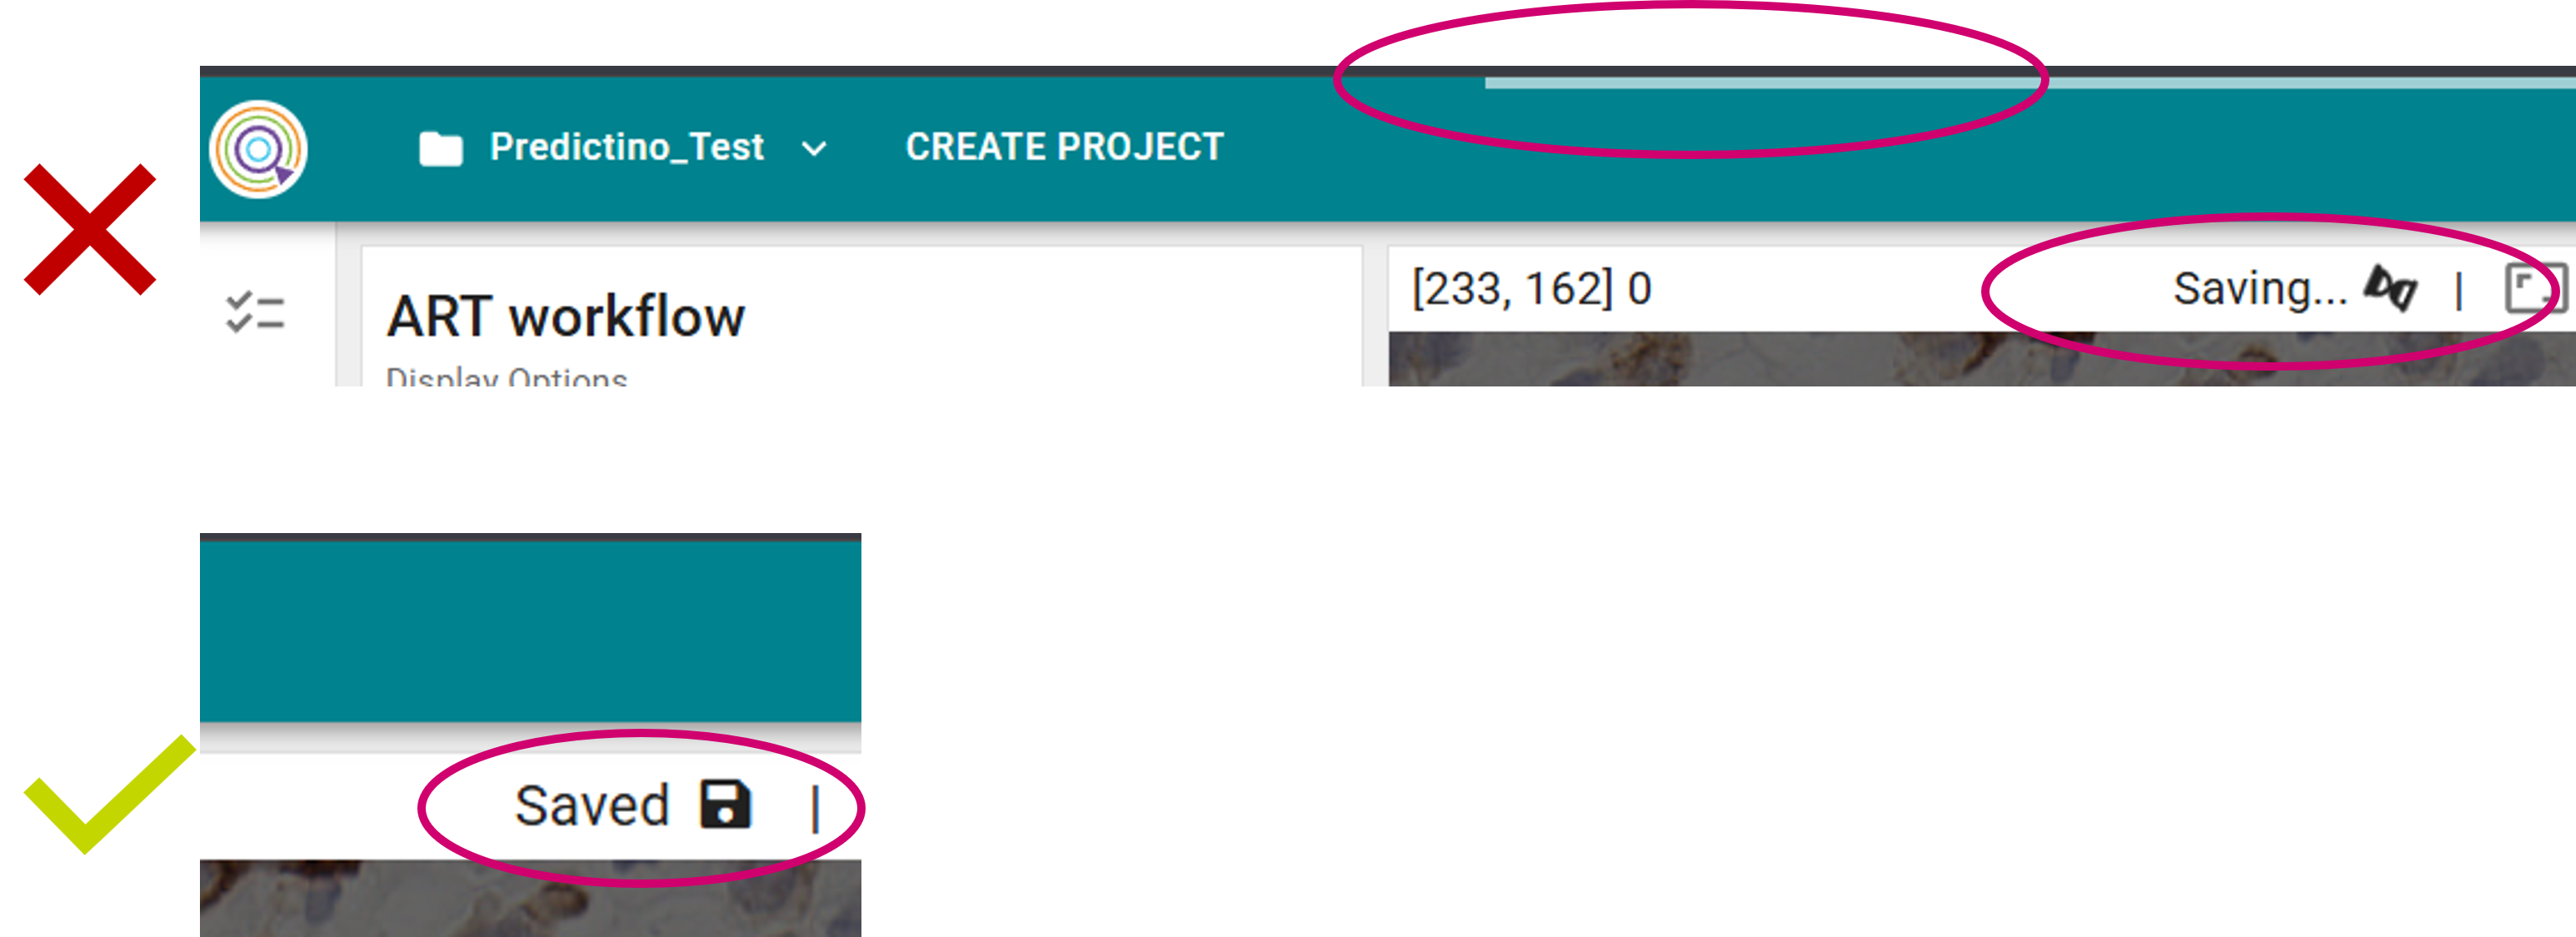
- Always wait until the saving is completed (i.e., wait until the "Saved" message appears in the top panel (4)).
- After the saving is completed, you will see the raster annotation set name displayed under User annotations in the Download panel on the right (7).
- Ensure the area outlines are closed before using the Reclassify tool to color all pixels within the area with the correct class (Left Mouse Key).
- Finish session Ctrl + S to save your latest changes. You can start a new session on the next edit.
- In the worklog section in the right panel (8) you can see the log of the relevant actions.
- Navigate through the FOVs by either directly selecting it in the image in the slide overview panel (6), or using the arrow buttons. Alternatively, you can return to the slide view by clicking Return To Full Slide.
FOV/ROI
For simplicity, we will refer to FOV (Field of View) throughout this document. Note that RACT can also be used for annotation of specific parts of the image specified by types 'FOV' or 'ROI'.
Create a raster annotation set (SSTC)
- Go to the field of view (FOV) of interest, use Right Mouse Key to access menu, and select RACT - SSTC (Raster Annotation Correction Tool - Subcellular Segmentation of Tumor Cell).
- This will ask you to lock the current FOV. (Not applicable if the FOV is already locked)
- Then RACT page will open.
- Load Proposed annotations in the Download panel (7).
- Apply Recalculate in the Recalculate panel (9).
- If annotation errors are detected, Confirm error and manually correct the errors in the annotations.
- This will open pop-up Start a new session. Confirm the raster annotation set name. The vector annotation set name is pre-filled by default, but can be modified.
- After the saving is completed, you will see the raster annotation set name displayed under User annotations in the Download panel on the right (7).
- Repeat step(-s) 5, 6 until annotations are correct.
- SHOW ALL layers and confirm they are correct.
- Finish session Ctrl + S to save your latest changes. You can start a new session on the next edit.
- Hide all layers in the Layer Selection panel (3).
- Show region layer (toggle visibility ON).
- Correct region outlines as needed with Left Mouse Key.
-
Show cell center layer.
- Toggle Recenter ON only if you want to enable repositioning of the cell centers during Recalculate.
- Place missing cell centers (Left Mouse Key) or remove cell centers (Right Mouse Key).
- Correct other annotation types (i.e., cell membranes, nuclei membranes, exclusions) as needed.
- SHOW ALL layers and confirm they are correct.
- Finish session Ctrl + S to save your latest changes. You can start a new session on the next edit.
- In the worklog section in the right panel (8) you can see the log of the relevant actions.
Annotation tips
- Ctrl + S to save the latest changes during annotation and Finish session.
- Toggle off Brush Auto-Fill. This fills areas that become completely encircled by a class with the encircling class, e.g. when drawing region outlines.
- Shift + Left Mouse Key allows you to draw a new object.
- Right Mouse Key allows you to remove the class pixels (works with brush and the Reclassify (aka Fill) tool).
- Hold ALT key to pan & zoom in the image.
- TAB key allows you to switch between the current and previous brush size.
- Shortcut F allows you to toggle the Reclassify tool.
- If you decide to enable/disable Recenter after Recalculate is complete, edit the position of a single center point to reset the review state, and re-run Recalculate.
Annotation input types
There are two input types available for initializing annotations in RACT: Proposed (DRC Deliveries) and User (existing raster annotations).
-
Proposed:
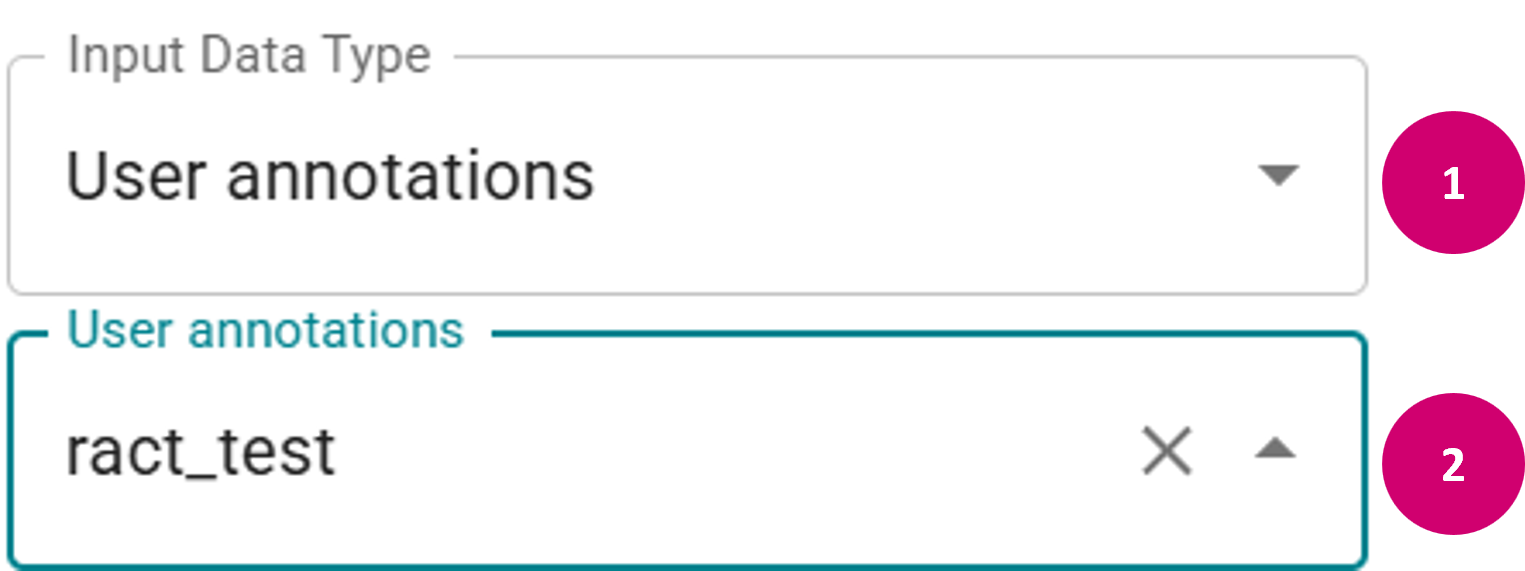
- In the Input Data Type dropdown menu, select Proposed annotations.
- In the second dropdown menu, choose a DRC delivery name. Only DRC deliveries that have the correct level and classes are offered for selection. This will load annotations for the current FOV based on the respective model predictions.

-
User:
- In the Input Data Type dropdown menu, select User annotations.
- In the second dropdown menu, choose the name of a previously created raster annotation set. This will load the annotations for the current FOV from the given set.
Edit raster annotation
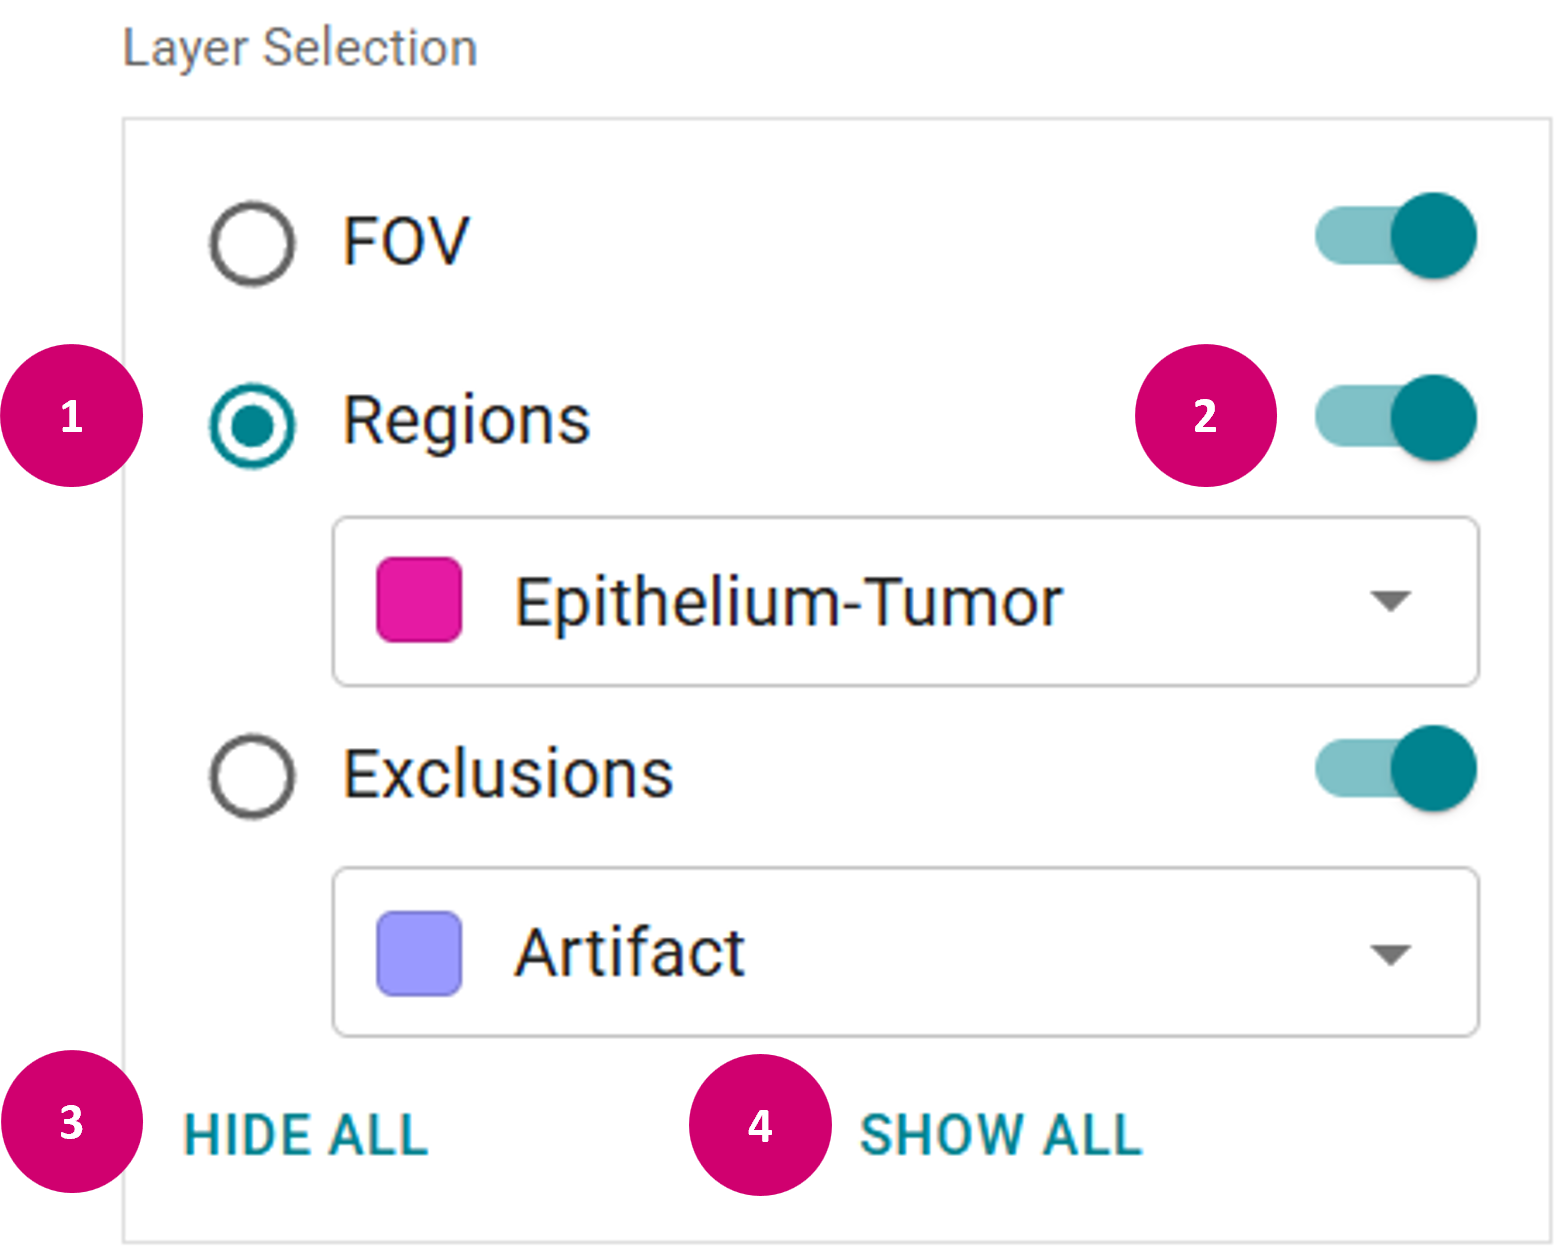
- Activate layer by clicking on the radio button (1) that belongs to the layer.
- Hide and show individual layer by enabling on and off the visibility toggle next to the layer name (2).
- Hide all layers by clicking the HIDE ALL button (3).
- Show all layers by clicking the SHOW ALL button (4).
Editing options
- Display options: In the Display Options panel, you can adjust the overall appearance of the annotations (1), as well as the thickness (2) and opacity (3) of the annotations.
-
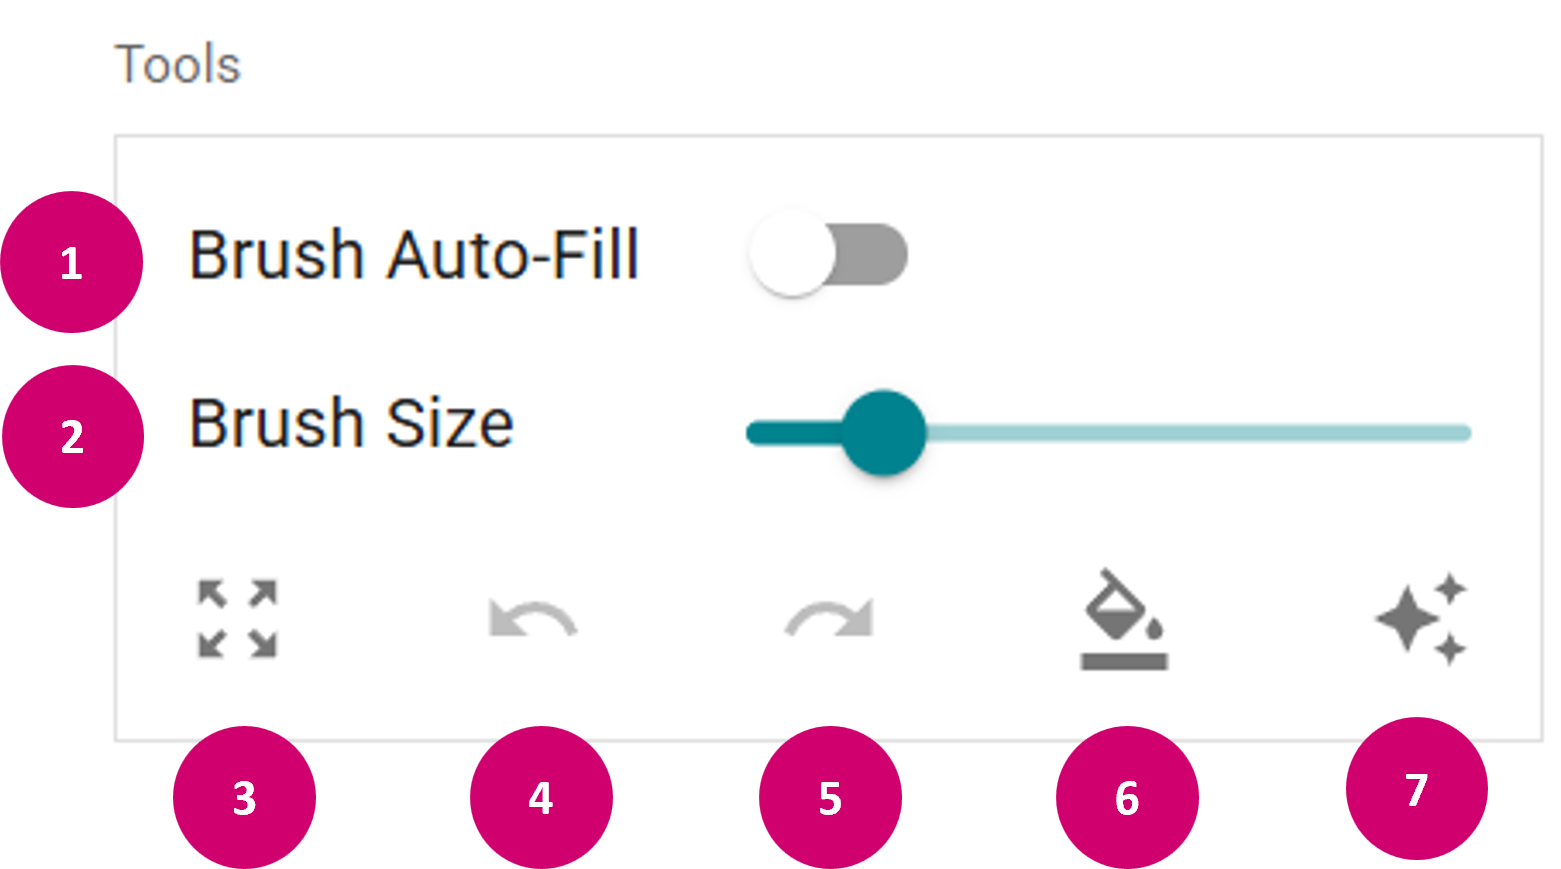
Tools: In the Tools panel, you can:
- Toggle the brush auto-fill (1). This fills areas that become completely encircled by a class with the encircling class, e.g. when drawing region outlines.
- Adjust the brush size (2).
- Toggle pan & zoom mode (3).
- Undo (4) or redo (5) the last performed annotation.
- Reclassify (6) (change the annotation class of an already drawn annotation or clear the selected region by Right Mouse click).
- Apply SAM (Segment Anything Model) .

Introduction to SAM (Segment Anything Model)
When using the SAM, you can easily view proposed annotations by hovering over the image, scrolling through different SAM segmentation proposals with Mouse Wheel, and segmenting the area with a Left mouse click. To remove any annotations, simply use the Right mouse click.
Important Note
The first use of SAM includes a disclaimer warning about occasionally wrong annotations. SAM embeddings are computed at the full image resolution, hence it is expected to perform equally well at different zoom levels.

Tip
Utilize X to temporarily enable SAM, and then switch to the classic brush tool for final corrections. Use the F shortcut to switch to Reclassify and remove non-accurate regions.
Raster annotation classes
- Classes used for vector region annotations can also be valid raster annotation classes. This applies to both class names and class colors.
- Note that only a subset of classes is available by default when creating new raster annotations.
- Additional classes will be displayed in RACT if available, for example, as a result of rasterization of legacy classes present in the vector annotation set.
- The class label map shall be dense without the latter being necessarily enforced. For additional documentation, please refer to the raster annotation image format.
- Available classes and colours can be obtained using Automation API Gateway (AAGW) GET /v1/annotationClasses endpoint.
ART Regions classes
Below are current annotation classes for Regions layer for the Automated Region Segmentation of Tumor (ART) annotation mode.
| # | Class name | RGB | Color |
|---|---|---|---|
| 1 | Dysplasia High Grade | (204, 102, 0) | |
| 2 | Dysplasia Low Grade | (9, 128, 255) | |
| 3 | Epithelium-Atypia-NOS | (204, 51, 255) | |
| 4 | Epithelium-In-Situ Tumor | (143, 33, 102) | |
| 5 | Epithelium-Non Tumorous | (248, 109, 7) | |
| 6 | Epithelium-Tumor | (229, 26, 163) | |
| 7 | Epithelium-Unclassifiable | (115, 0, 153) | |
| 8 | Excluded | (146, 208, 80) | |
| 9 | Ignore | (80, 85, 237) | |
| 10 | Lepidic | (255, 69, 0) | |
| 11 | Necrosis | (153, 123, 12) | |
| 12 | Other | (217, 255, 217) | |
| 13 | Sarcomatoid Tumor | (155, 189, 181) |
ART Exclusions classes
Below are current annotation classes for Exclusions layer for the Automated Region Segmentation of Tumor (ART) annotation mode.
| # | Class name | RGB | Color |
|---|---|---|---|
| 1 | Artifact | (153, 153, 255) | |
| 2 | Excluded | (146, 208, 80) |
Raster annotation review cycle
| Review status | Description | Color |
|---|---|---|
| To annotate | The user has selected a proposed annotation but has not started to annotate. | Red |
| In progress | The user has started annotation session, is making edits, until they click on Finish Session button. | Red |
| To Review | The user clicked Finish Session and the annotation can be sent to review. | Blue |
| Under review | The user clicked Send to Review and assigned another user as a reviewer. | Yellow |
| Accepted | The reviewer has reviewed the annotation and accepted it by clicking on the 'Approve' button. | Green |
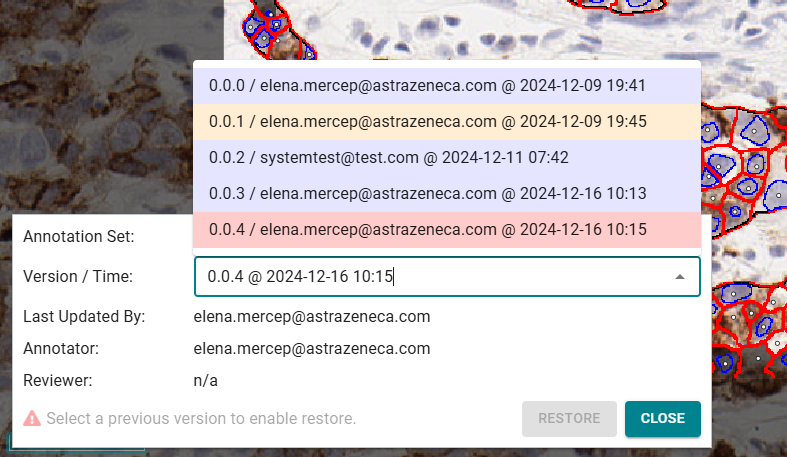
Restore raster annotation
- Click the Show version selector button. This prompts a new window.
- Use the dropdown to choose the annotation version.
- Note that the latest version cannot be restored.
- After selecting a previous version, click Restore. This will make the restored past version the new head of the versioning history.
View work log
After the annotation session has been started, the user can see the key actions logged in the work log panel (8). Each log entry includes: date, time, user name, and action.
Annotate as part of workflow
In addition to standalone RACT usage, starting from version 4.2.0, RACT has been integrated as part of several Workflow types. This integration streamlines the annotation process by embedding RACT functionality directly into workflow tasks.
Note
Starting from version 4.3.0, RACT automatically recognizes when to operate as part of a running workflow using the WorkflowType system variable. The previously used value of the Image Set column is no longer used.
When working within a workflow, RACT provides the same powerful annotation capabilities while being guided by the workflow structure.
- Testset Annotation Workflow - for creating test set annotations with ART and SSTC
- Training Annotation Workflow - for creating training annotations based on model performance
- Validation Set Annotation (Morphology based) Workflow - for morphology-based validation annotations
- Validation Set Annotation (Model-performance based) Workflow - for performance-based validation annotations
Key differences for Test Set Annotation Workflow

The Test Set Annotation Workflow represents a more complex workflow implementation with specific user interface restrictions, particularly regarding ART and SSTC integration. When RACT operates as part of this workflow, several key differences apply compared to standalone usage:
Access and Mode Indication
-
Role-based access: Only users with the
ProjectWorkflowrole can access and annotate within the workflow. Users without an assigned task will be automatically redirected to the task list if they attempt to access a task. - Mode visibility: The system clearly indicates when operating in ART annotation mode for Test set (1), ensuring users are aware of the workflow context.
Annotation Set and Class Restrictions
- Pre-existing annotation sets: Users work with annotation sets automatically created and named by system (2) rather than creating new sets from scratch.
- Predefined Regions classes: Annotation can be restricted to a finite set of predefined Regions layer classes (3), as specified in the workflow configuration. Users cannot add custom classes.
Disallowed Features and Tools
To ensure consistency and adherence to the Test Set Annotation Workflow requirements, several RACT capabilities are restricted or disallowed:
- Tools: Segment Anything Model (SAM) is not available (4).
- Layer editing: Field of View (FOV) / Region of Interest (ROI) and Exclusions layers cannot be edited (5).
- Navigation: FOV/ROI backward/forward navigation and direct FOV/ROI selection are disallowed (6).
- Download options: Input data type is fixed to 'User' and annotation set is locked to the existing workflow annotation set (2).
- Lifecycle transitions: Users cannot transition annotation status from "To Review" to "Under Review" status (7) as Review step is absent in this workflow.
Note
When a feature is restricted, hovering over the disallowed control will display a tooltip explaining the reason for the restriction.
Navigation and Task Completion
- Restricted navigation: Users can only navigate to other tasks through the task list, preventing unintended workflow interruptions.
- Status requirement for completion: Annotation tasks can only be marked as finished when the annotation review lifecycle status is set to "To Review".
- Work instructions: Click the information icon (i) in the Utilities panel to access detailed work instructions in a new tab.
-
Automatic data transfer: Upon
Finalize ART task completion, the system
automatically transfers the Regions layer
Epithelium-Tumorclass to the SSTC model annotation set for use in subsequent Annotate SSTC workflow step, and redirects the user to the task list. - Sign off: Task completion is signed off automatically. Users will see the notification "Signing off on this step is not supported with a 21 CFR Part 11 compliant electronic signature" until the eSignature functionality is implemented.
Combined ART and SSTC annotation
The Test Set Annotation Workflow is the only workflow supporting the strict order of creation where ART annotation serves as a prerequisite for SSTC annotation. This ensures a systematic approach to creating comprehensive test set annotations.
The system thoroughly supports this complex workflow with all required steps seamlessly integrated:
- Create ART annotation: The user first creates ART annotations for the Field of View (FOV).
- Automatic data transfer: The system automatically copies the Regions annotations for the Epithelium-Tumor class from ART to the Regions annotations of the SSTC annotation set for the Region of Interest (ROI).
-
Create SSTC annotations: The user then
creates SSTC annotations by:
- Annotating cell outlines (cell and nuclei membranes) for the cell centers of the Tumor class (of the Cell Marker Annotations (CMA) origin, automatically copied to the RACT format by the system)
- Placing new cell centers (RACT native or Cell-Center class) without cell outlines
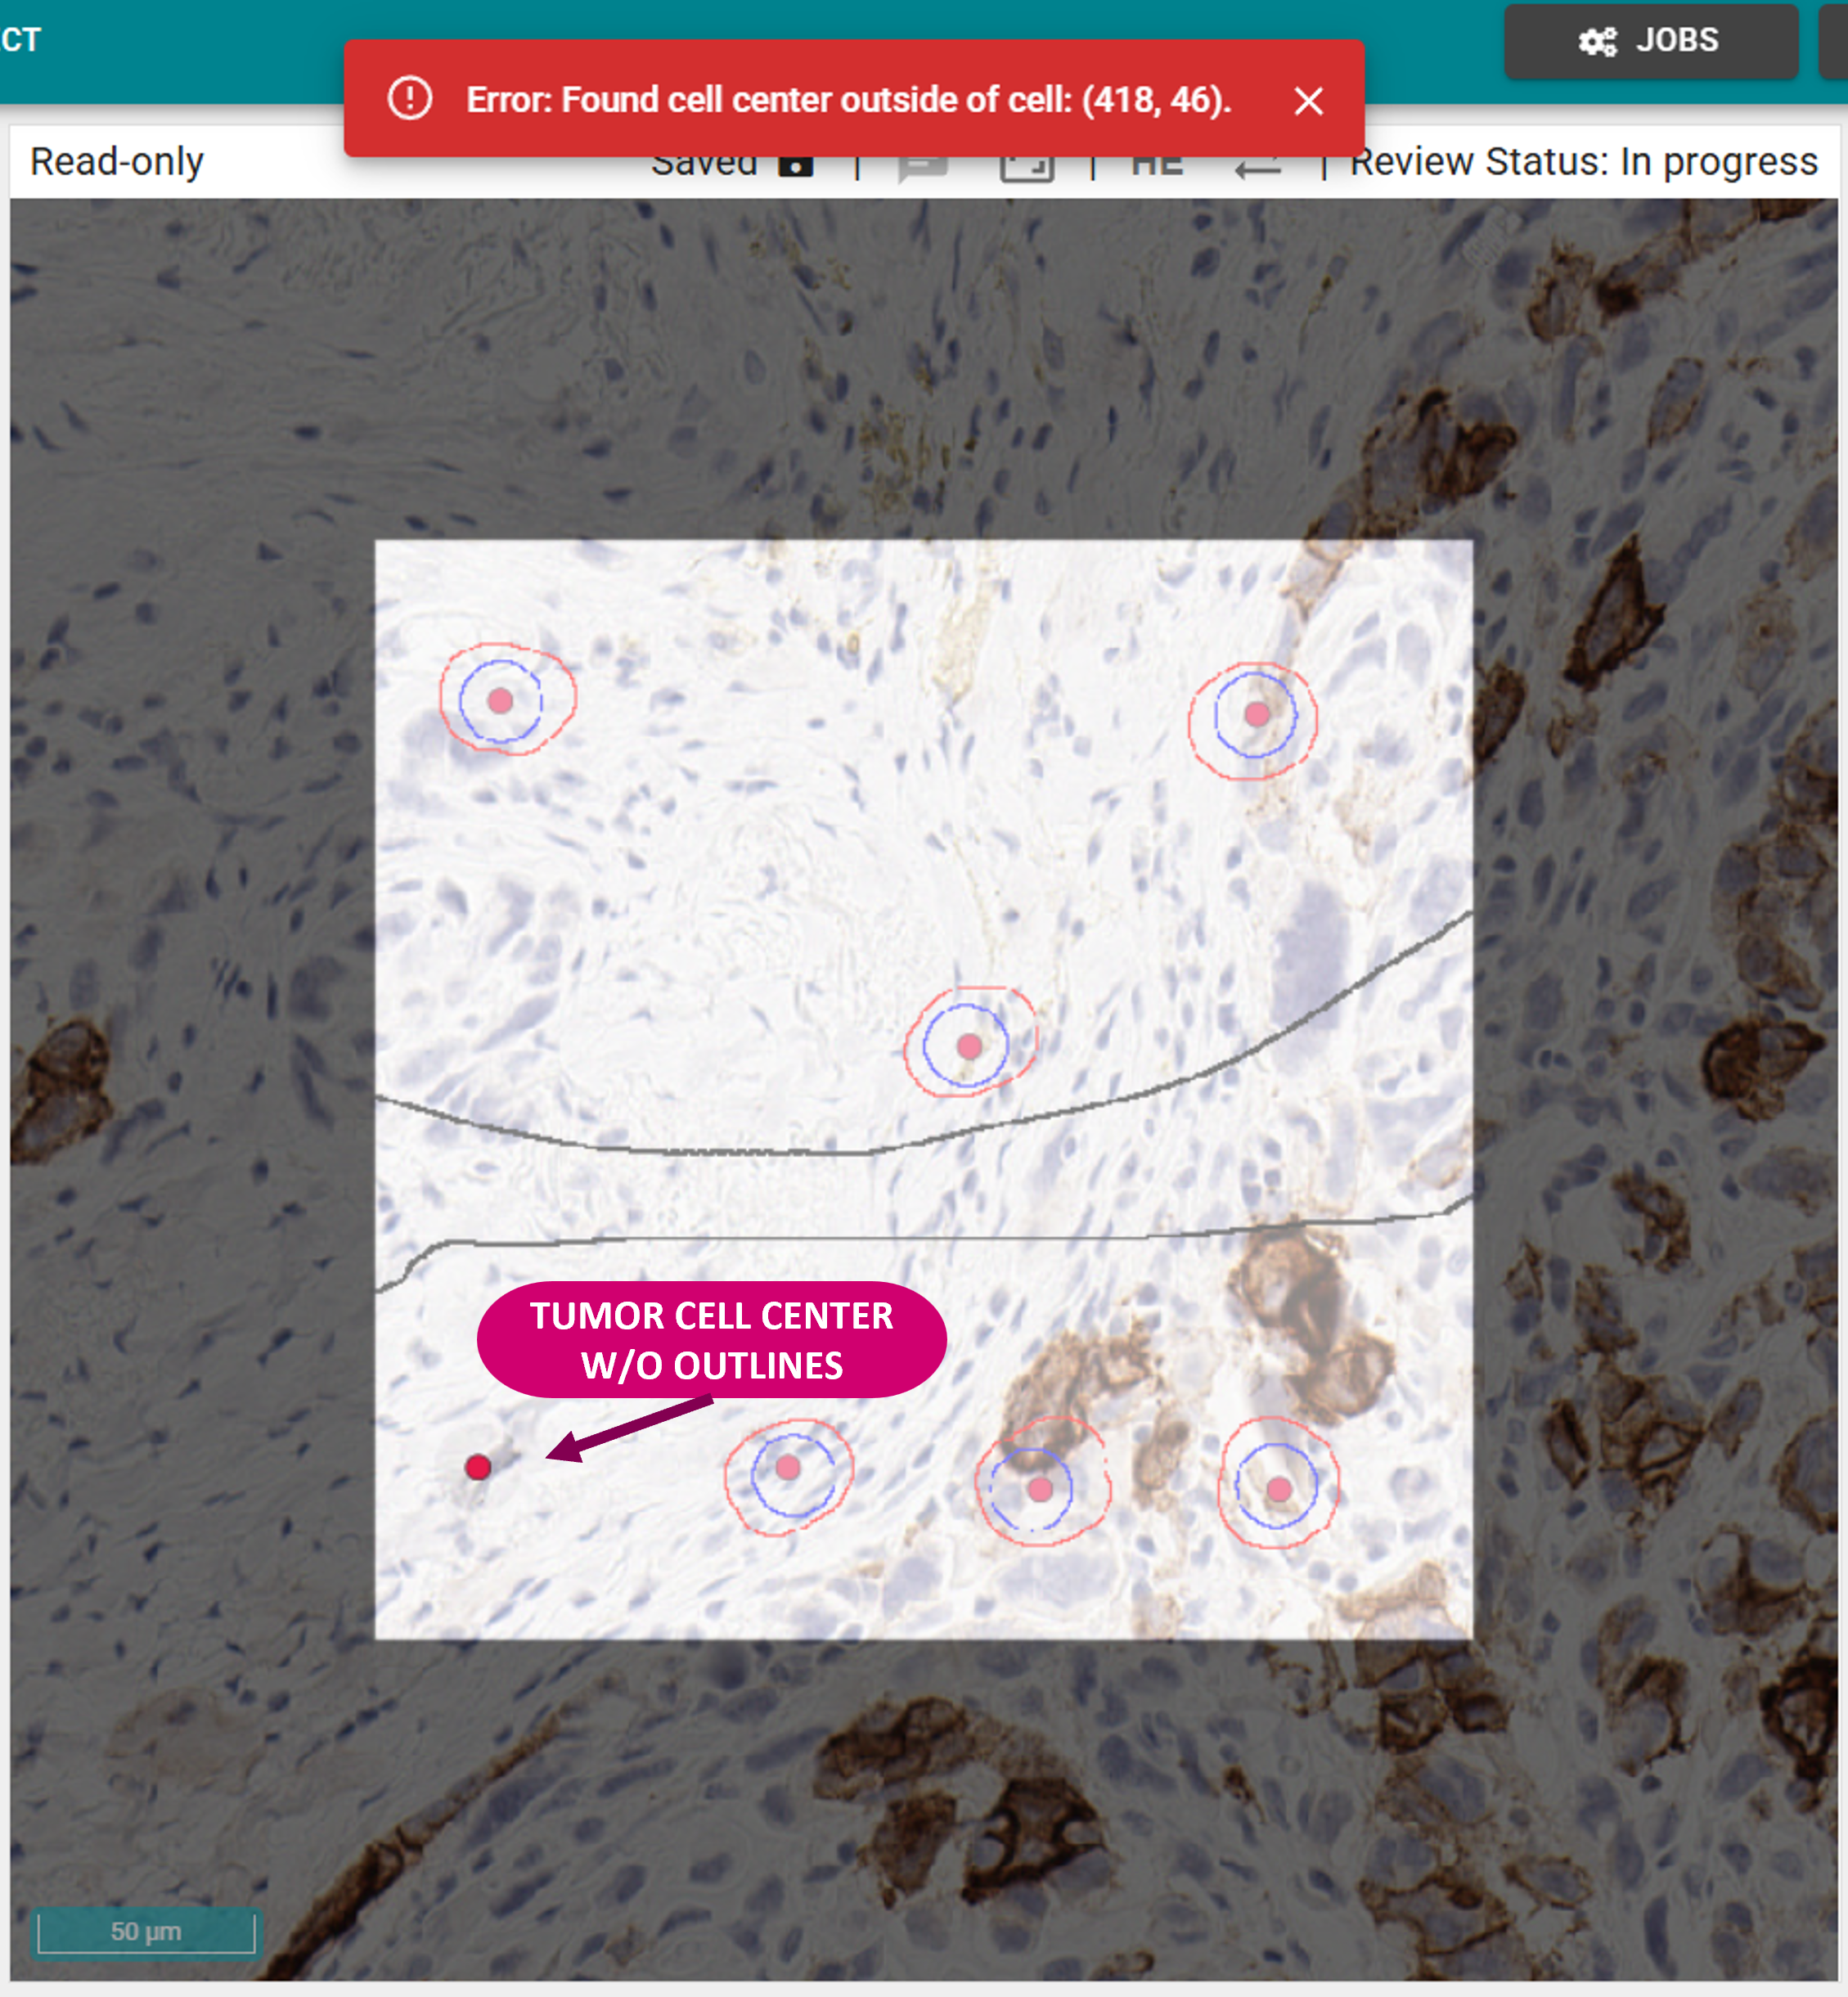

Tips
- The Validate functionality is tailored to automatically detect errors in the annotation workflow, preventing you from proceeding if any of the cell outlines are missing for cell centers of the Tumor class (left), or if any outline is present for native, newly placed cell centers (Cell-Center class) that should not have outlines (right).
- The UI constrains annotation within Regions bounds automatically, preventing users from drawing cell outlines outside of the Regions borders.
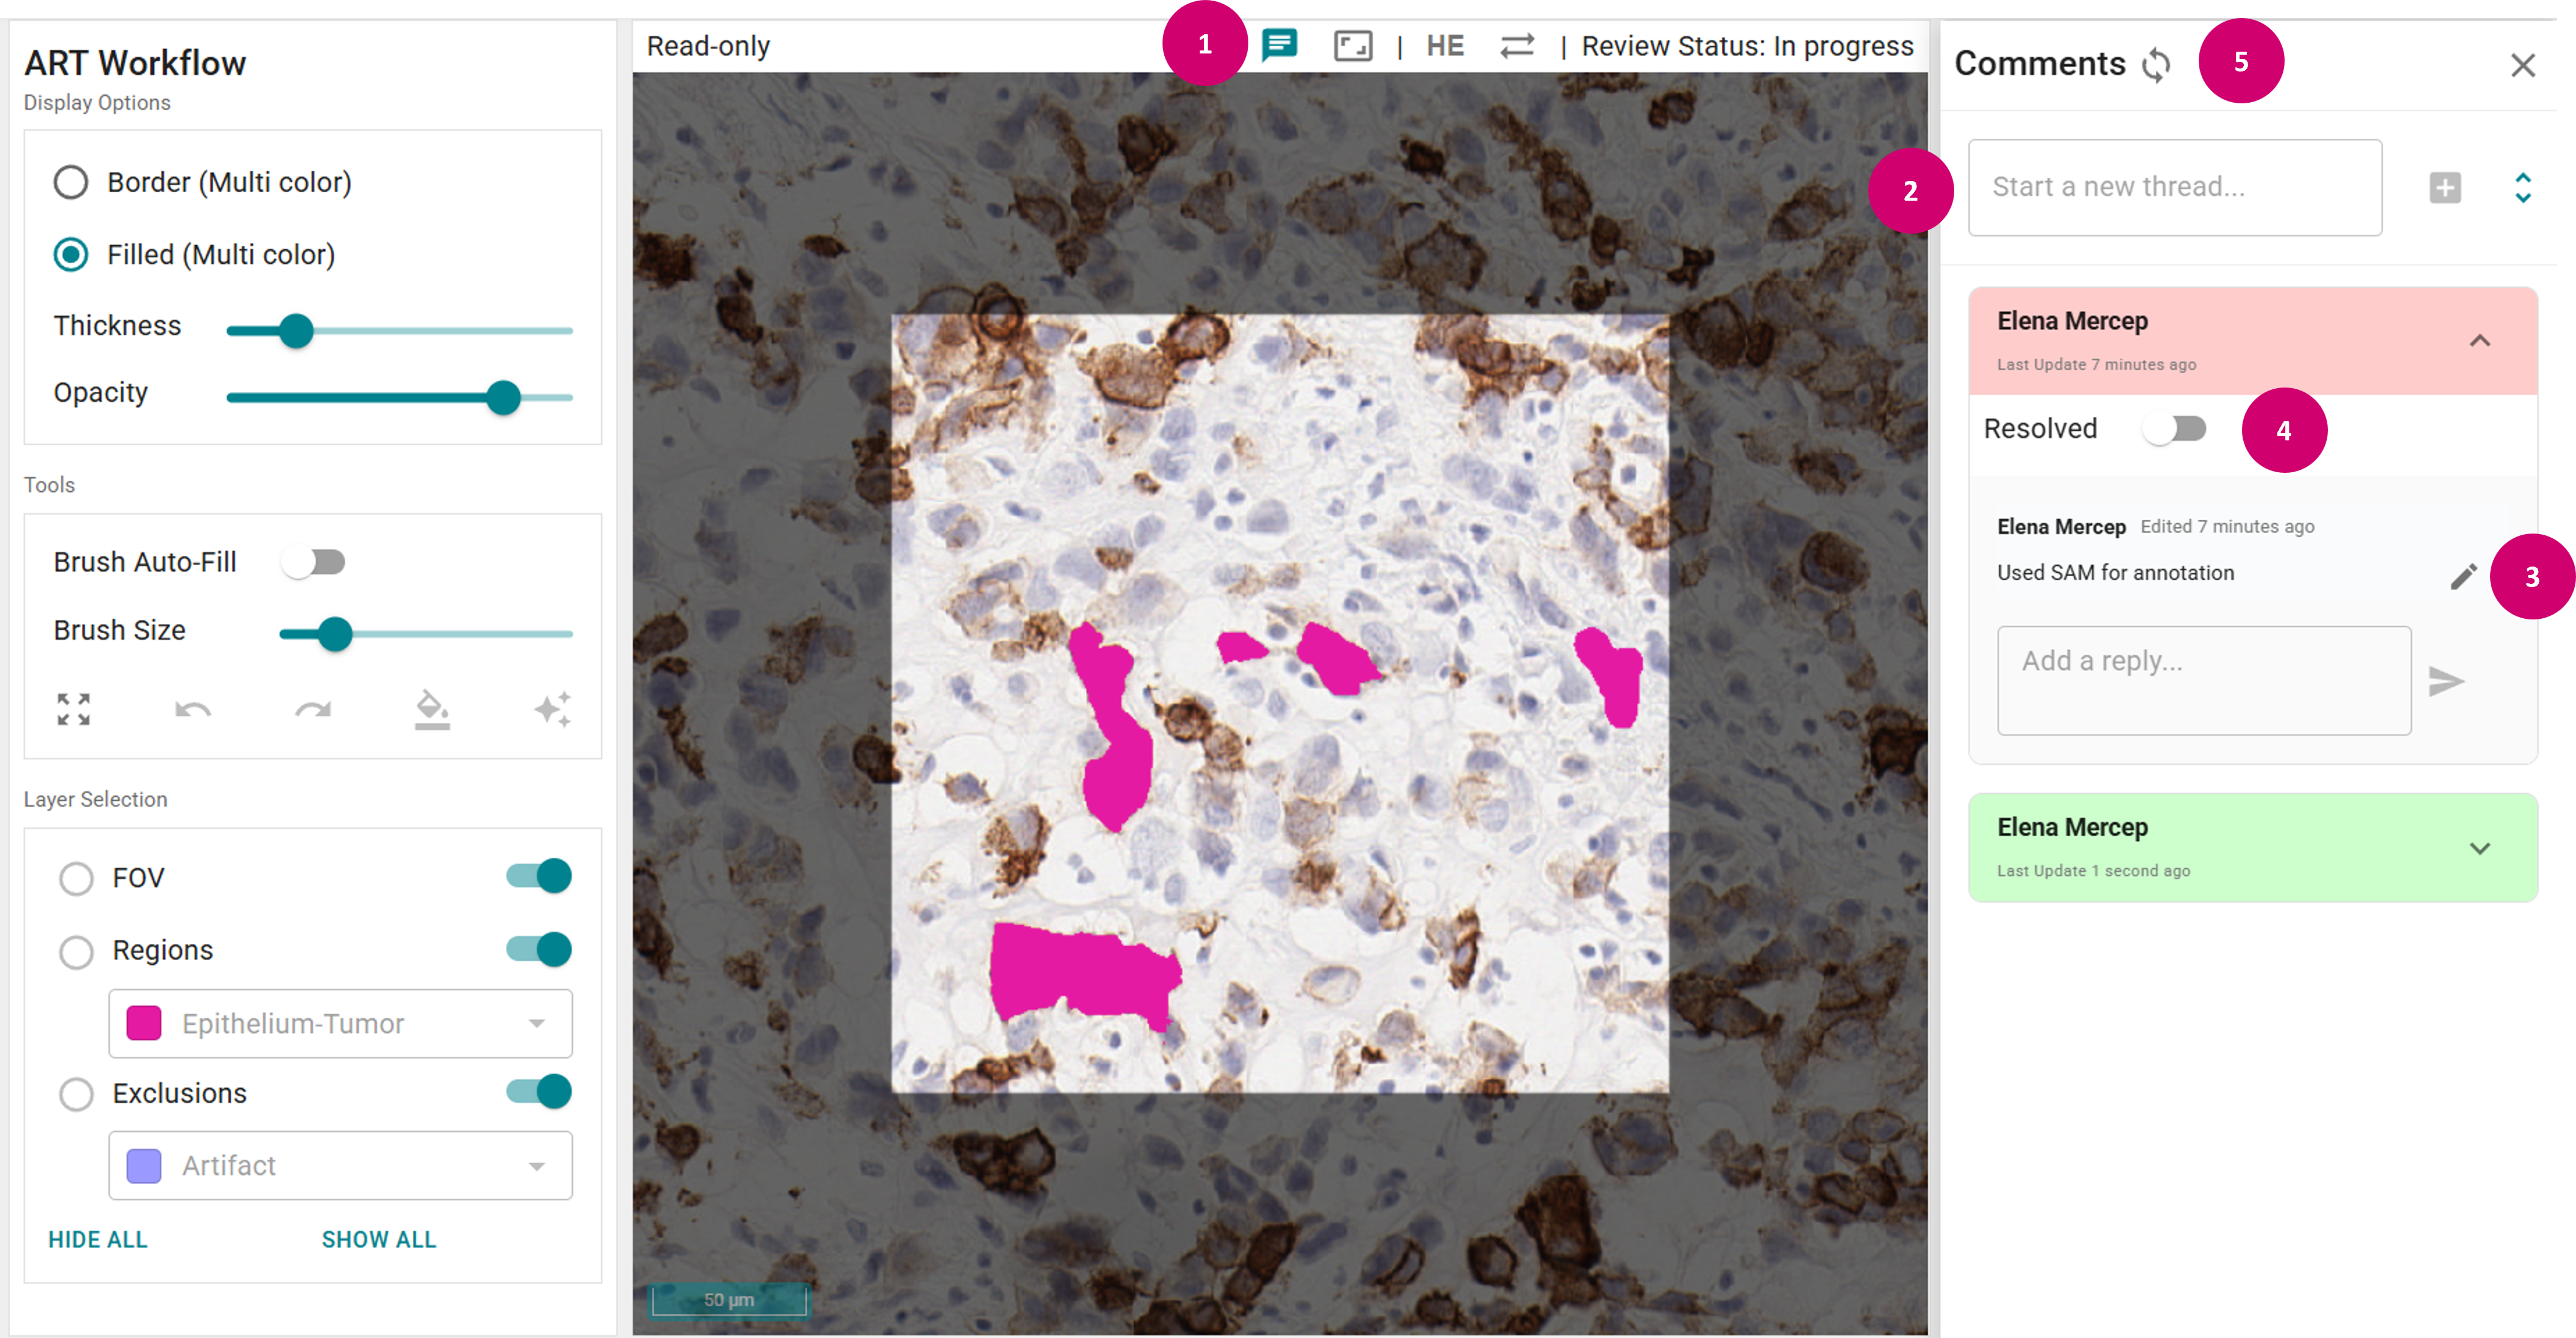
Add comments
Starting from version 4.3.0, RACT supports Comments functionality. The new RACT Comments capability adds text-only and spatially grounded (pixel and bounding-box) comments directly on raster annotations, enabling precise in-context collaboration that reduces review ambiguity, improves traceability and annotation quality, and accelerates progression from creation to acceptance to deliver high-quality data for the digital pathology AI model development.
General comments
- Enable the comments section by clicking the respective icon or using the shortcut K. This will open a new panel on the right.
- Start a new thread by typing your comment and clicking Enter.
- You can edit your comment. The edited comments can be seen by the corresponding time of the edit action.
- Respond to existing comments by adding a reply and clicking on the Send a reply button or Enter.
- Resolve comments that are addressed or no longer relevant.
- Refresh the comments panel to update the threads that other users might have added meanwhile.
Tip
Hovering over the Edited time will bring up a tooltip with detailed information on who created and updated the comment, and when. Similarly, hovering over the Last Update time for an entire comment thread will display when the thread was created and (un-)resolved.
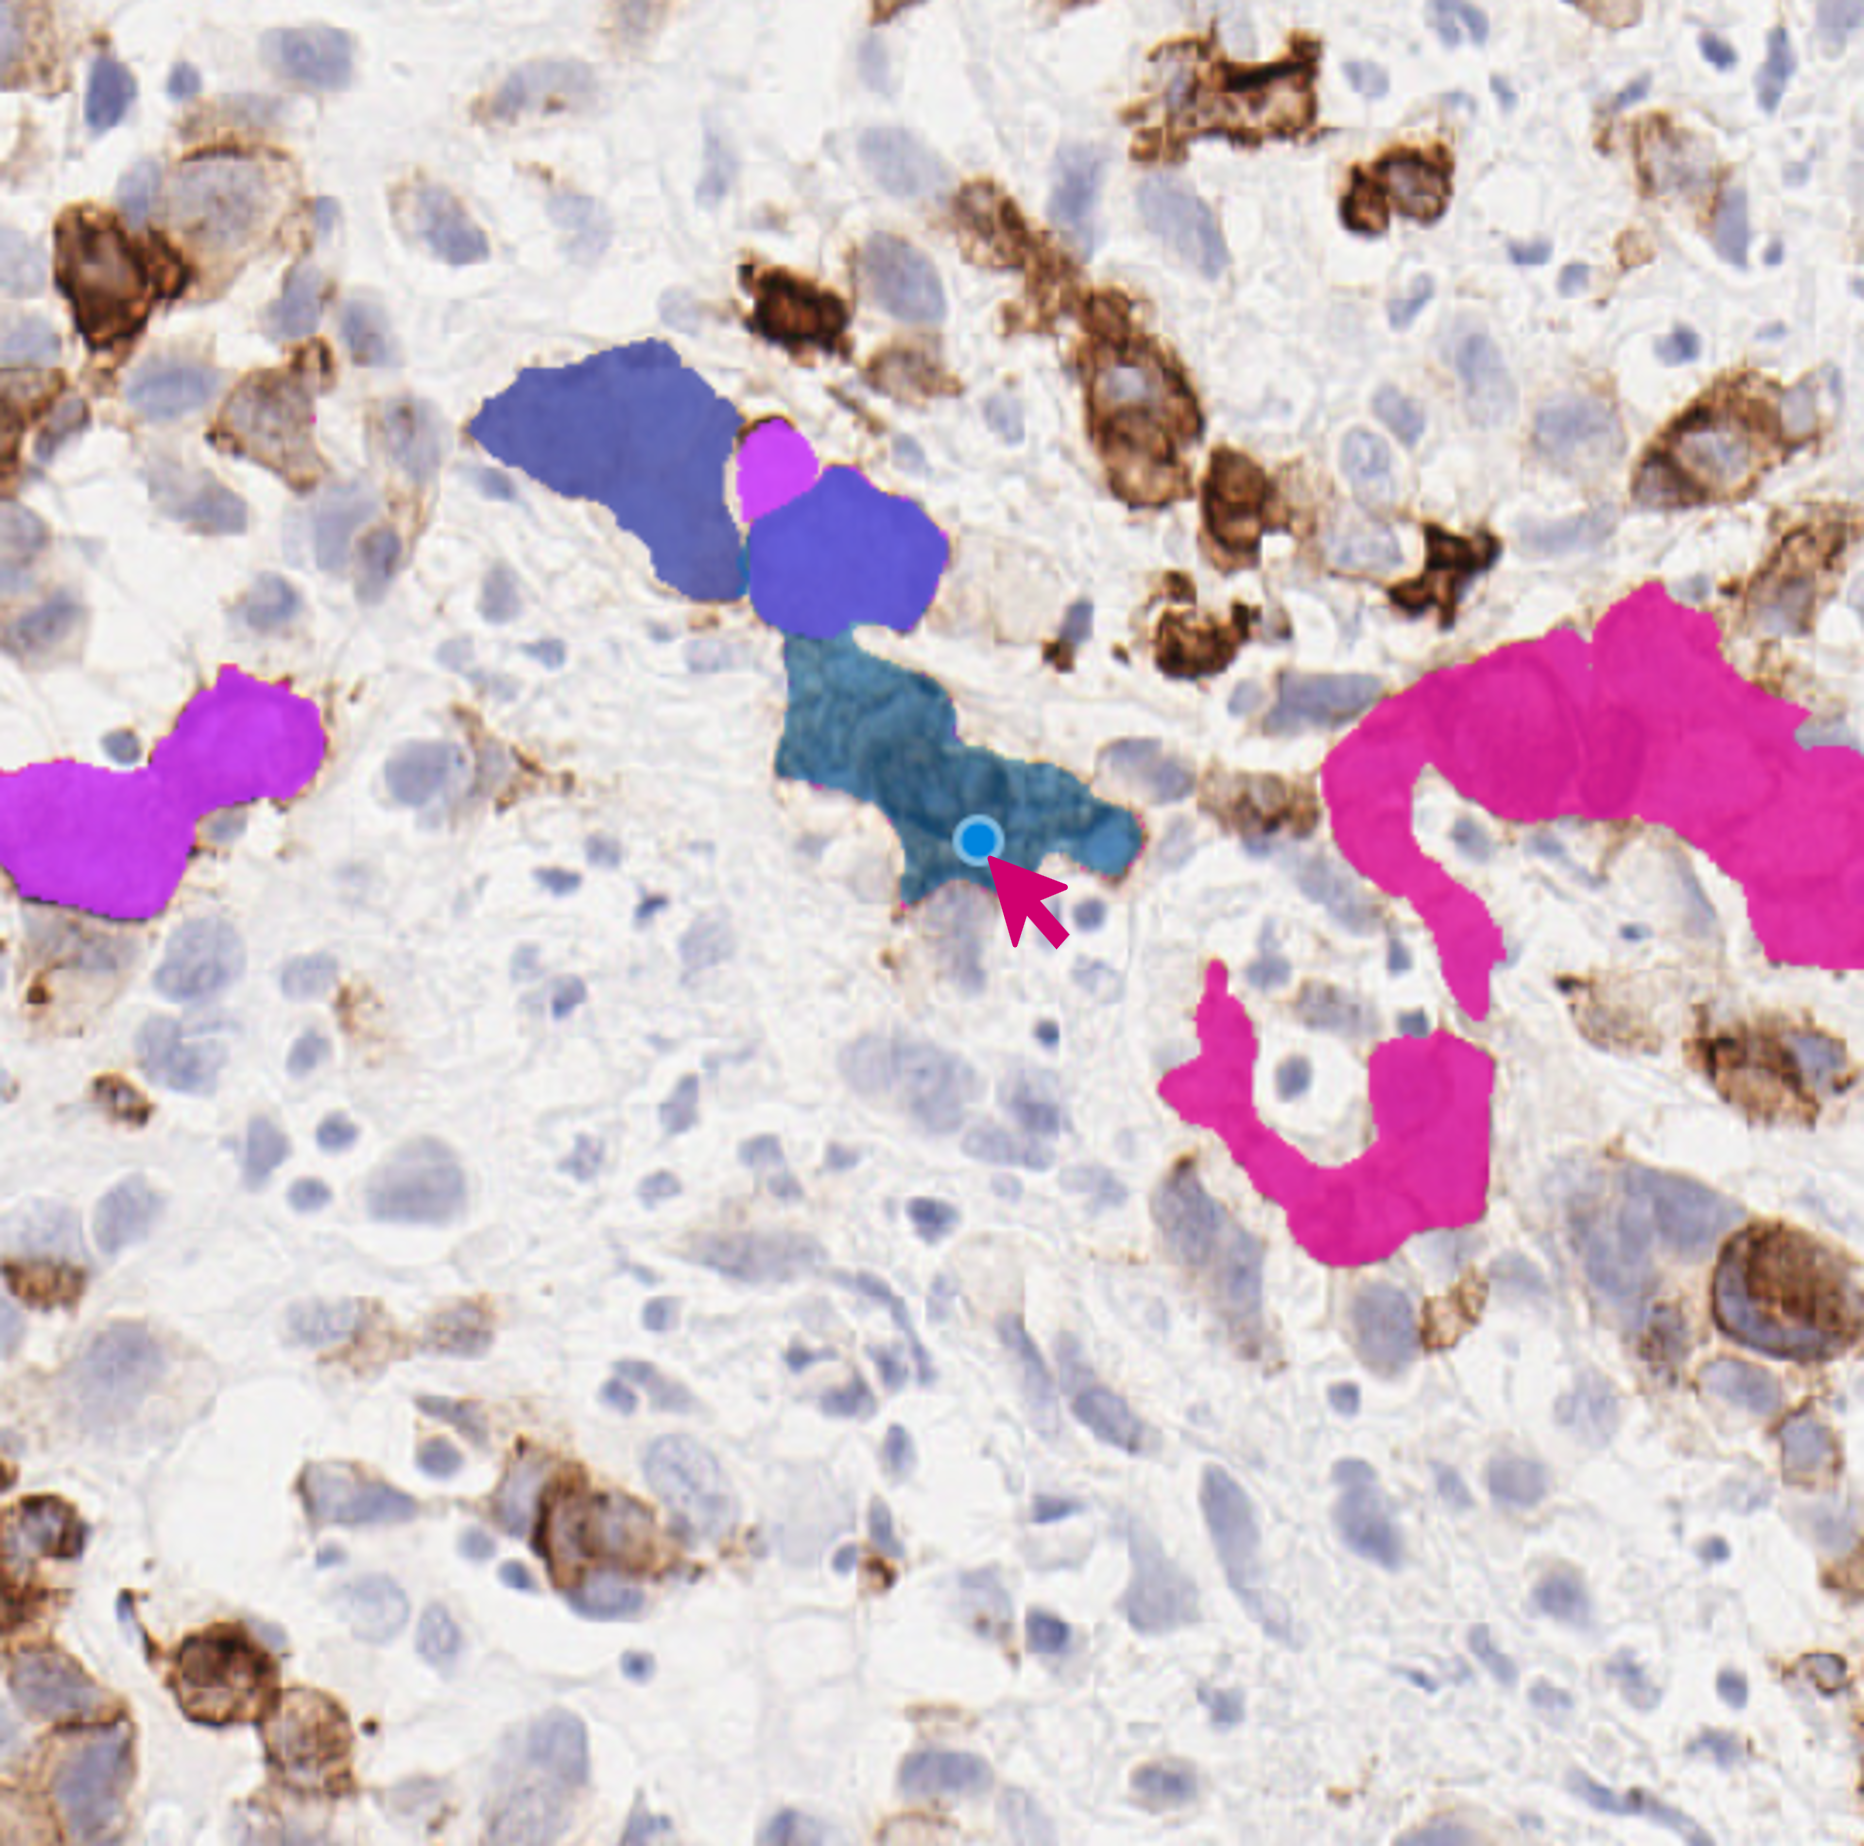
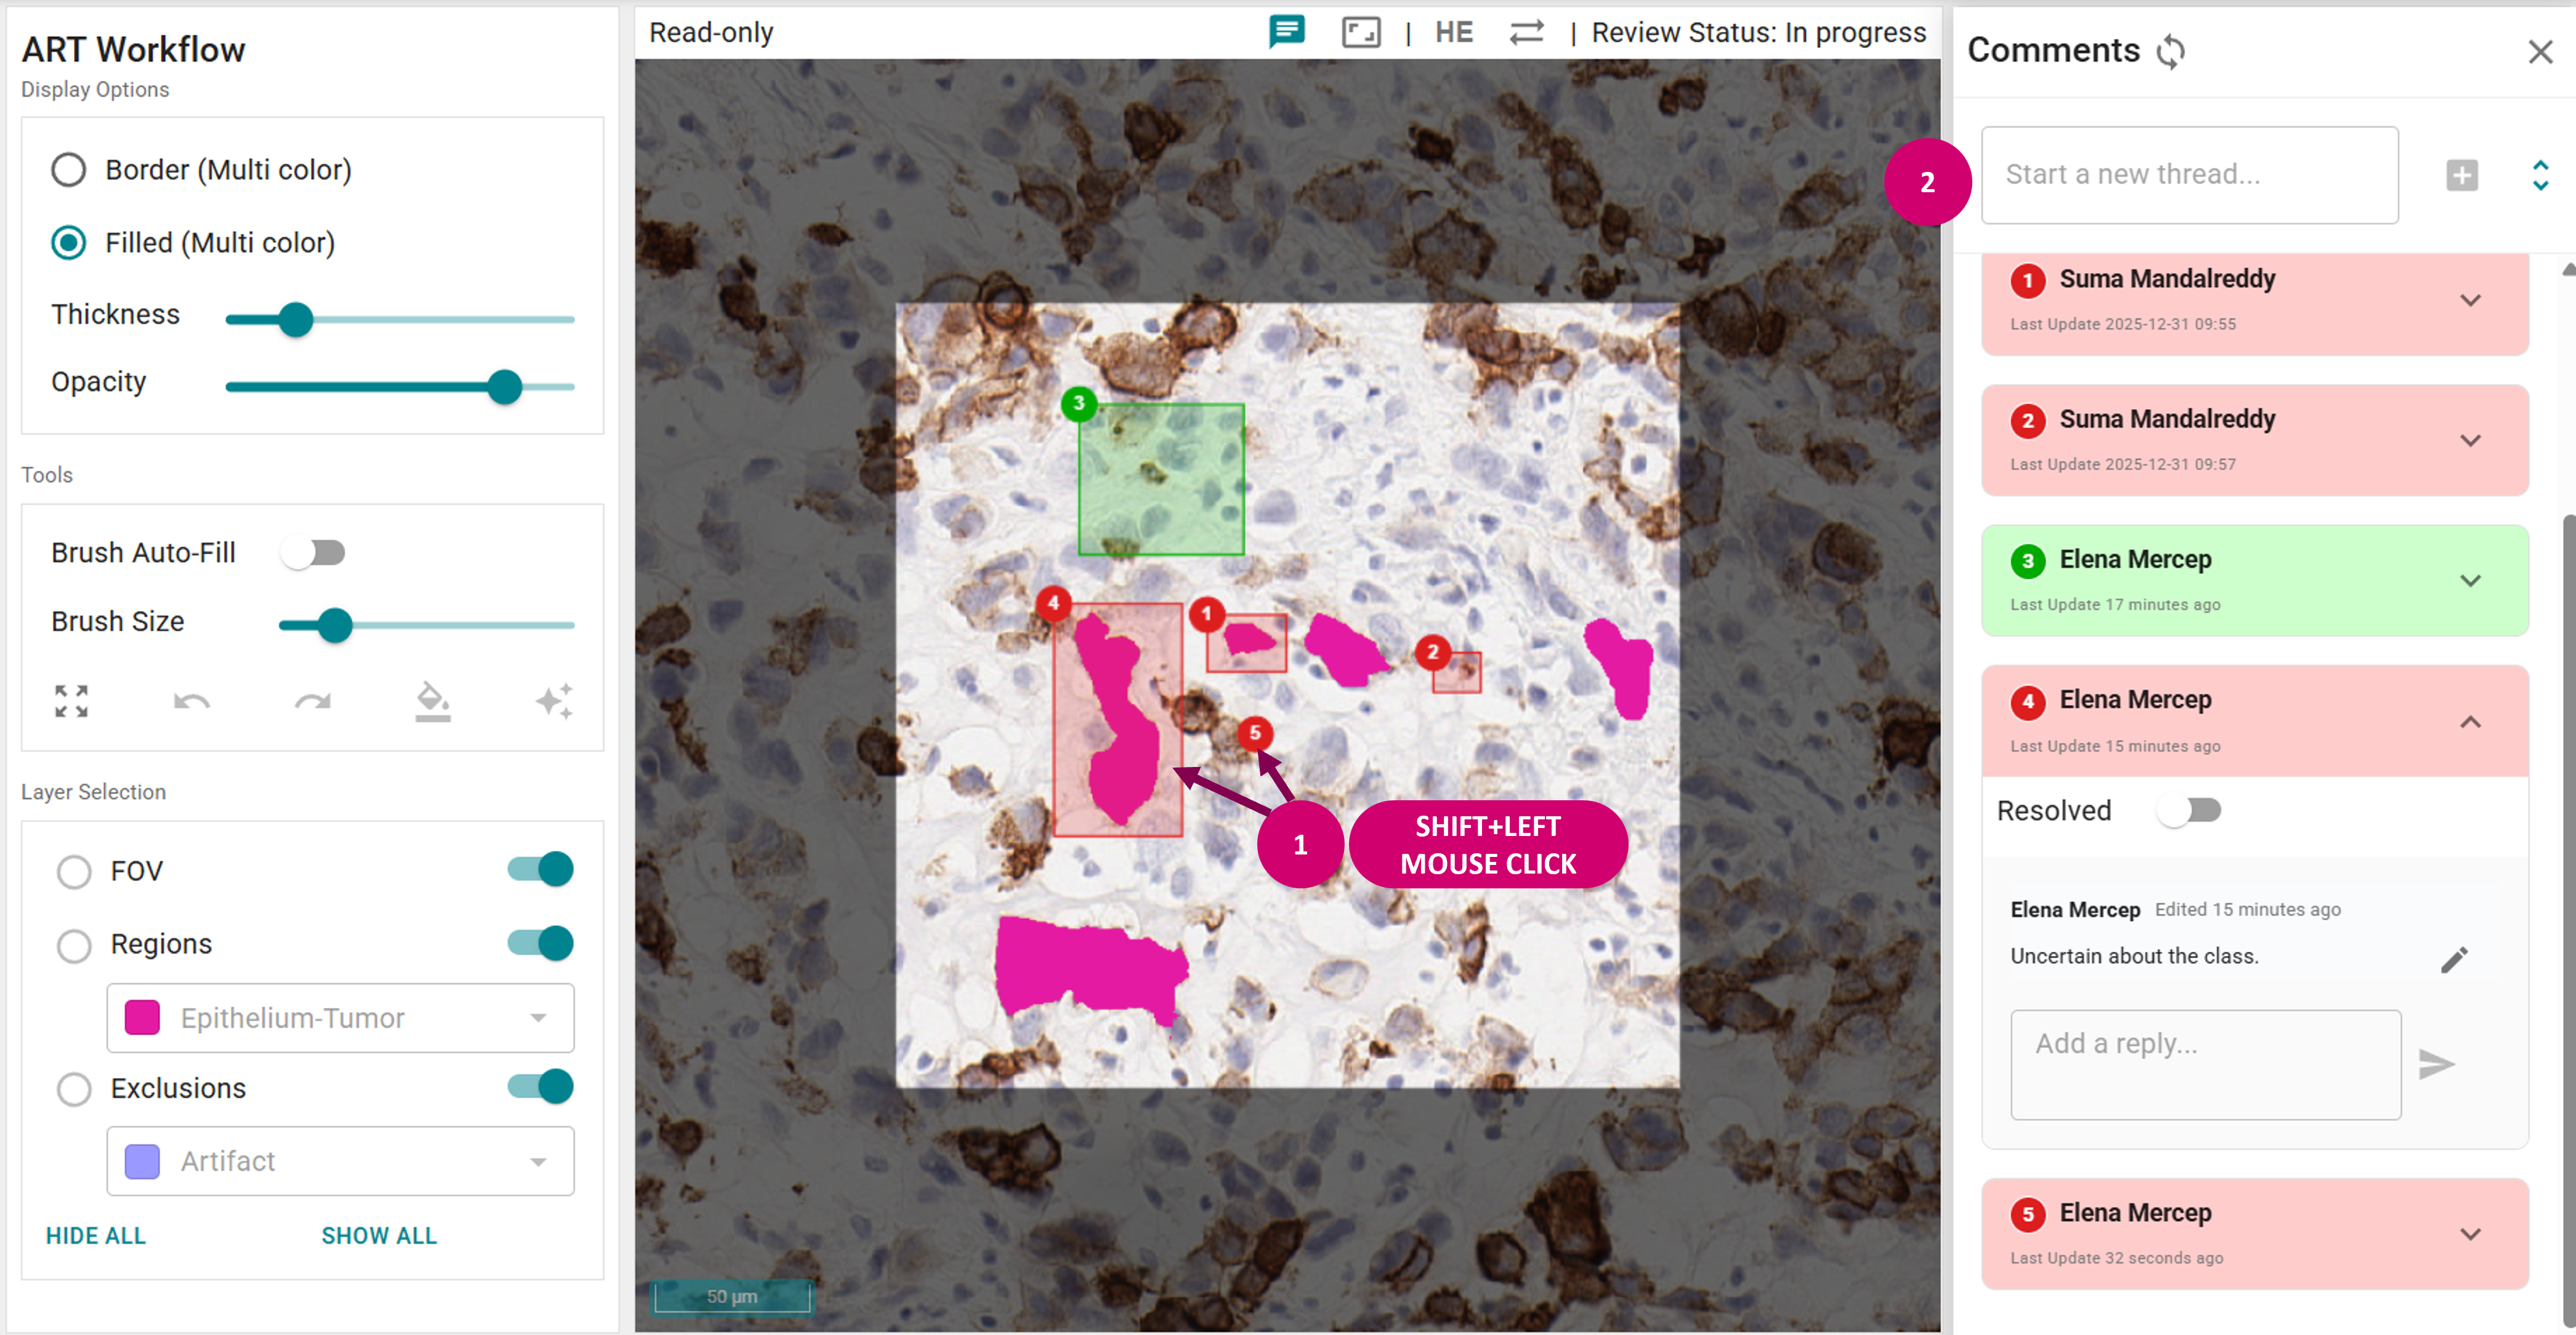
Spatial comments
Spatial comments allow you to attach comments to specific locations or regions within the raster annotation, providing precise context for collaboration and review.
- Shift + Left Mouse Click to add a comment area (as a bounding box) or spot (as a single pixel).
- Start a new thread by typing your comment and clicking Enter.
- Interact with comments using the same functionalities as described in the General comments section (edit, respond, resolve, etc.).
Note
It is not possible to delete comments. Instead, you can edit the comment text, or try placing the spatial comment without adding text as a comment yet. Clicking on another place will erase the placed bounding box/pixel.
Troubleshooting guide
| Observation | Potential Cause / Mitigation | Recommendation |
|---|---|---|
|
Long loading times My images/annotations are not loading or loading very slowly. |
Unstable or slow internet connectivity. |
1. Check your network connection by performing the
speed test. 2. Once the test has completed, select RESULTS and EXPORT RESULTS – this will generate a *.csv file. 3. Go to https://www.whatsmybrowser.org/ and create a screenshot for the details. 4. Share information with the Support team: DEMU_Support@astrazeneca.com |
|
Failure loading the image raster data I see the error message Unable to load raster data. |
Network interruptions: Unstable internet connectivity
can lead to interruptions during the (auto-)saving
process, resulting in incomplete data uploads. Corrupted or malformatted data: The raster data might be corrupted or improperly formatted, leading to errors during loading. |
1. Make sure to always wait until the
loading/(auto-)saving of the raster annotation is
complete (as indicated by the waiting bar and "sand
clock" save icon) before proceeding with new edits or
interacting with the tool. 2. Attempt to refresh the page. 3. If the issue persists, restore previous version after confirming raster data loaded correctly. 4. Make sure you always Finish session to save your latest changes. 5. Use the built-in screen recorder to capture the full screen when the issue occurs. 6. Record network activity and export an HTTP Archive (HAR) file. Ideally, combine this with step #1 for comprehensive evidence. How to record network activity and export a HAR file: 1. Option+Command+I (Mac) or F12 (any platform) to open DevTools. 2. Reproduce the error state or unexpected behavior. 3. Click on the "Export HAR" button in the developer console. 4. Save the report locally and share Share information with the Support team: DEMU_Support@astrazeneca.com. |
|
Unexpected Application error I get 'Unexpected Application error' or a similar error in RACT |
For unexpected errors, record network activity as described above. |
1. Follow the steps above to record a HAR file and
screen capture when the error occurs. 2. Share the evidence and a description of your actions with the Support team: DEMU_Support@astrazeneca.com |
|
Raster annotation with this name already exist for
current FOV I cannot create a new raster annotation set with this name. |
Raster annotation with this name already exists. Currently we do not support a simple reuse of name to minimize risk of unintentionally overwriting existing annotation sets. |
Case 1: If you are trying to newly
annotate an FOV that already has a raster annotation set
with this name, you can edit the existing raster
annotation instead of creating a new one. Case 2: If you specifically want to save a new proposed annotation set using the same name as an existing set (thereby overwriting the existing set), this is currently not supported to prevent accidental data loss. In this case, we recommend raising a delete request with the Support team: DEMU_Support@astrazeneca.com until an option to overwrite existing sets is available. |